Overview
This tutorial explains how to set up Single Sign-On (SSO) in the CDQ Cloud Apps using Microsoft Azure as an Identity Provider. Please note that a contractual setup is needed with the commercial data provider in order to connect to their services.
Create a Support Ticket via the CDQ Service Desk with the subject "Setup SSO" and a short description of your enquiry:
- Name of your organization,
- Identity provider (e.g. Microsoft Azure)
- Authentication method (OpenID or SAML)
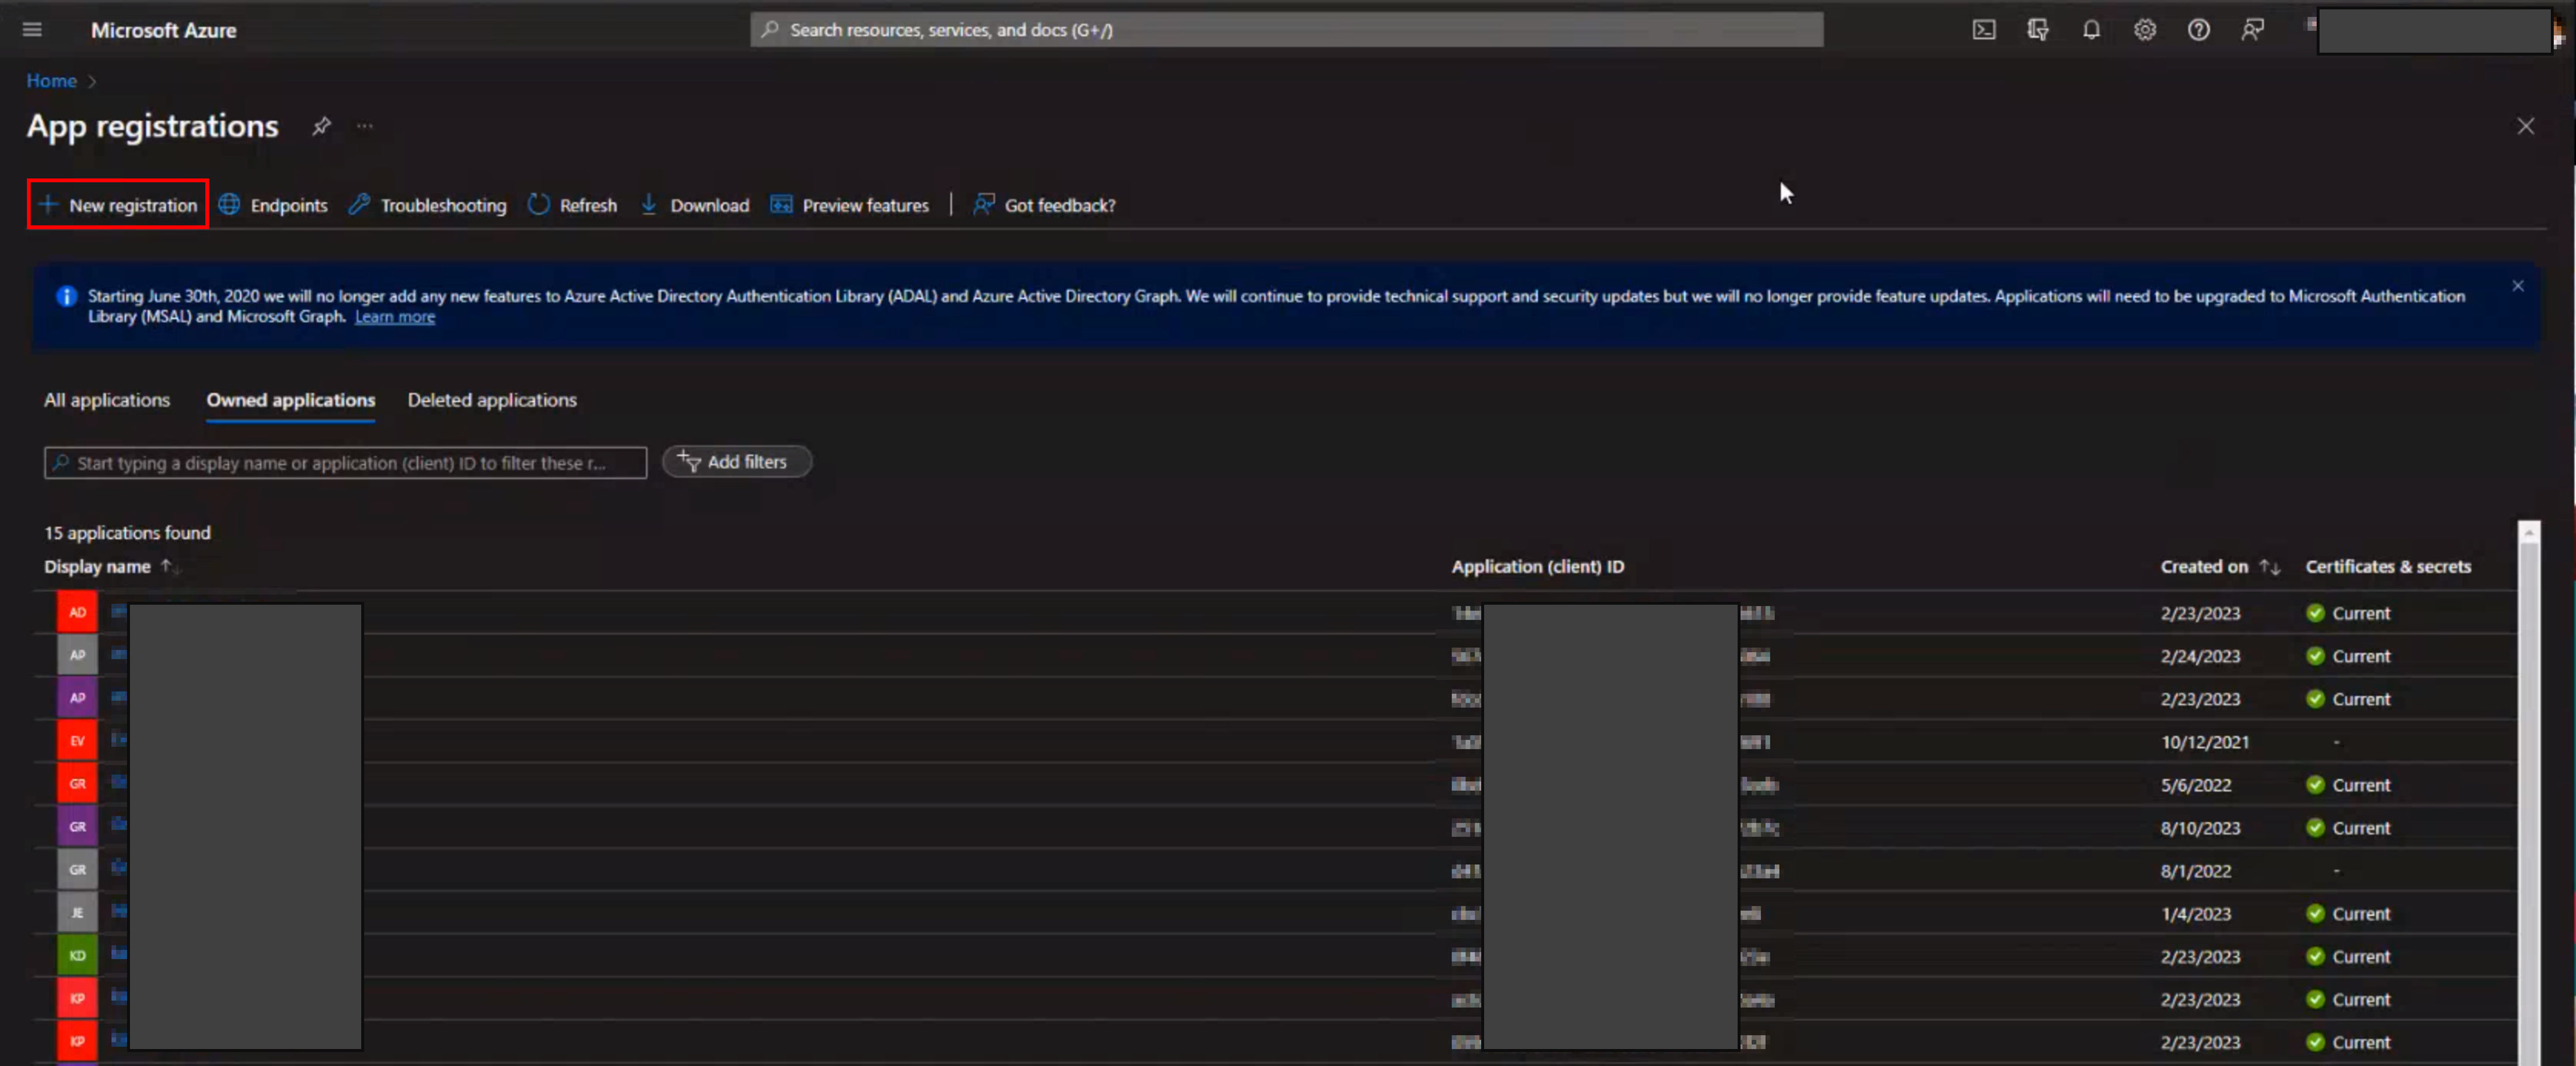
Once you receive a Redirect URI from CDQ, go to Microsoft Azure and create a new app registration:
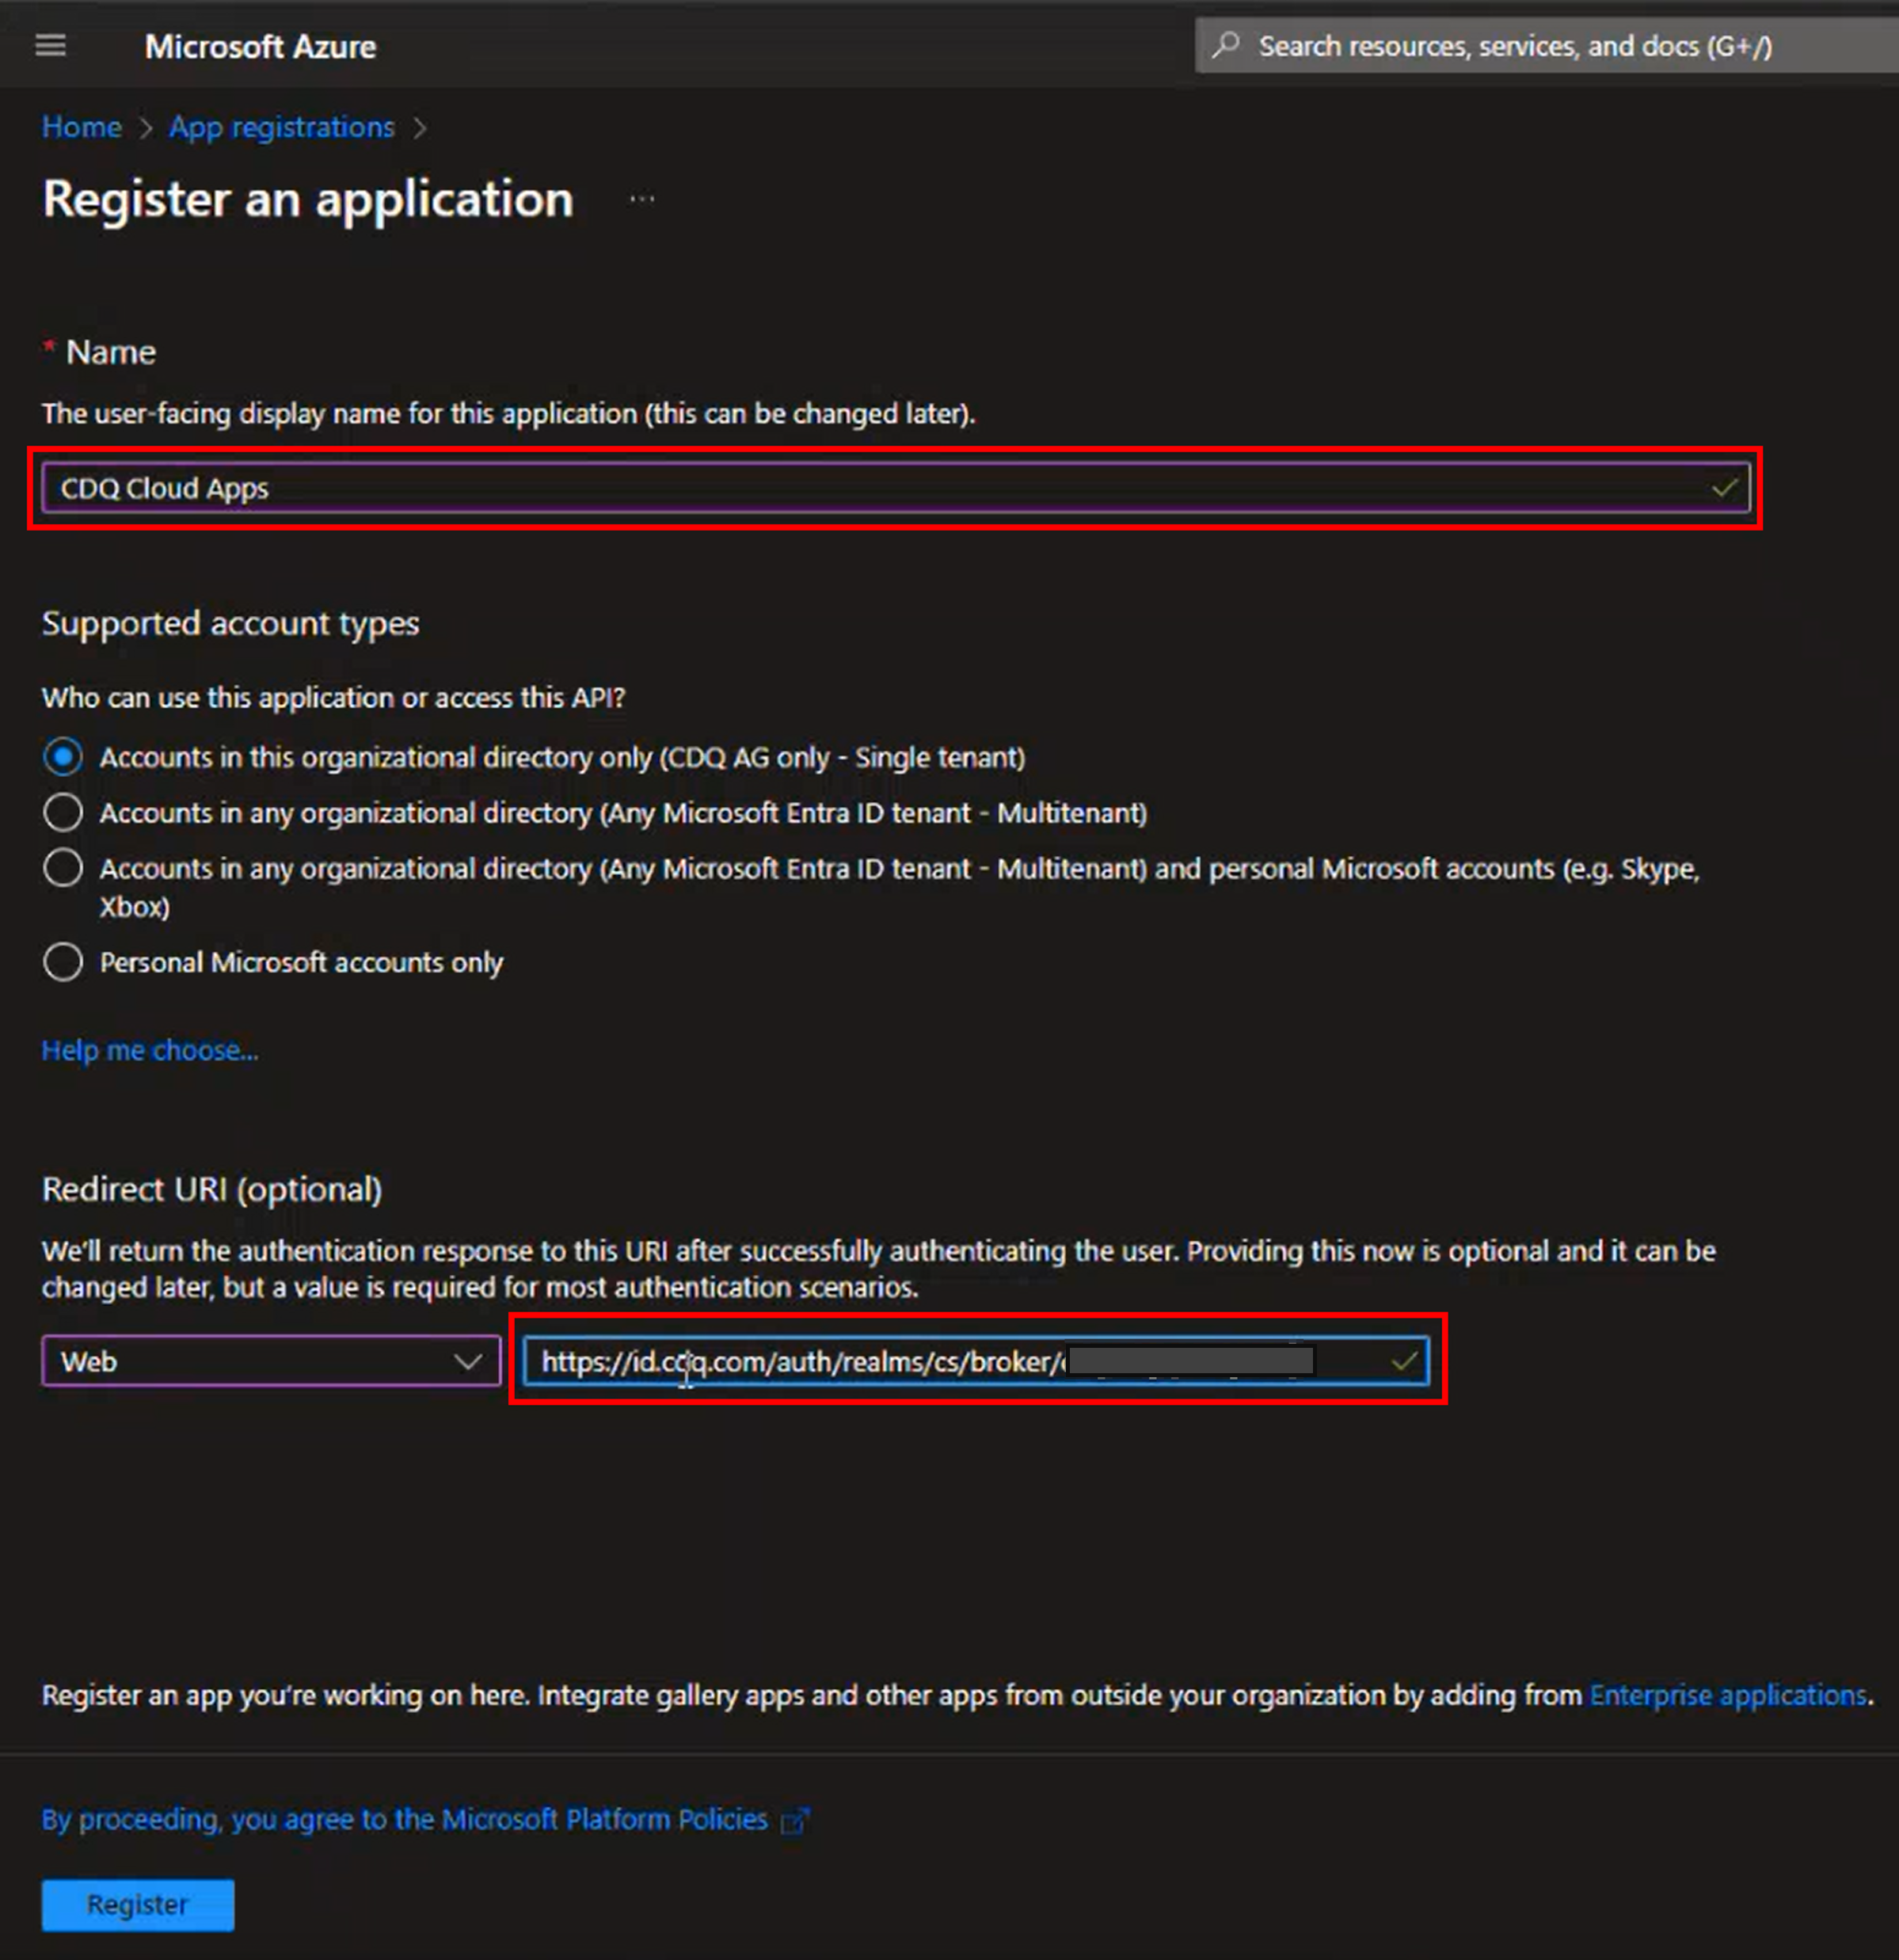
- Enter the Name (e.g. CDQ Cloud Apps) as well as the Redirect URI (as web URI) and click on "Register":
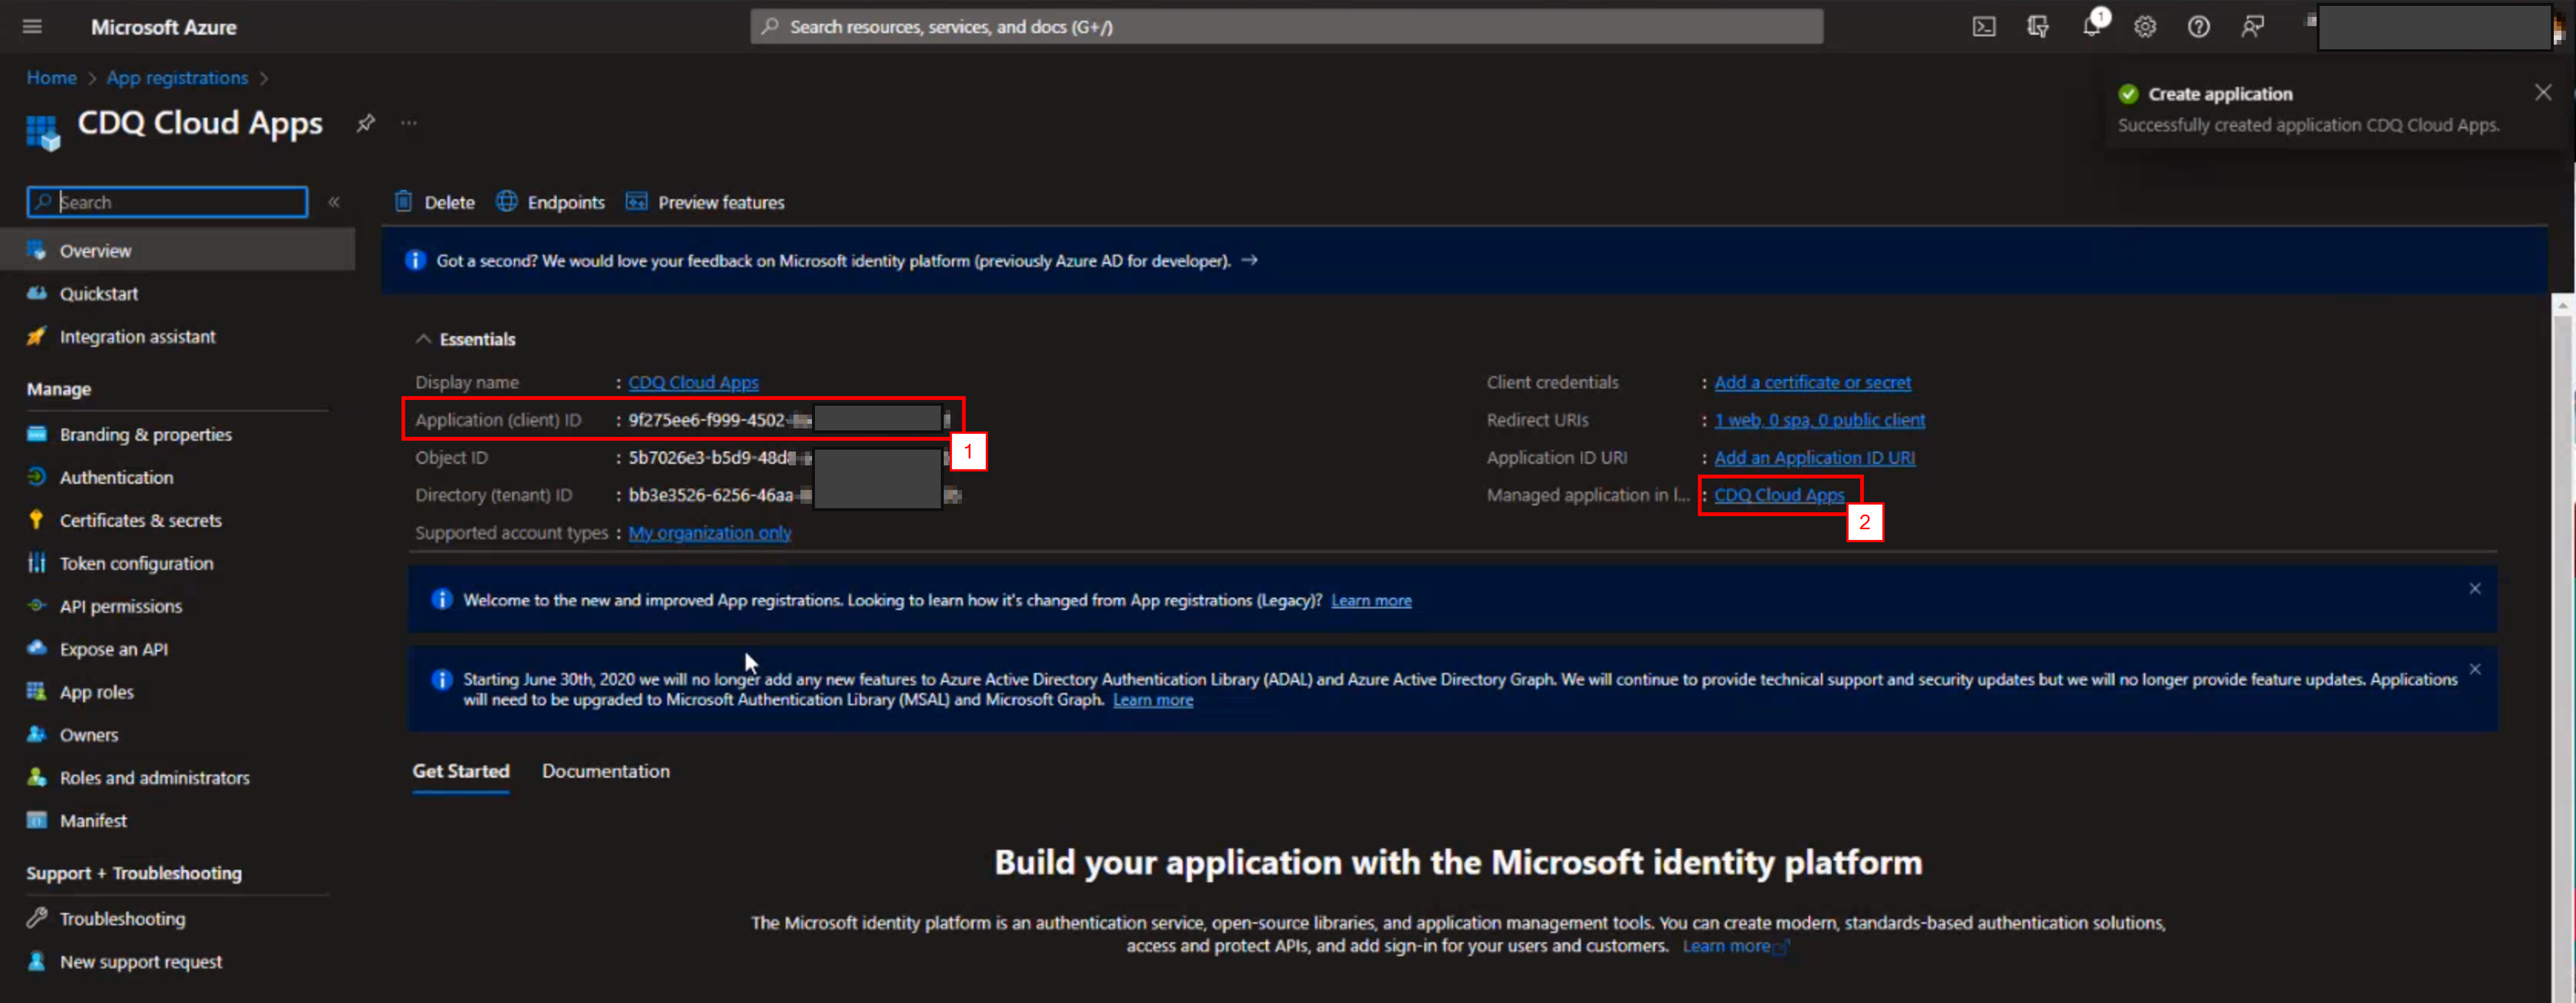
- From the Overview on the next page write down the Application (client) ID. Afterward, click on Managed application in the local directory:
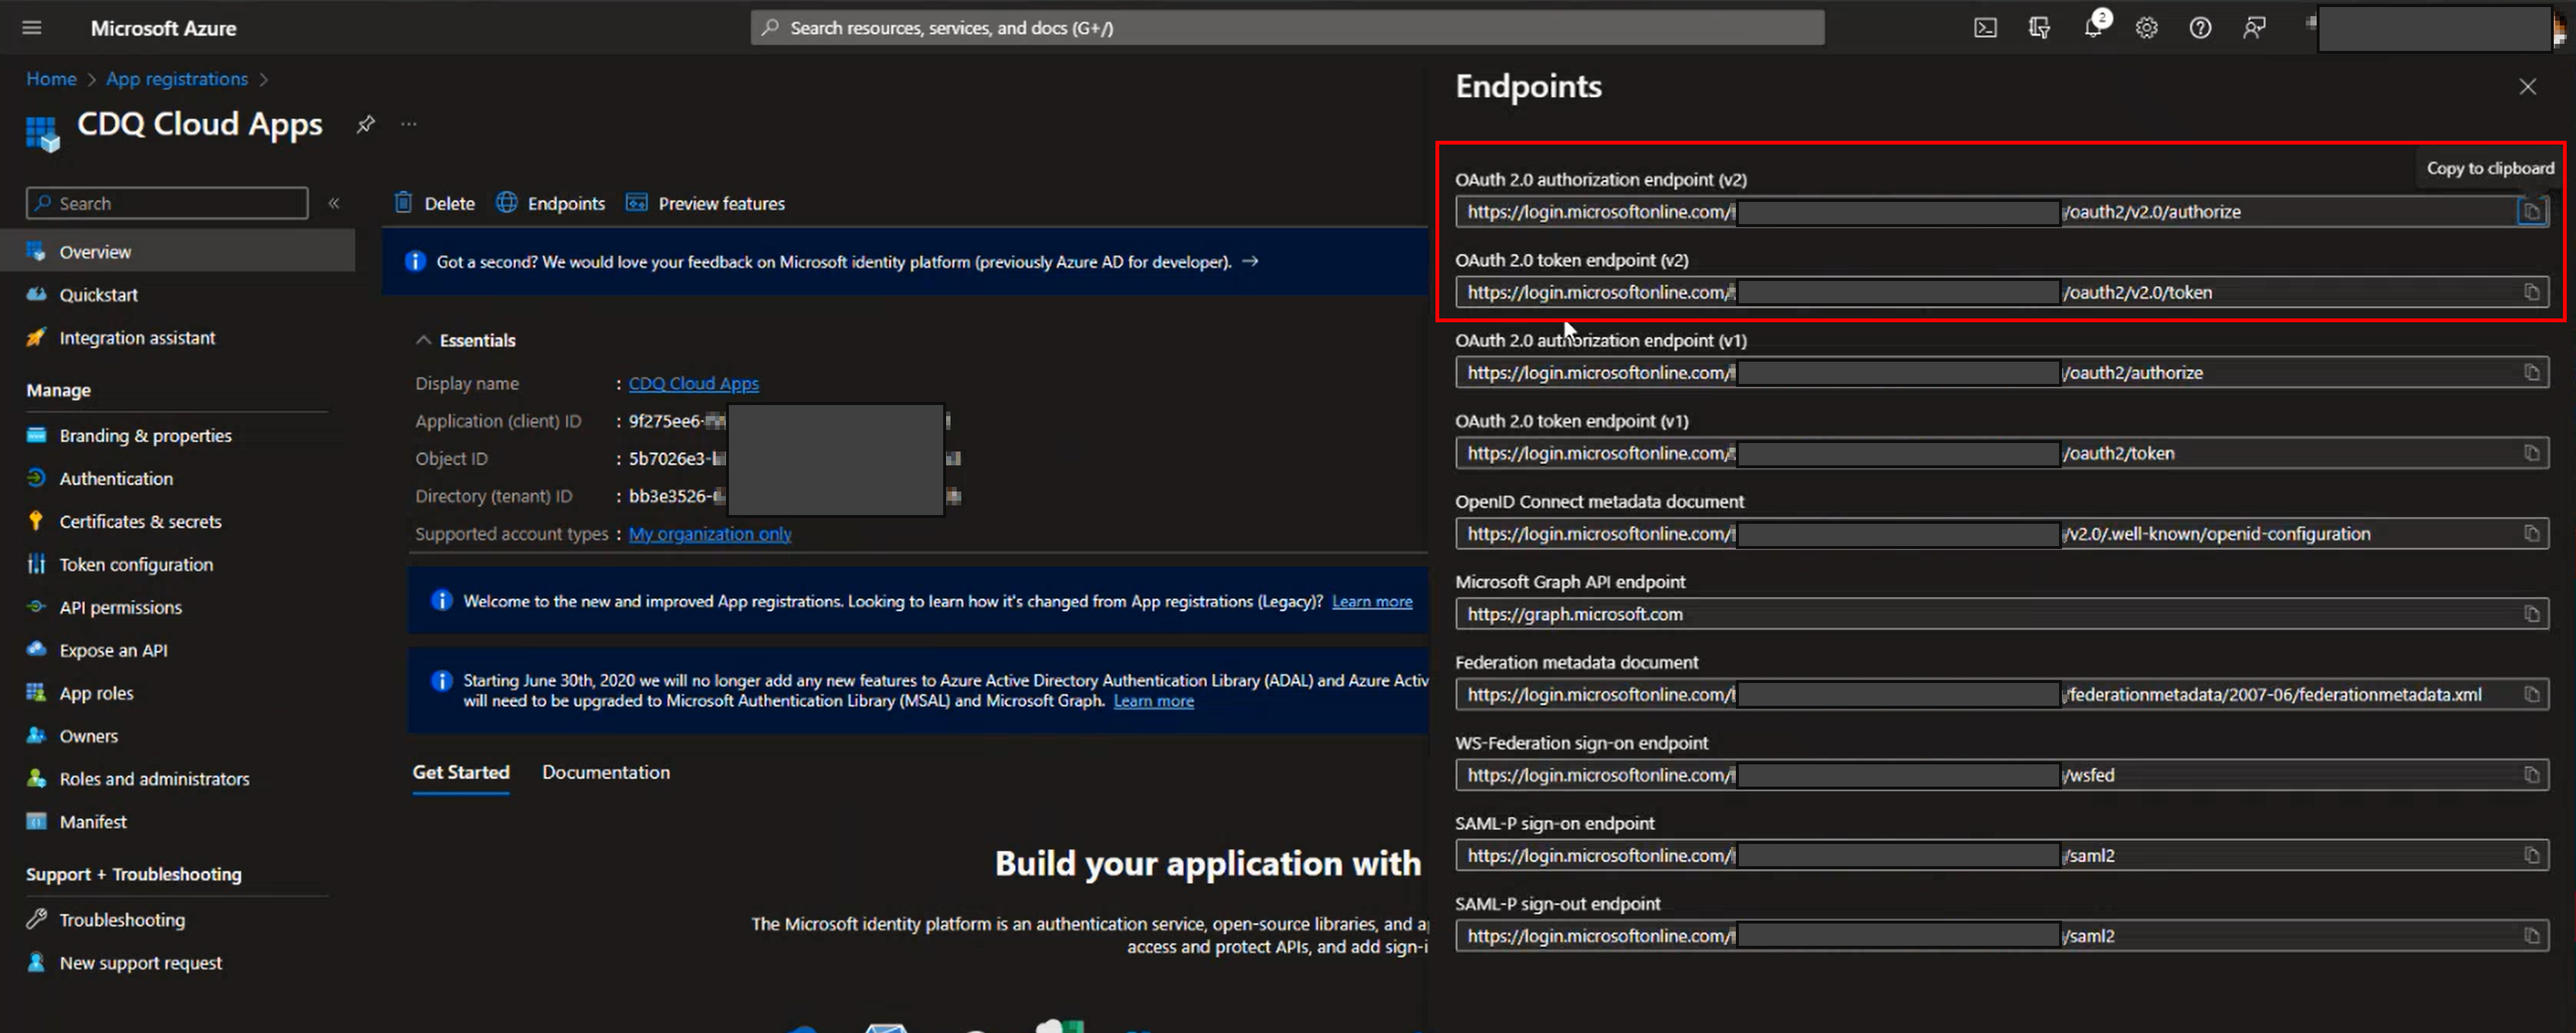
- In the appearing panel copy the URL for OAuth 2.0 authorization endpoint (v2) as well as the OAuth 2.0 token endpoint (v2):
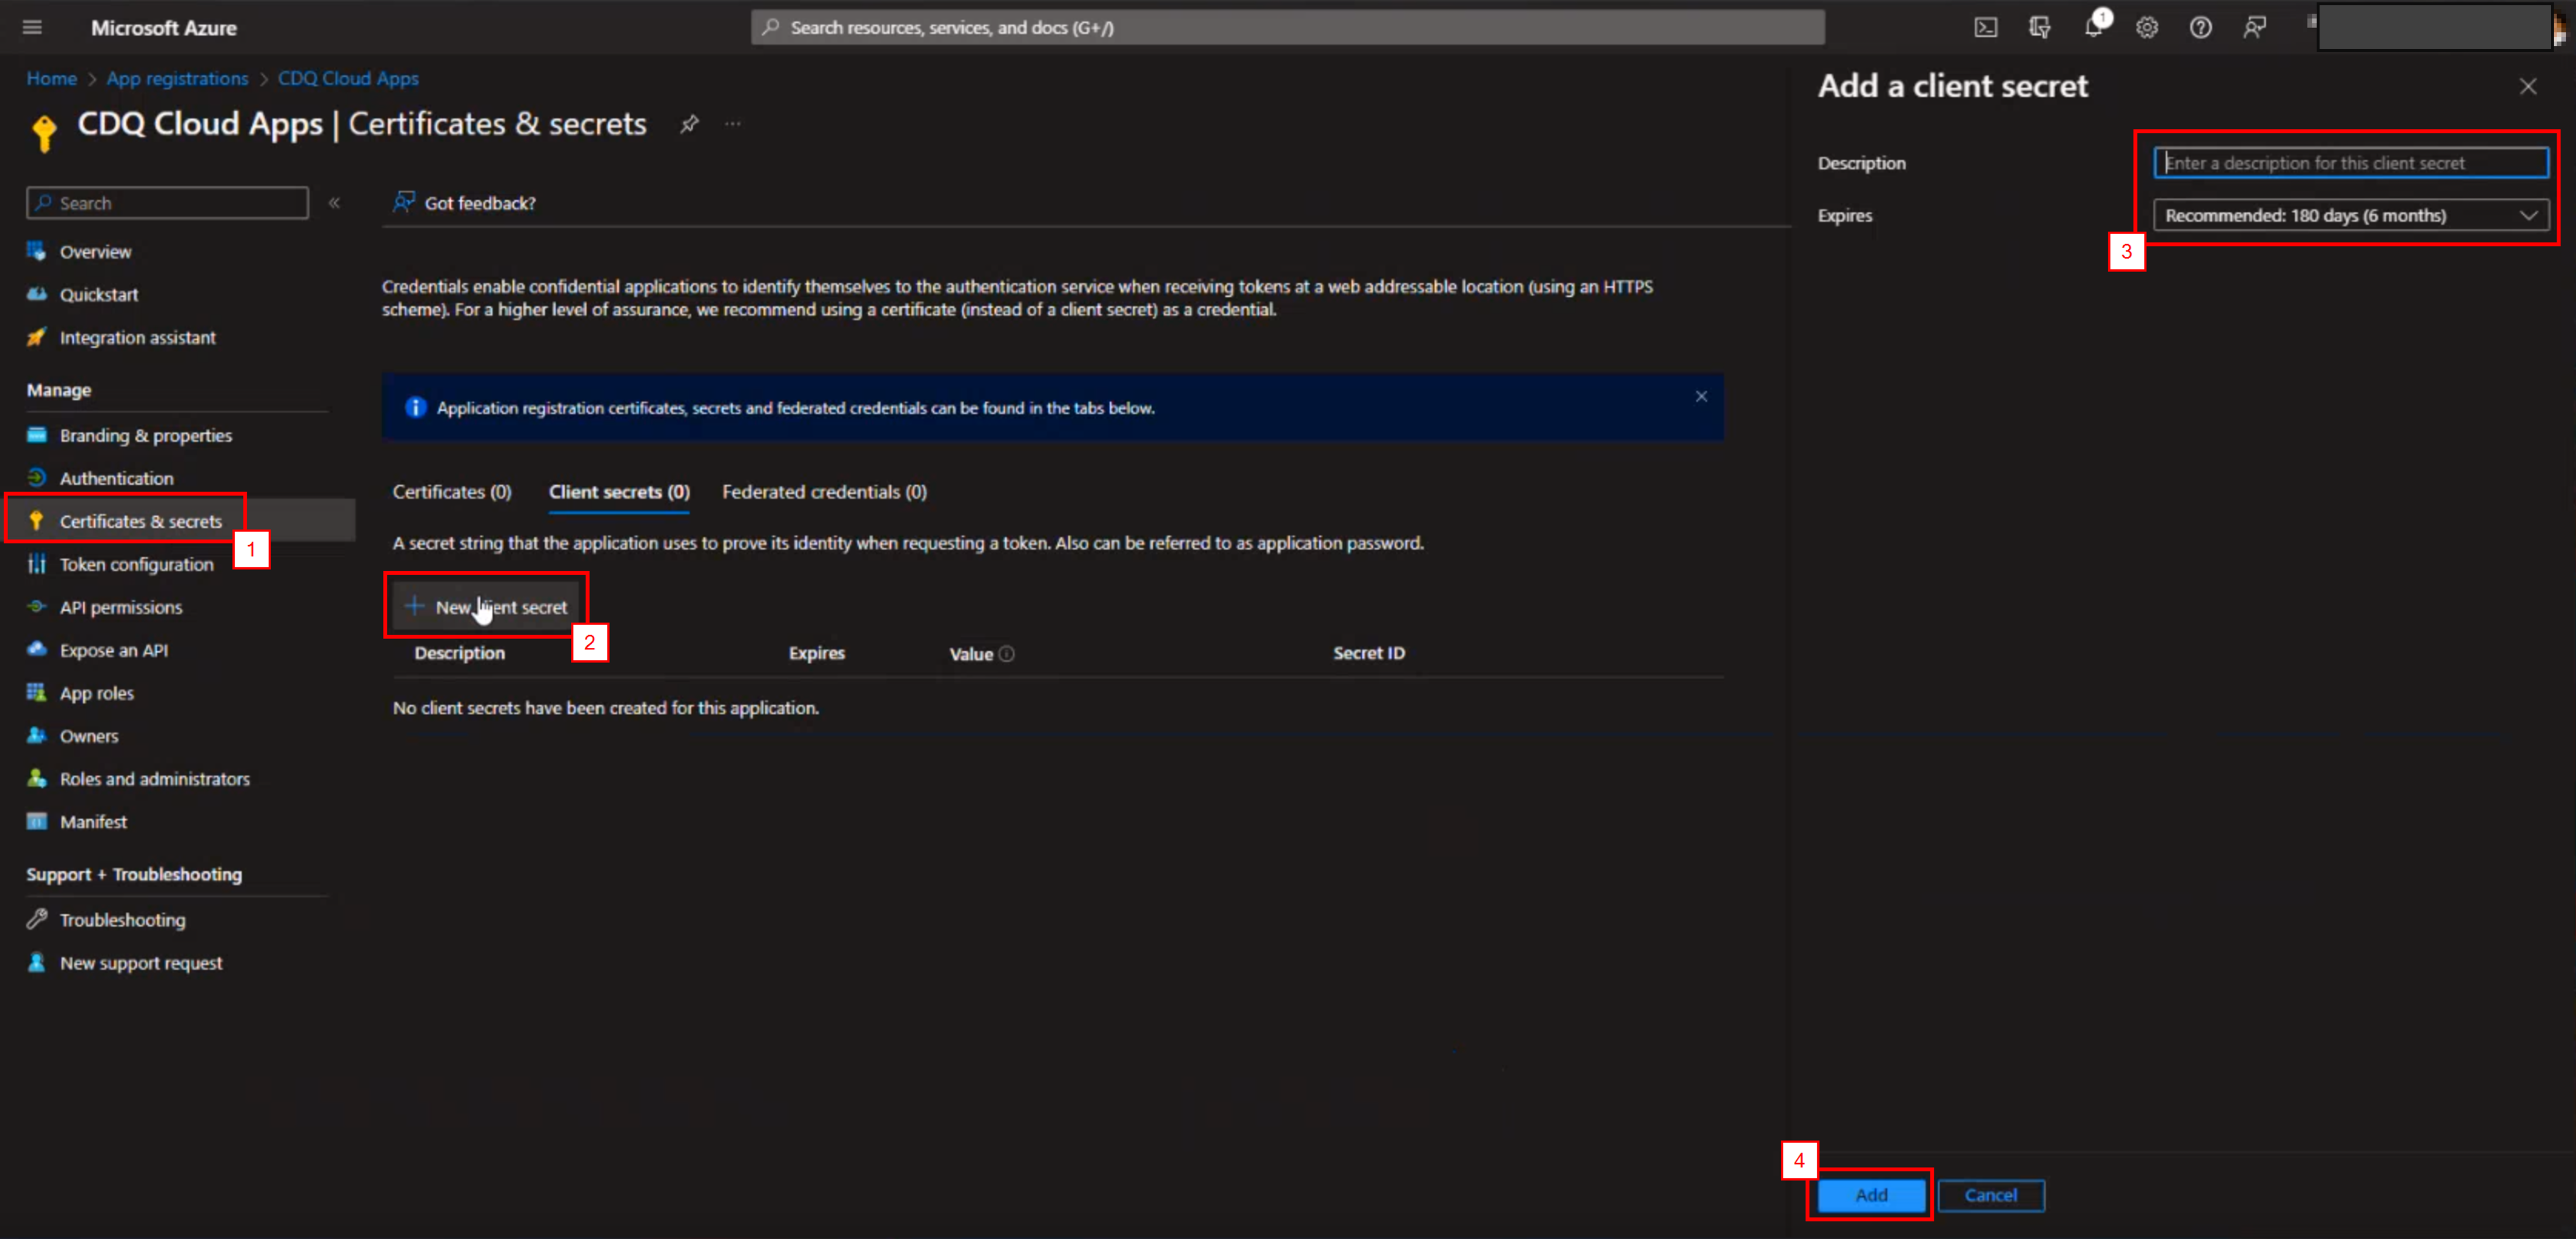
- Go to Certificates & secrets, add a new client secret enter a description, and select an expiration time (we recommend one-year intervals):
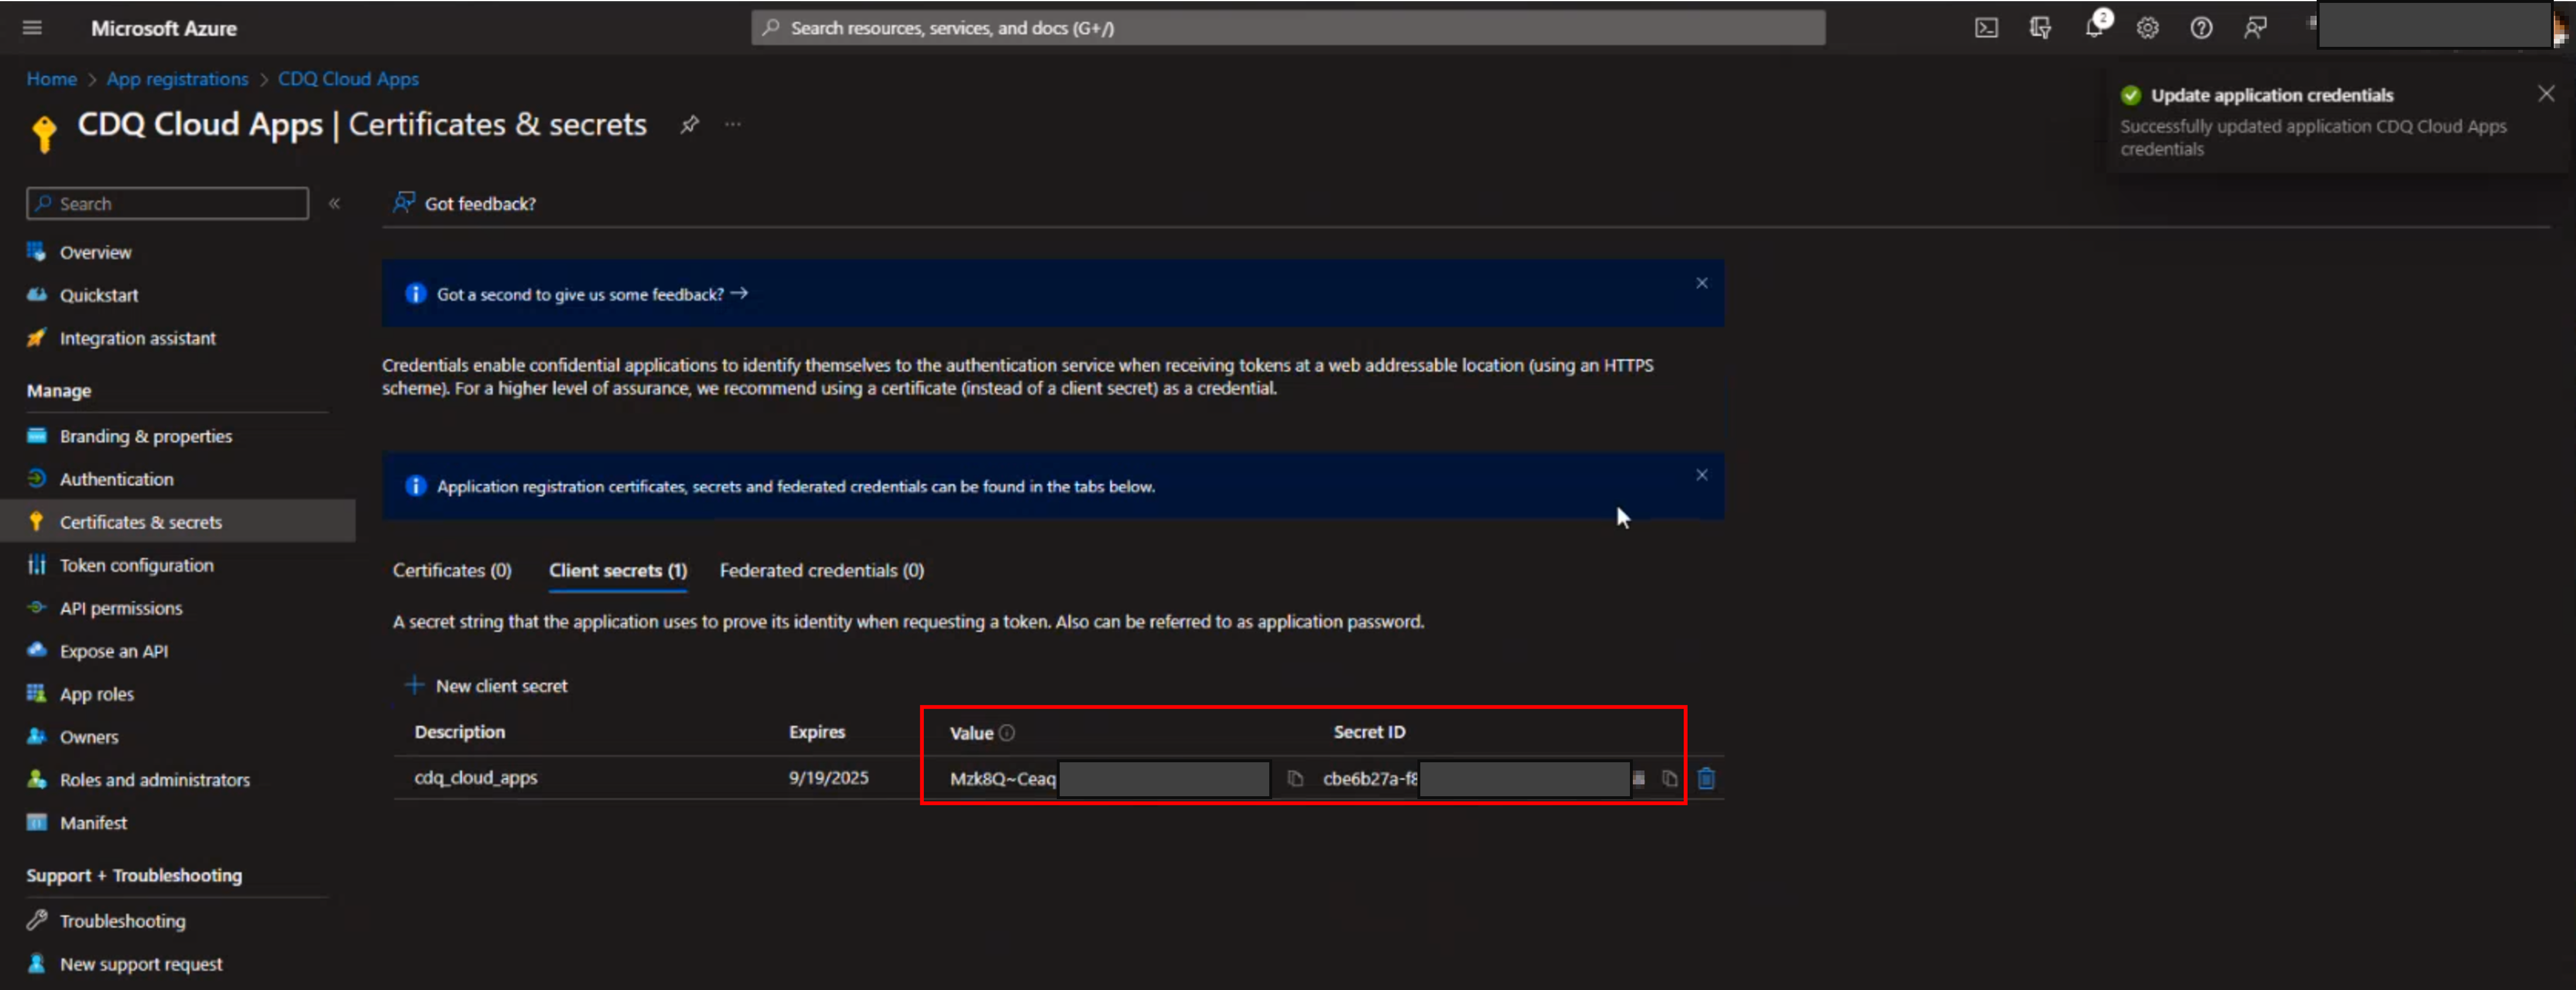
Before the secret expires create a new one and contact CDQ to switch to the new secret. Otherwise, users will not be able to log into the CDQ WebApps after the expiration date. After the old secret has expired and the switch to the new secret has happened the old secret can be deleted.
- From the newly created client secret write down the Value and Secret ID:
- Go to App roles and create the following roles as shown in the image below:
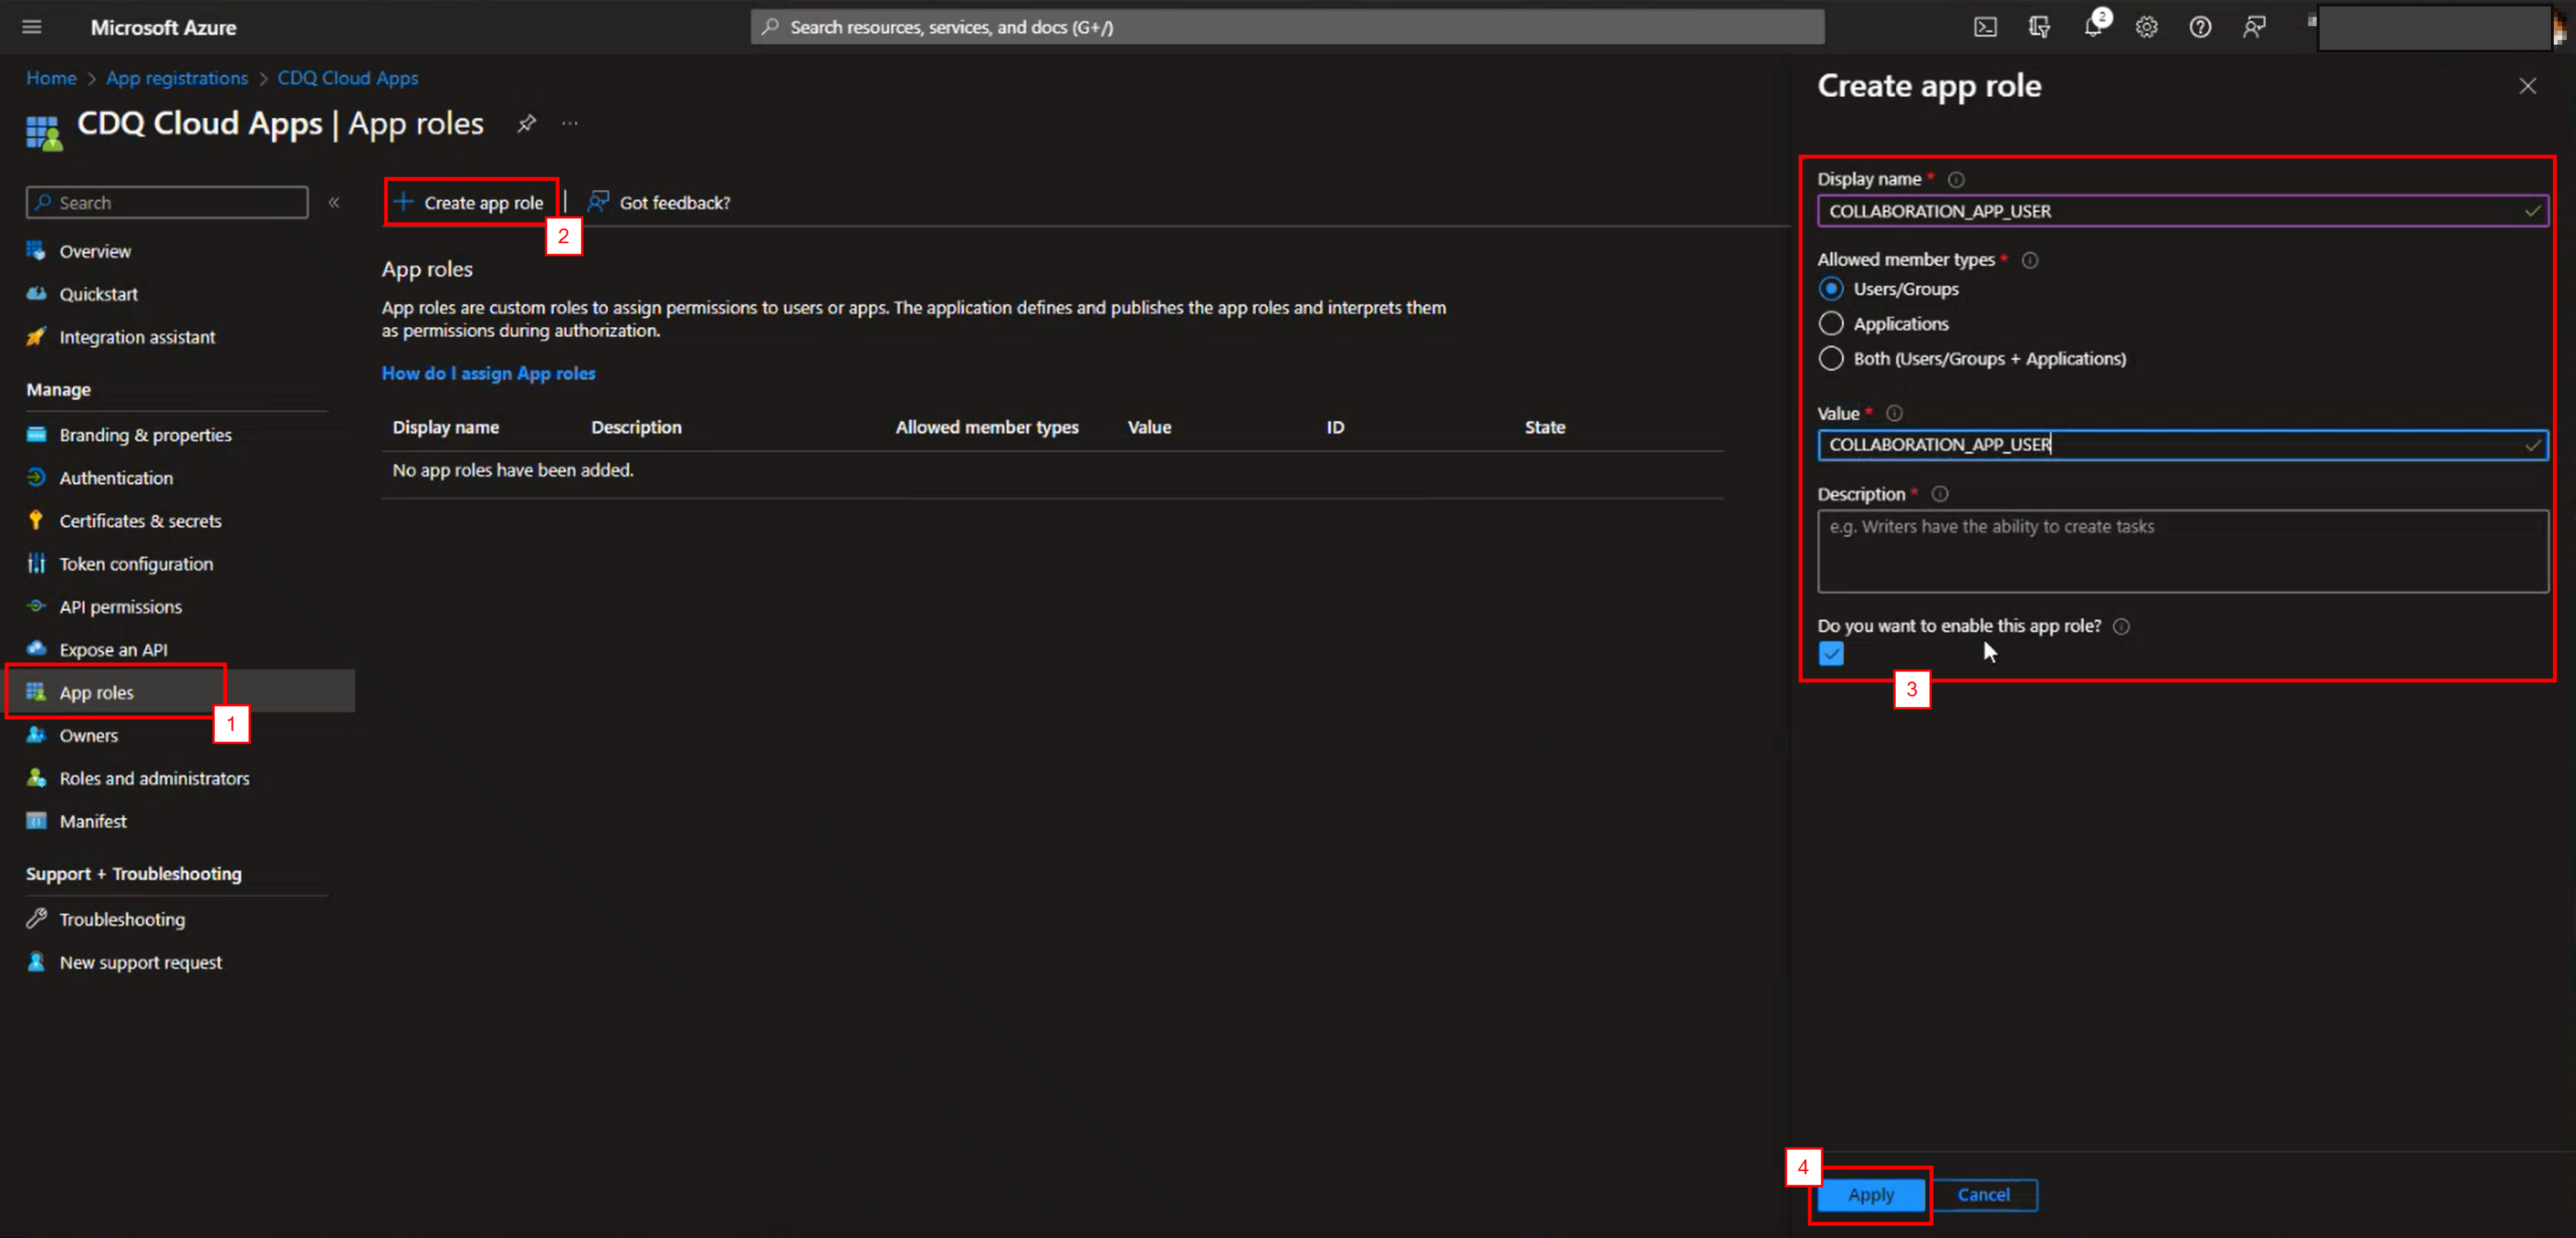
| Application(s) | Value | Description |
|---|---|---|
| Activity Log, User Management | BUREAUCRAT | User can manage users for their complete organization |
| AML Guard | AML_GUARD_MANAGER | User can configure AML Guard rules and approve decisions |
| AML Guard | AML_GUARD_USER | User can run AML Guard checks and work on alerts |
| AML Guard | AML_GUARD_VIEWER | User can view AML Guard alerts in read-only mode |
| Global Administration Apps, Organizational Settings, User Management | CDQ_ADMINISTRATOR | User can administer global apps and organization-wide settings |
| Collaboration Configuration, Collaboration Self Review | COLLABORATION_APP_MANAGER | User can disclose records in the collaboration app |
| Collaboration Self Review | COLLABORATION_APP_USER | User can access and view the collaboration app |
| Curation (single and batch) | CURATION_APP_USER | User can access the single and batch curation apps (address cleansing and business partner curation) |
| Augmented Business Partner, Data Clinic, Data Mirror Management, Data Monitoring Configurator, Update Monitoring Configurator | DATA_MIRROR_APP_MANAGER | User can upload data in the data mirror, create data sources etc. |
| Business Partner Update Browser, Data Mirror Details, Data Mirror Jobs | DATA_MIRROR_APP_USER | User can access and view the data mirror management app (details, jobs, updates) |
| Email Domain Guard Configurator, Email Domain Guard | EMAIL_DOMAIN_GUARD_MANAGER | User can configure Email Domain Guard policies and maintain allow/deny lists |
| Email Domain Guard | EMAIL_DOMAIN_GUARD_USER | User can run Email Domain Guard checks and review results |
| Extended Data Quality Assessment, Extended Data Quality Checks | EXTENDED_DATA_QUALITY_ASSESSMENT_APP_USER | User can access and view extended Data Validation apps |
| Bank Data Curation, Fraud Case Browser, Report Fraud | FRAUD_APP_MANAGER | User can create and manage fraud cases and configurations in the Fraud Management App |
| Bank Trust Score Check, Batch Bank Trust Score Check | FRAUD_APP_USER | User can view and work on fraud cases, including trust score checks |
| Business Partner Lookup, Business Partner Lookup Configurator | LOOKUP_APP_USER | User can access and use the business partner lookup apps |
| Bank Data Lookup | LOOKUP_SYSTEM_BANK_DATA_USER | User can access and use the Bank Data Lookup app |
| Duplicate Matching, Duplicate Matching Configurator, Linkage Matching | MATCHING_APP_USER | User can access and use duplicate and linkage matching apps |
| API Key Management, Data Curation Configurator, Data Transformation Configurator, Data Validation Configurator, Decision Log App, Global Settings, Organizational Settings | ORGANIZATIONAL_SETTINGS_APP_MANAGER | User can access and manage organizational settings, API keys, and data configurators |
| Sanction List | SANCTION_LIST_APP_USER | User can access and use the sanction list app |
| Data Validation, Extended Data Quality Assessment, Extended Data Quality Checks | VALIDATION_APP_USER | User can access the single and batch validation app; needed with extended role for extended checks |
| Bank Account Pool | WHITELIST_APP_MANAGER | User can upload data in the CDQ Bank Account Pool |
| Trust Score Lookup | WHITELIST_APP_USER | User can access and use the trust score lookup app |
- Assign the app roles to individual users or user groups:
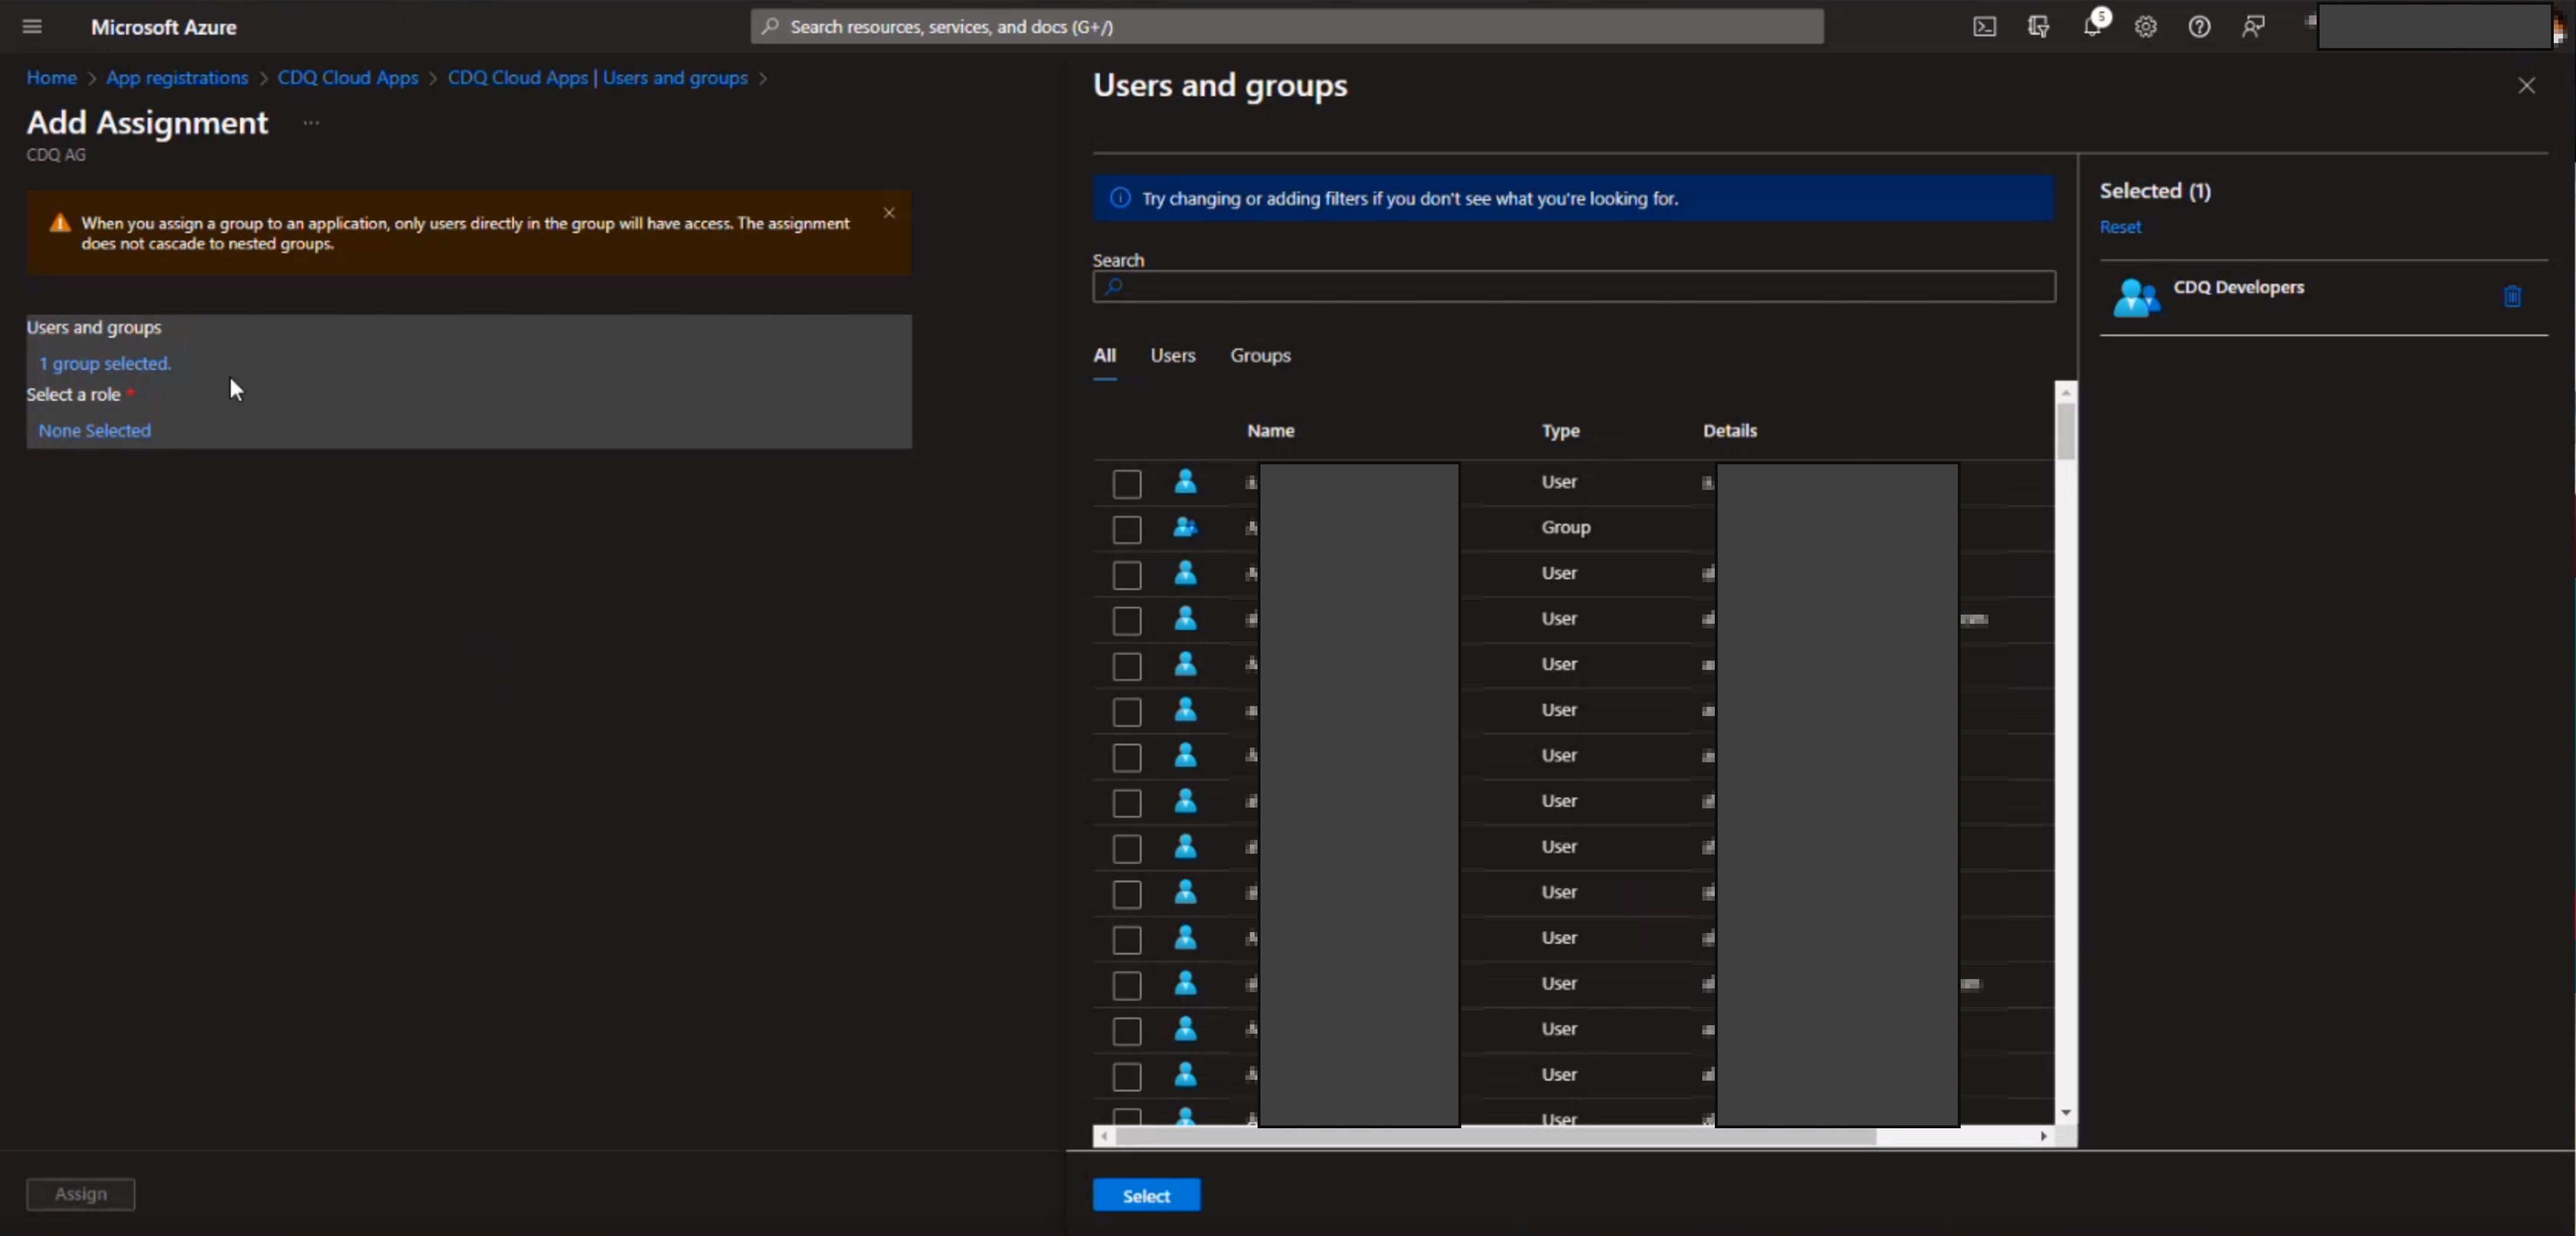
For further details see: How to create user groups and How to assign app roles to user groups
Send the following information via the support ticket to CDQ (for OpenID):
- Client ID (see step 4)
- Authorization URL and token URL (see step 5)
- Client Secret Value and ID (see step 7)
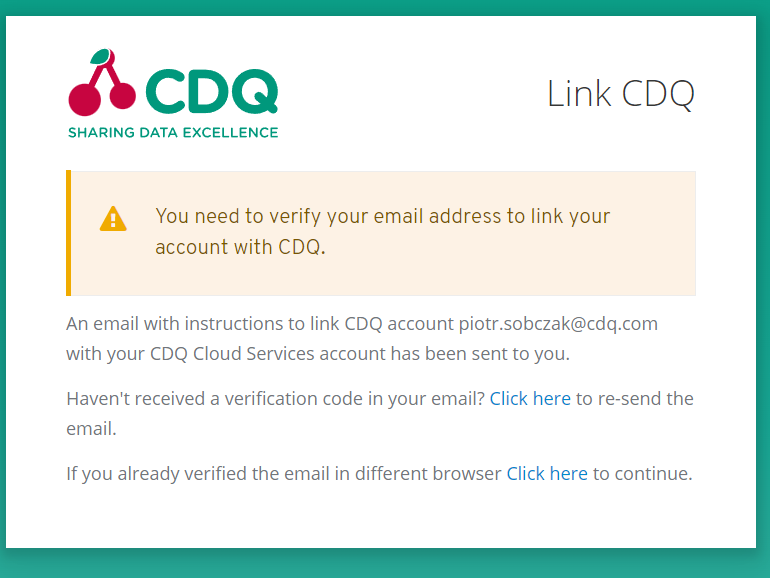
You will receive a URL that your users should use to log in to the WebApps. Note: During the first login a new user is automatically created at CDQ. If a similar user existed before (e.g. because user authentication was used previously as a sign-in method) the user needs to verify the merger of his accounts via email.
We are constantly working on providing an outstanding user experience with our products. Please share your opinion about this tutorial!