Use Case
Qualifying Business Partners can be achieved using the First Time Right (FTR) app, which includes a new Tax Guard capability accessible through the Qualify button. Additionally, it covers how to take advantage of the appropriate settings and manage the Tax Guard Qualification results displayed in FTR. The Qualify button utilizes the /businesspartners/qualify endpoint, operable through Data Validation API version 3.
To understand better the qualification process, get familiar with:
- Tax Guard Qualification Process.
- CDQ Tax Guard tutorials section on the Tutorial Page.
Login
Log into the CDQ Cloud Apps.
If you have no access to the CDQ Cloud App, ask internal point of contact to create a CDQ dedicated account. Account details will be sent by email.
The Tax Guard Qualification provides two profiles, four features and eighteen different data sources. All of them are available in the FTR app settings.
Read the Tax Guard Qualification Process for more details.
To set the qualification profiles and features:
- Navigate to First Time Right app,
- Click on the Settings icon in the top right corner,
- Check the Qualification tab.
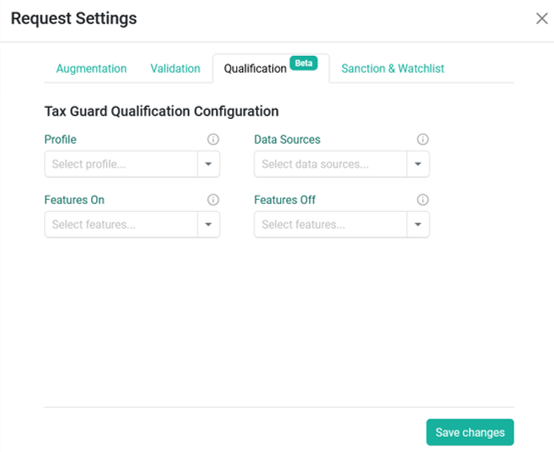
In the setting window user can set the qualification profiles and features:
- Profile: Select
EU TAX QUALIFICATIONorWORLDWIDE TAX QUALIFICATION. - Data source: One or more of the available data sources. Use Select All option, to add all available data sources.
- Features On: Features to be turned on during qualification.
- Features Off: Features to be turned off during qualification.
The same features can't be set as On and Off at the same time. Moreover, it isn't allowed in the Tax Guard Qualification Configuration view.
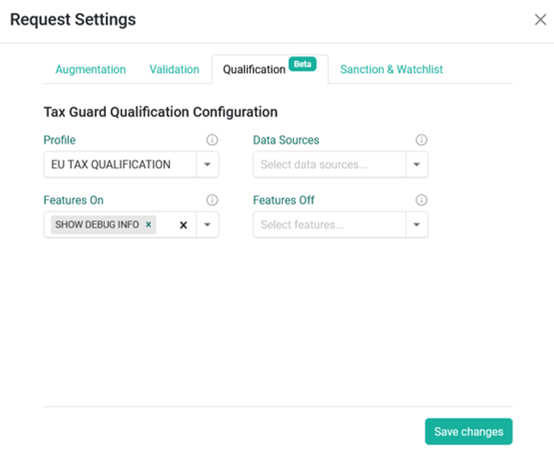
The default configuration for Tax Guard Qualification includes EU TAX QUALIFICATION profile with SHOW DEBUG INFO feature set to On.
All the Tax Guard Qualification settings are described in the Tax Guard Qualification Process.
The qualification results are displayed in the FTR app after clicking the Qualify button. To see the results, follow these steps:
Set the qualification profiles and features in the Settings view:
- Profile:
EU TAX QUALIFICATION - Data source:
VIES - Features On:
SHOW DEBUG INFO
- Profile:
Save changes,
Set the values to qualify the Business Partner:
- Country:
PL - Poland - Identifier:
PL8992790965 - Type:
EU_VAT_ID_PL
- Country:
Click the Qualify button,
Analyze the qualification results.
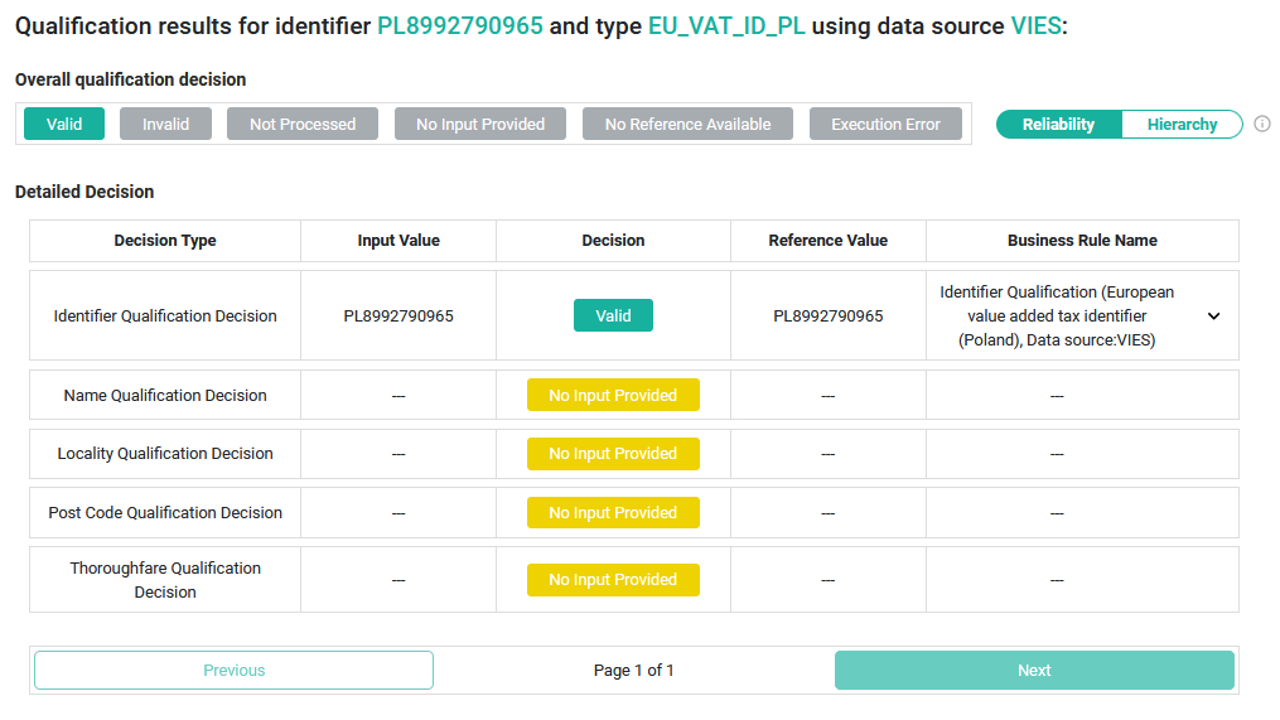
Two orders of decisions
Two different views of the overall qualification decision are available:

Reliability - This reflects the importance of statuses from a
VALID/INVALIDperspective. In this case, these two decisions are the most significant and are presented at the beginning of all other decisions.Hierarchy - This indicates the order of decisions that the Tax Guard Qualification provides. Based on the detailed decisions, the overall decision is calculated.
Get the Request identifier
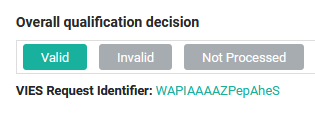
If the FORCE EXTERNAL CALL feature is enabled for VIES, the results provide a request identifier, such as WAPIAAAAZPepAheS.
Get the Business Partner Status
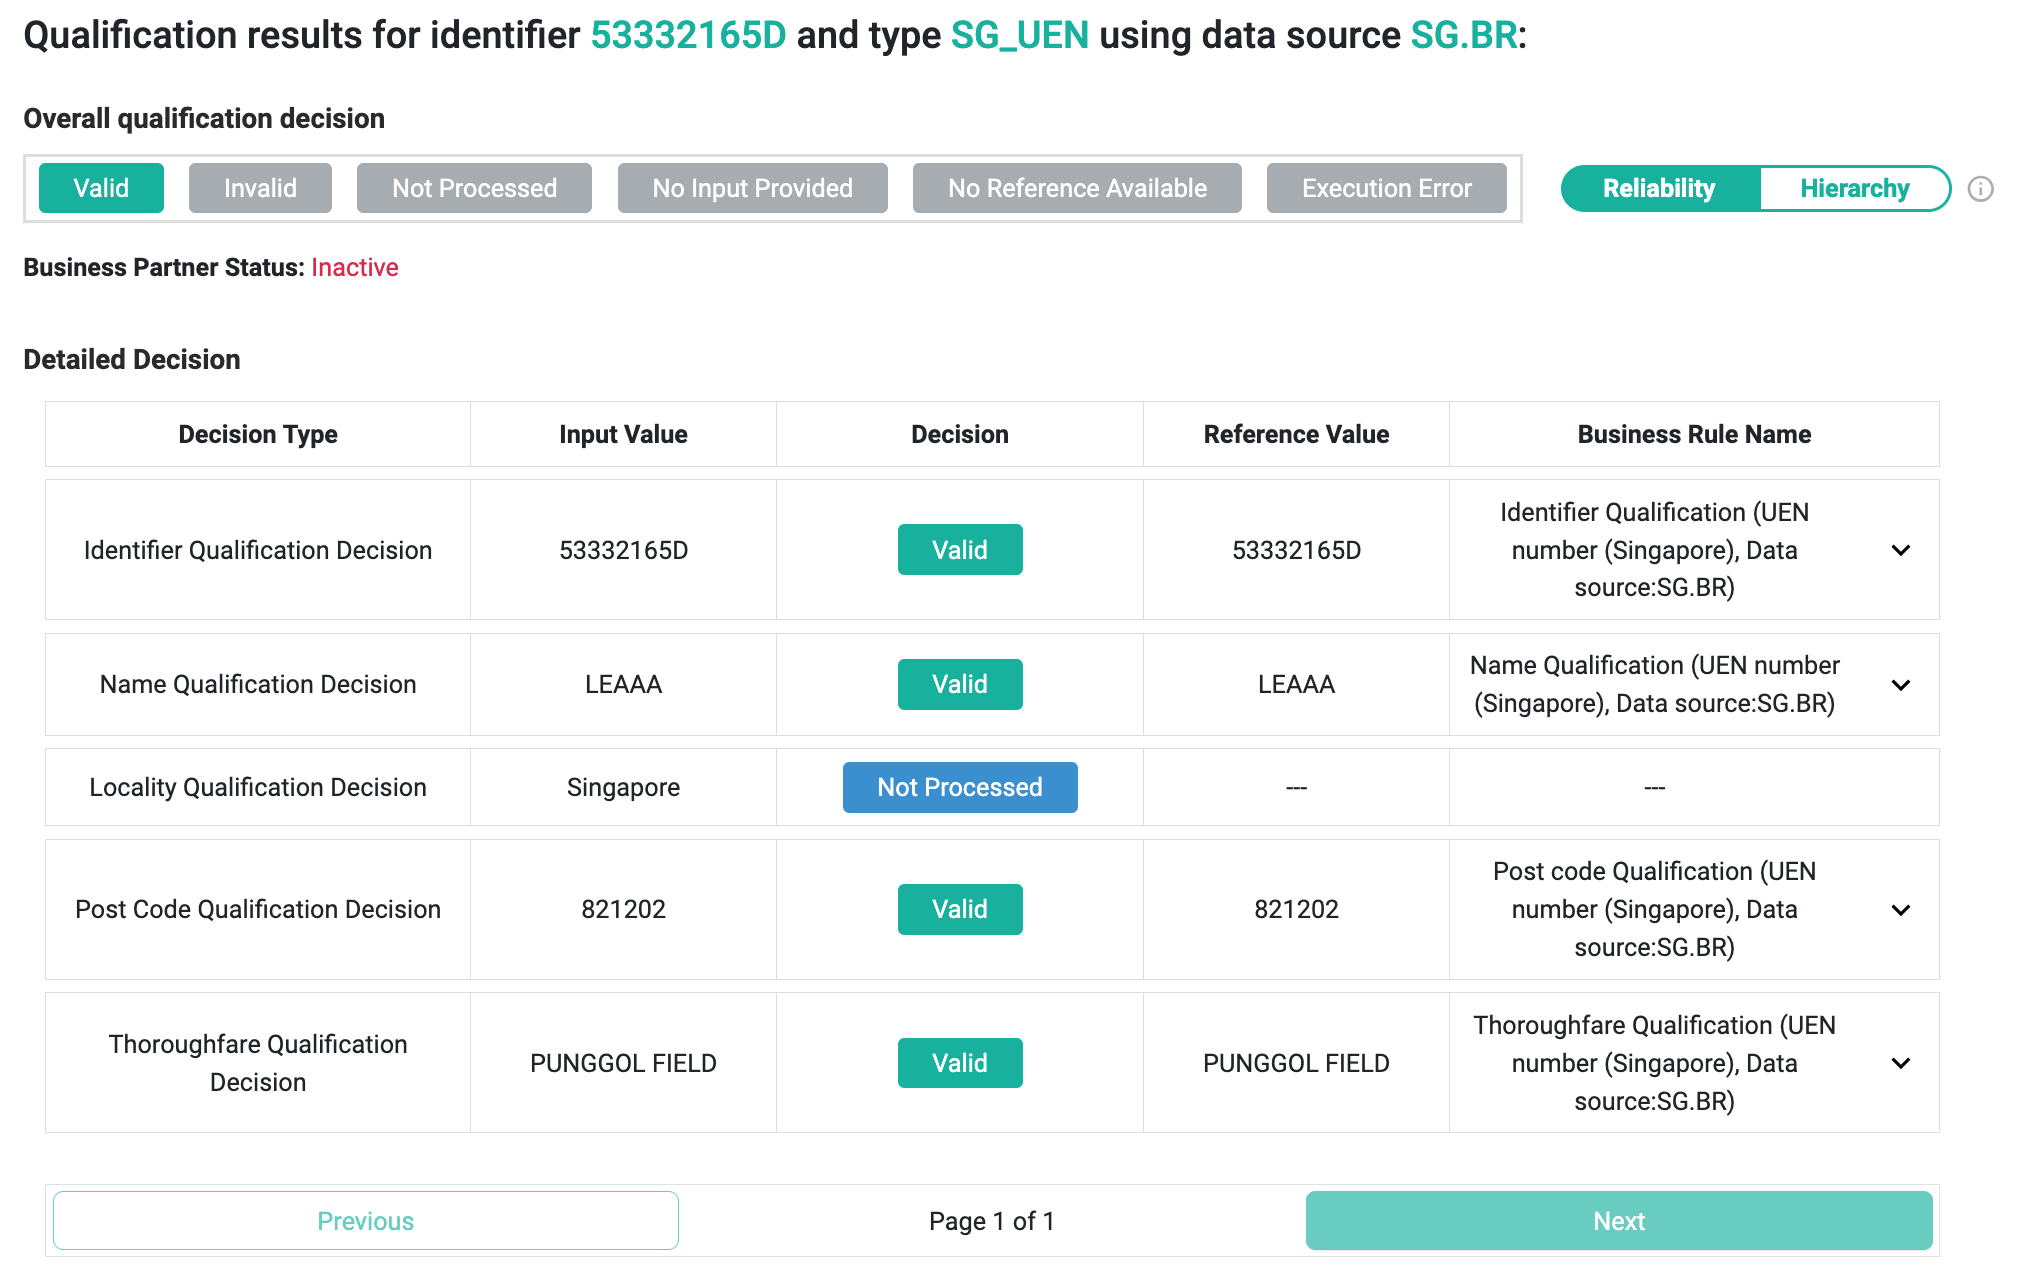
If the Business Partner Status value differs from ACTIVE or UNKNOWN, it will be displayed under Overall qualification decision and under VIES Request Identifier if present. See an example of qualification results in the case of an INACTIVE Business Partner:
Detailed decisions
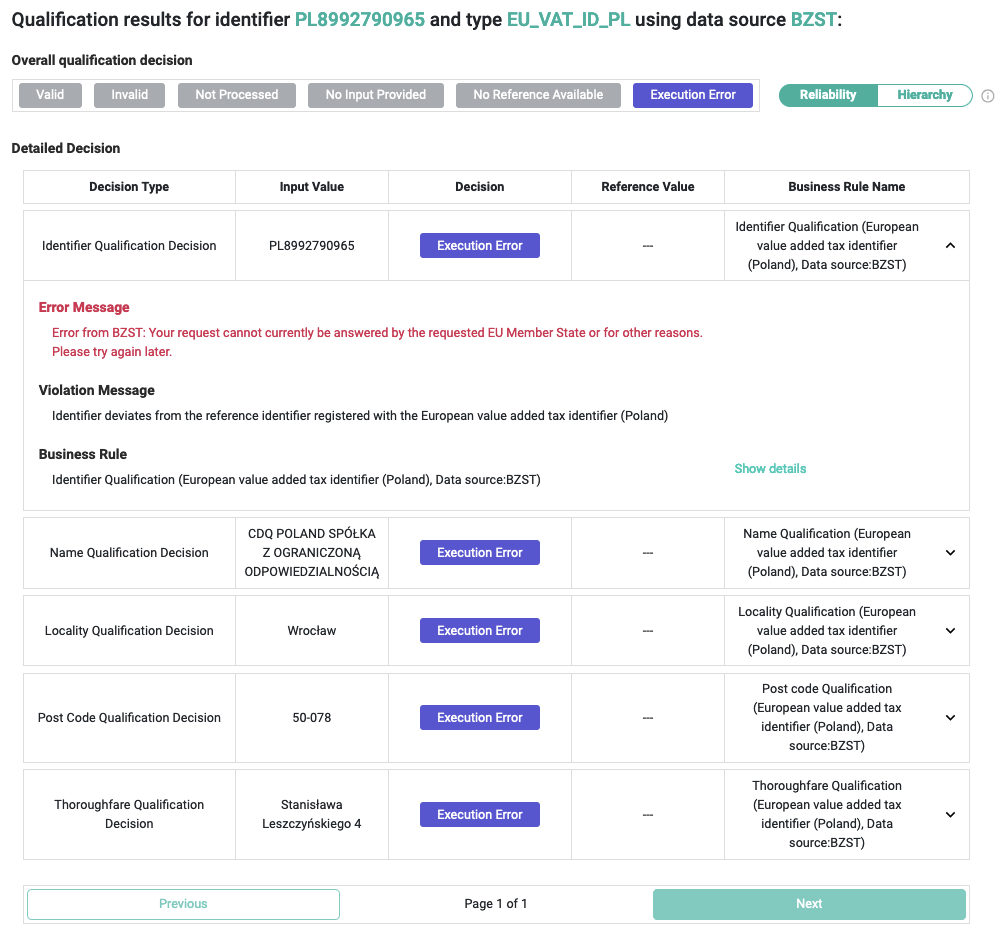
Detailed decisions include:
- decision type,
- input value ,
- qualification decision,
- reference value (if possible), and
- a business rule that provided the decision.
Clicking on a decision allows accessing the violation message, discover the rule's name, and conveniently visit the CDQ Wiki for more information on that rule.
Check the Tax Guard Qualification Process for decision statuses explanation.
Each decision is color-coded to simplify the understanding of qualification results.
| Decision | Description |
|---|---|
| The input value and the reference value provided by the qualification data source are judged as congruent. | |
| There is no congruency between the input value and the reference value provided by the qualification data source. | |
| There is no rule for qualifying this particular target, a rule was deactivated, or we are not able to process this particular data field. | |
| There was no input value provided. So, there is no possible comparison with the reference value provided by the qualification data source. | |
| the qualification data source provided no reference value. So, there is no comparison possible. This might happen when no such a value is available or the mapping and transformation of the raw data source are not working correctly, resulting in an empty value. Anyway, such cases need to be checked by a user. | |
| A rule was not properly executed, e.g., there was some internal software issue, or a qualification data source was not available (downtimes, connection lags, etc.). |
Errors
An explanation is provided in situations where errors occur, for example:
- the data source isn't available,
- the maximum number of requests per day for a specific identifier is exceeded.

Info Icon
A special info icon is provided ![]() . When clicked, it describes a particular element, allowing for quick explanations.
. When clicked, it describes a particular element, allowing for quick explanations.
For better understanding, analyze those three cases of qualifying Business Partners. All cases are qualified in FTR app with different settings. Detailed data like identifier comes from the Lookup results but can be changed or provided manually.
Remember that the user must provide values like country, identifier type, and identifier itself to perform a qualification process. In some cases, like when using BZST, additional fields, such as name and city, need to be given.
In the following examples, the following data is used:
- Name:
CDQ - Country:
PL - Poland
To qualify a European Business Partner with default settings, follow these steps:
Set the qualification profiles and features in the Settings view:
- Profile:
EU TAX QUALIFICATION, - Features On:
SHOW DEBUG INFO,
- Profile:
Fill the provided values:
- Name:
CDQ, - Country:
PL - Poland,
- Name:
Click the Lookup button,
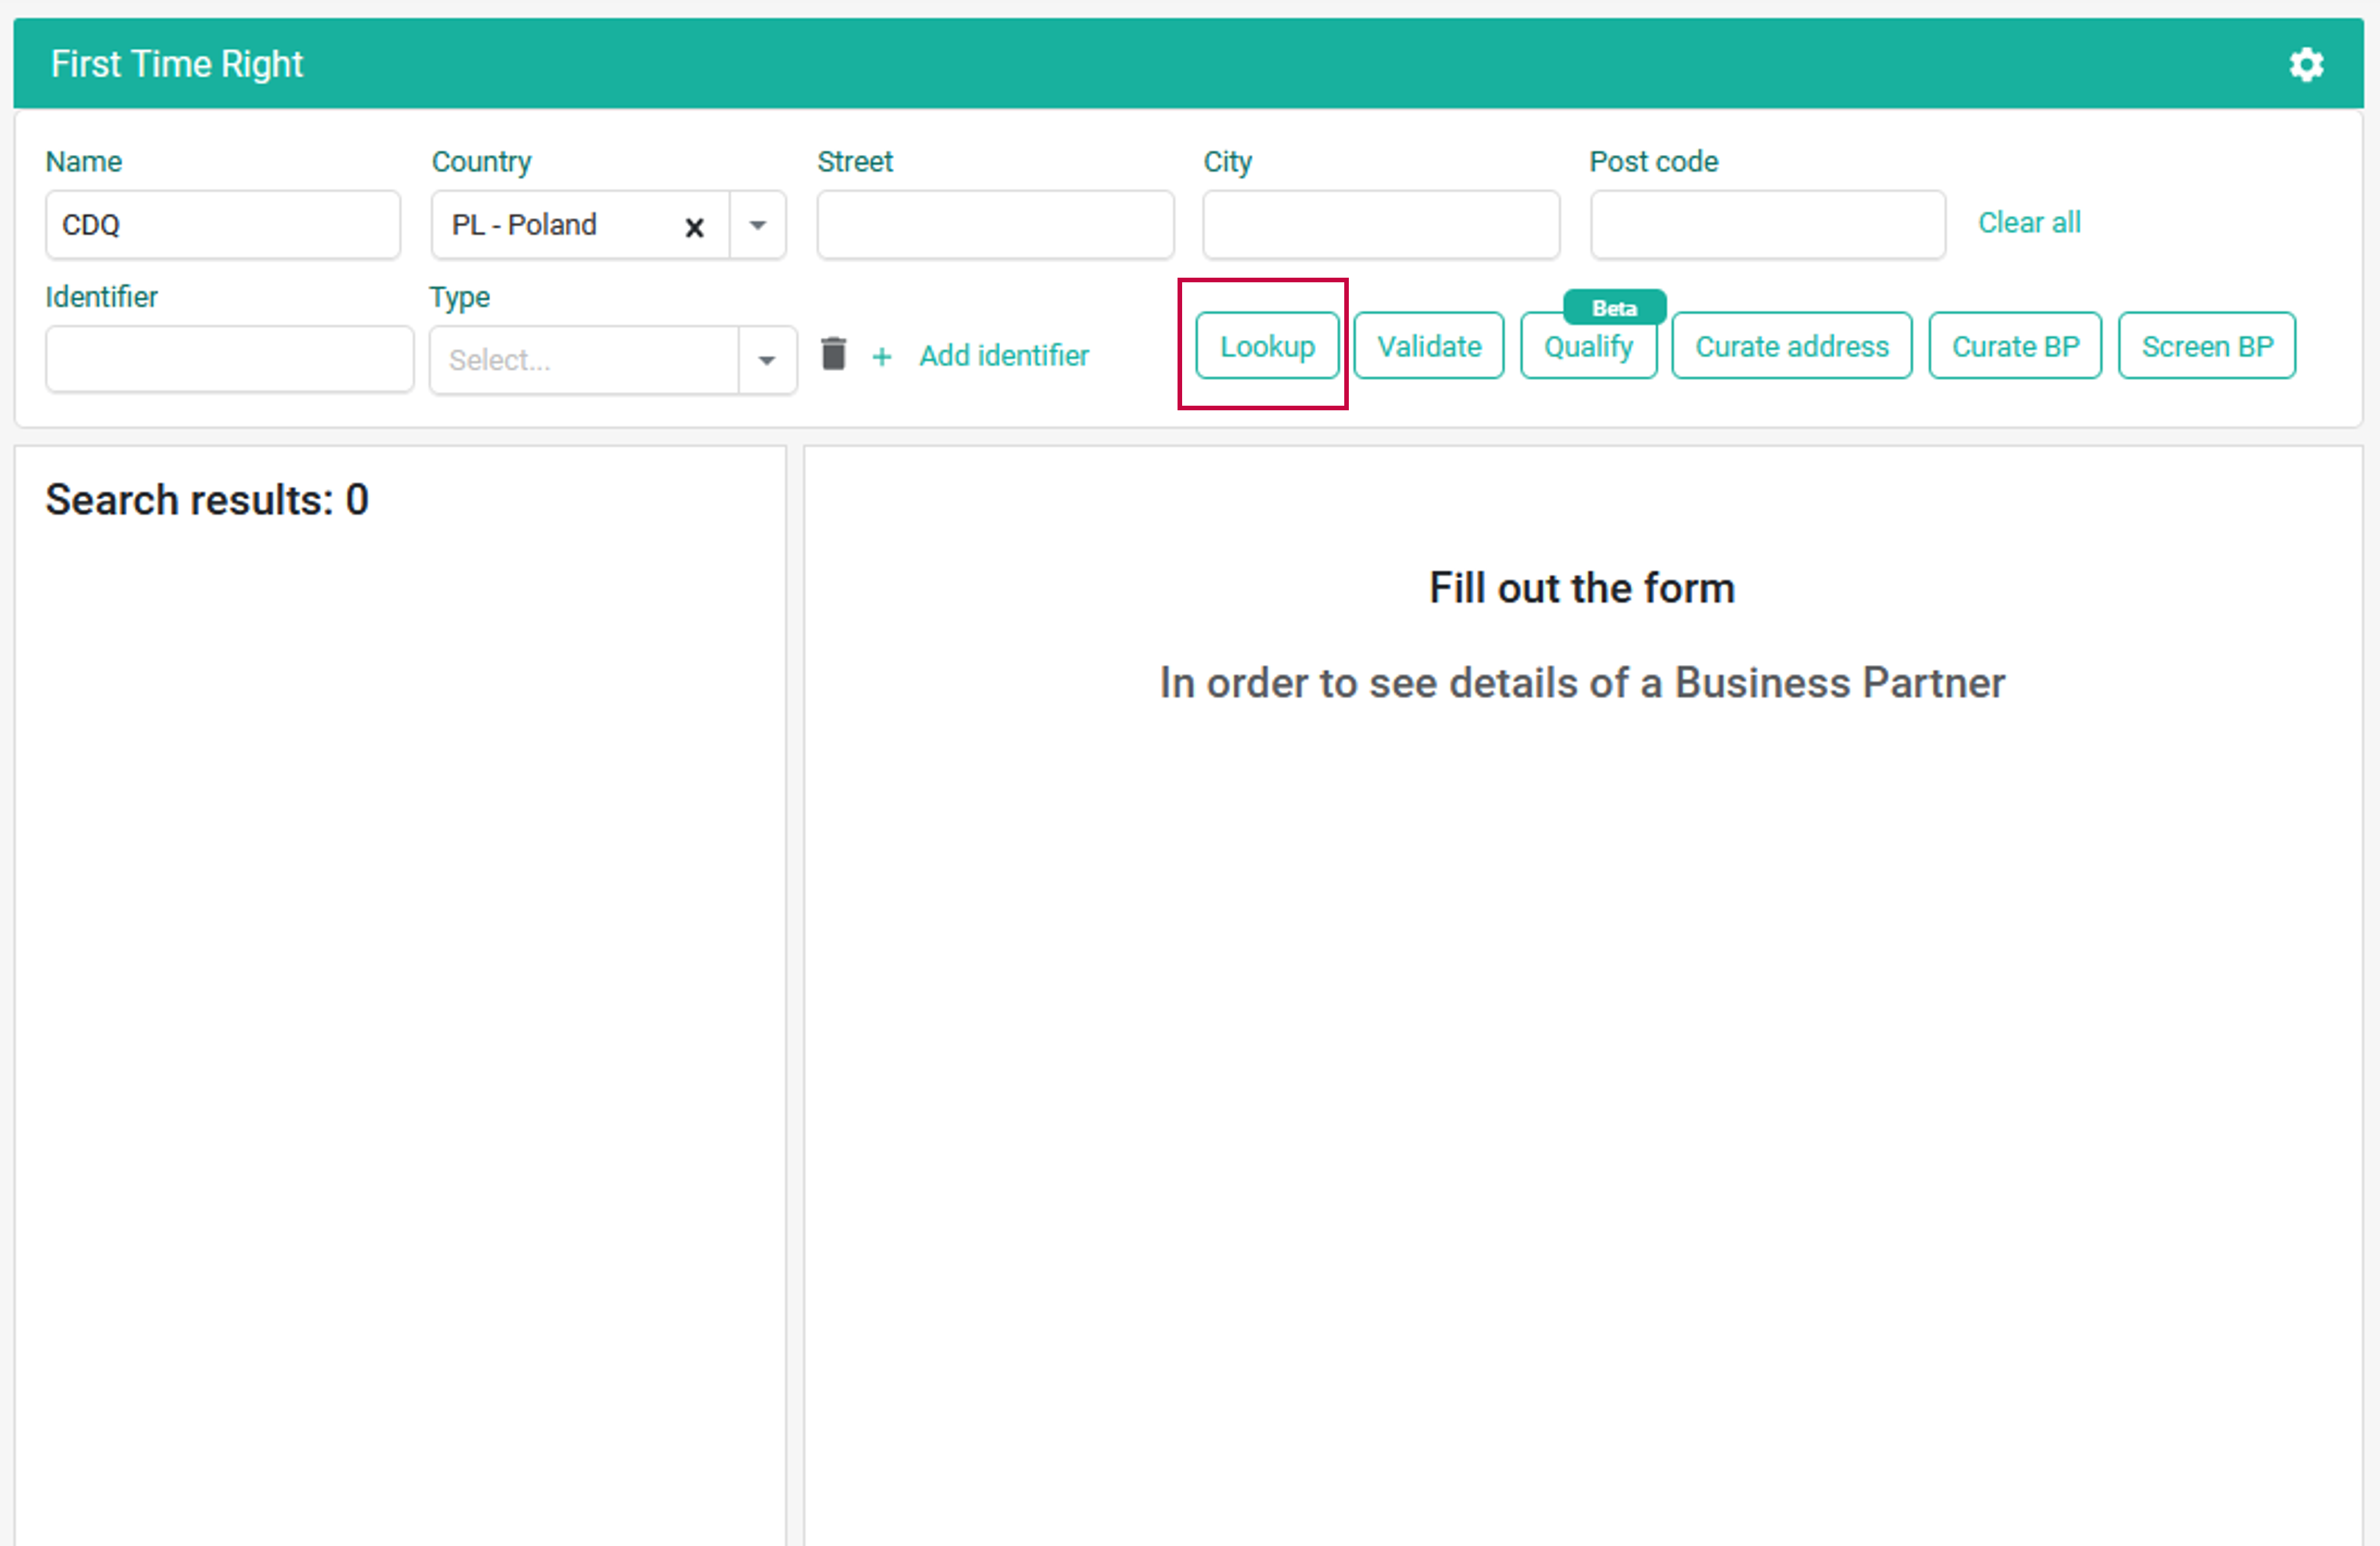
- Select the results from the
VIESdata source, - Click the
Transfer values to search maskbutton,
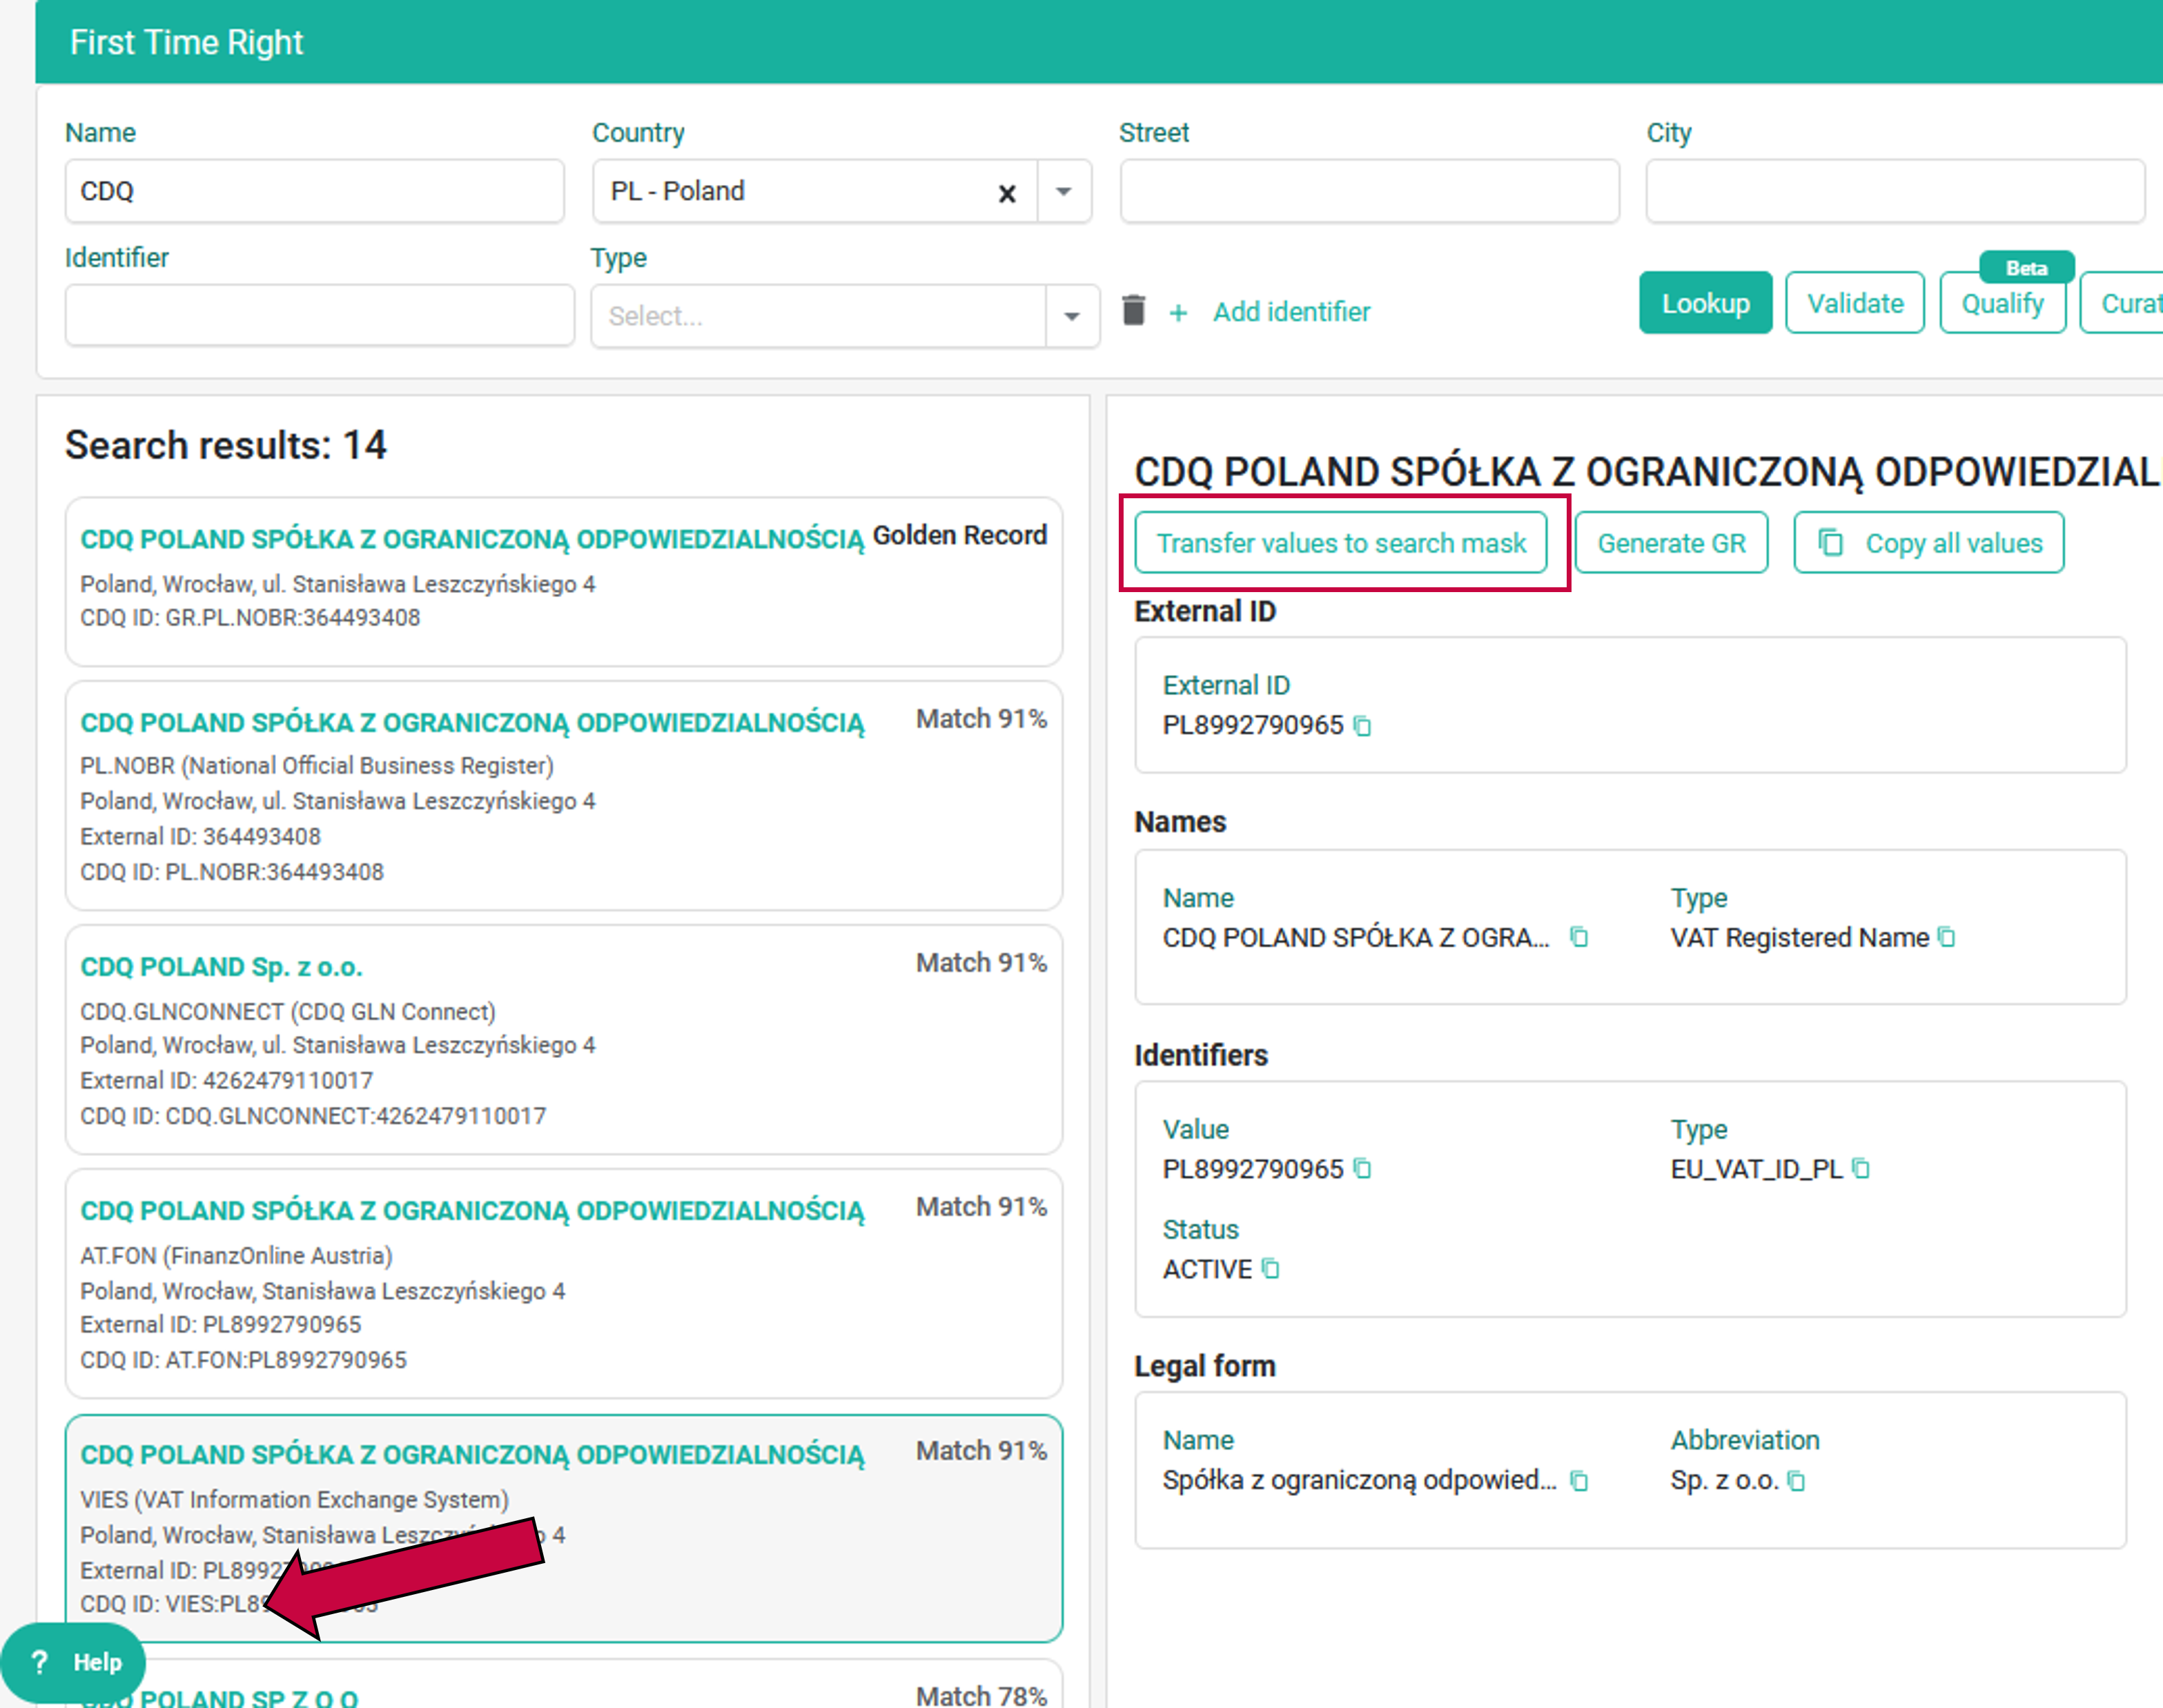
- When the values are transferred, click the Qualify button,
- Analyze the qualification results.
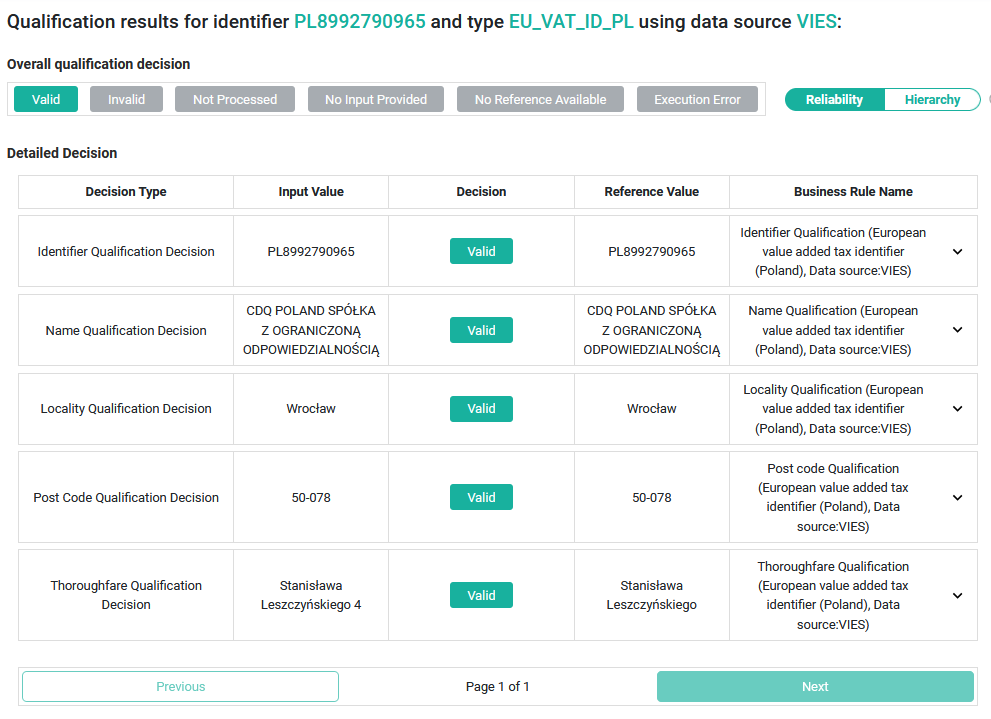
Only valid decisions were obtained, which are consistent with what VIES provides.
To qualify a European Business Partner with multiple data sources, follow these steps:
Set the qualification profiles and features in the Settings view:
- Profile:
EU TAX QUALIFICATION, - Data source:
VIES,BZST,AT.FON, - Features On:
FORCE EXTERNAL CALL,
- Profile:
Fill the provided values:
- Name:
CDQ, - Country:
PL - Poland,
- Name:
Click the Lookup button,
Select the results from the
VIESdata source,Click the
Transfer values to search maskbutton,When the values are transferred, click the Qualify button,
Check the results from other data sources by switching the pages.
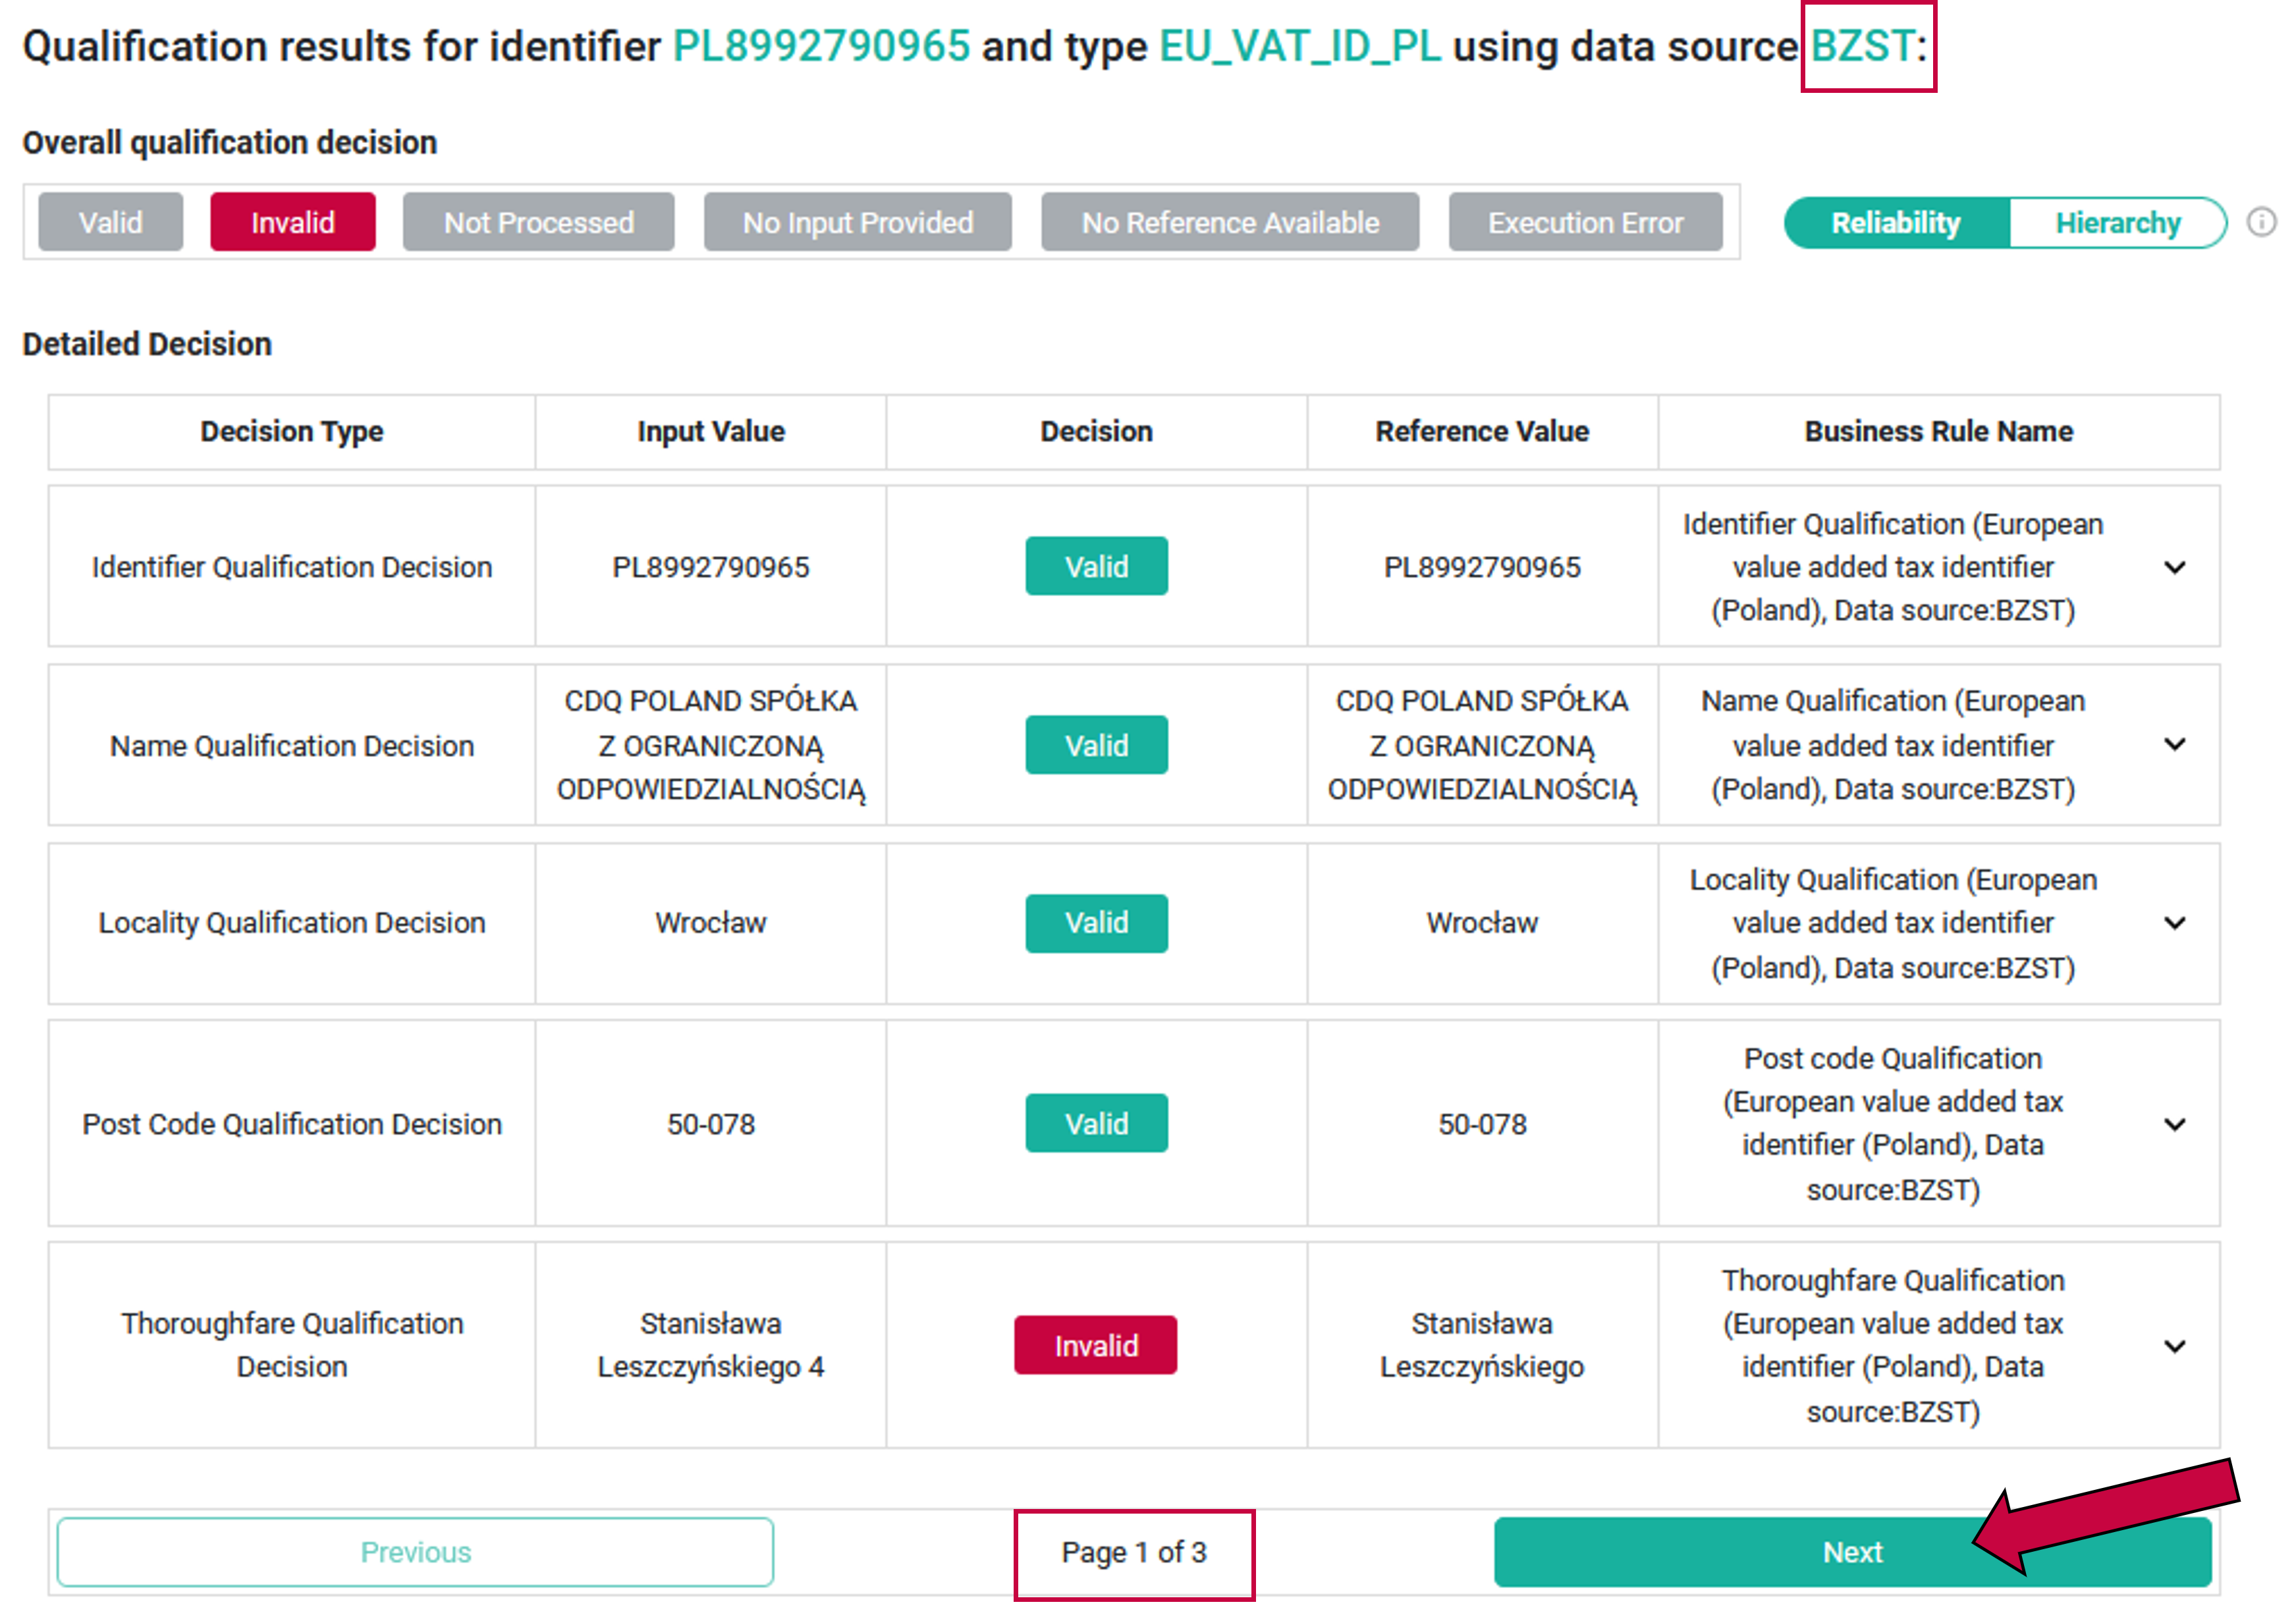
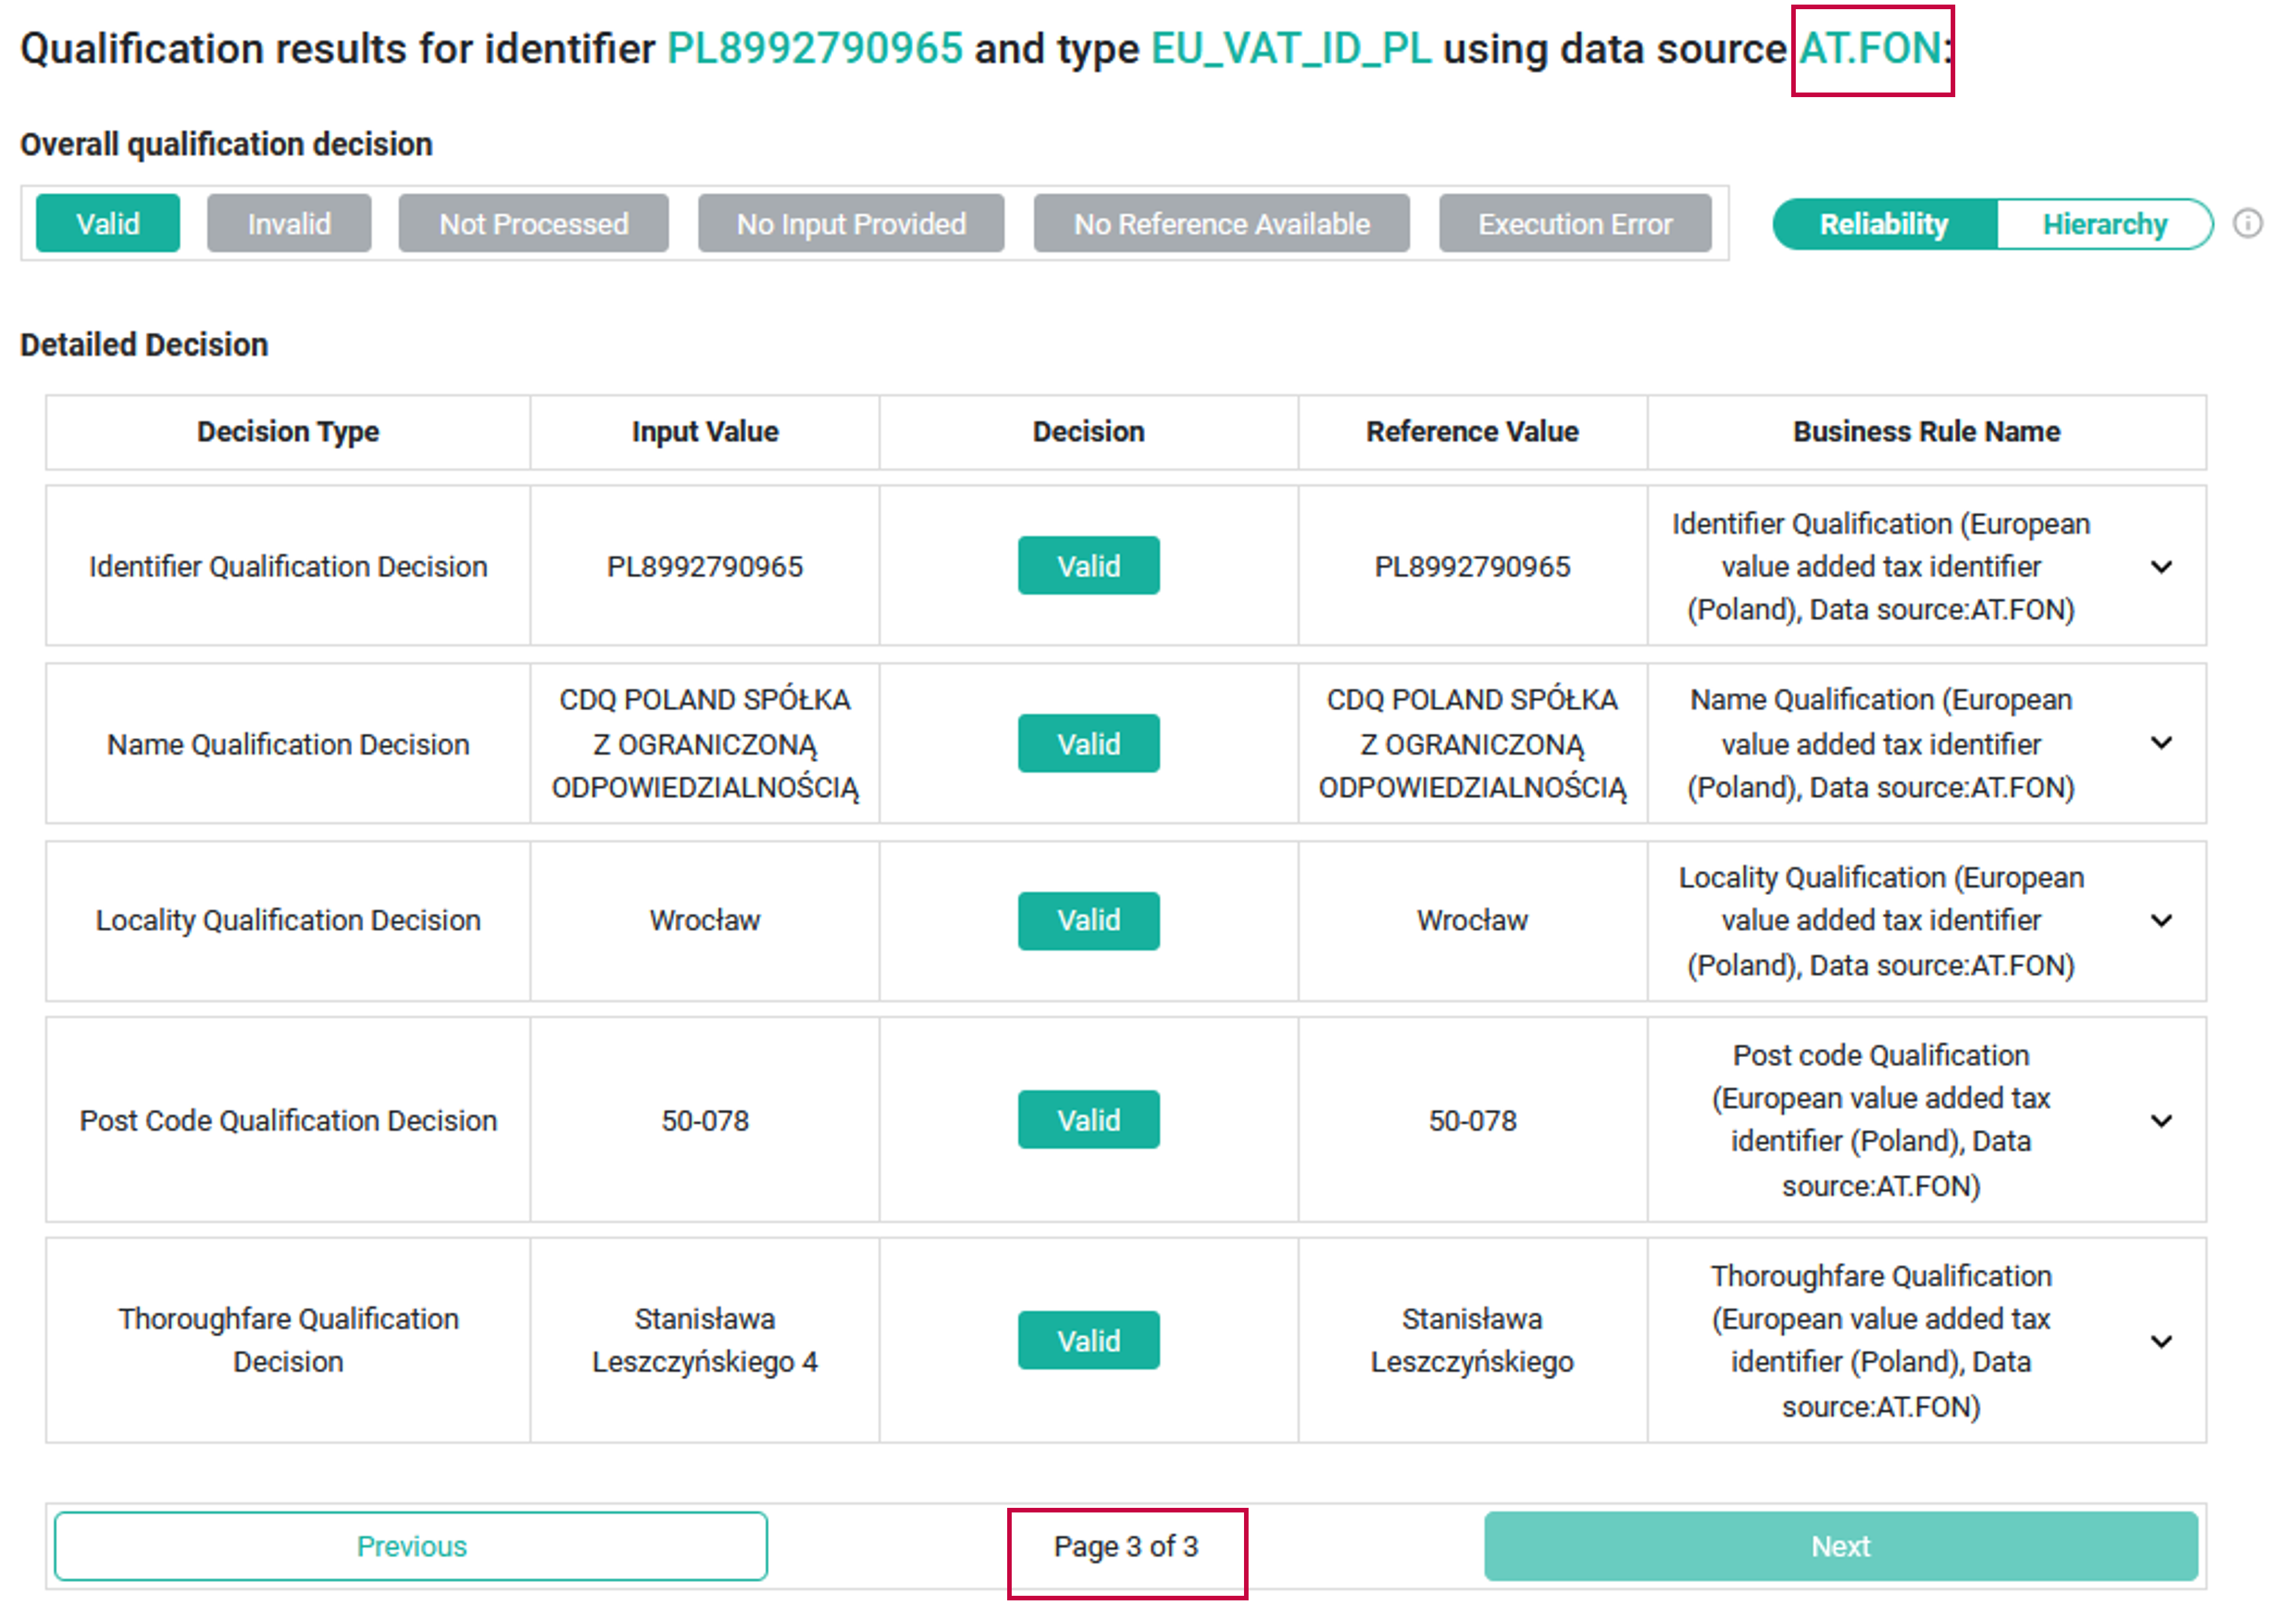
To qualify a European Business Partner with European and Local Registers, follow these steps:
Set the qualification profiles and features in the Settings view:
- Profile:
EU TAX QUALIFICATION, - Data source:
VIES,PL.NOBR, - Features On:
FORCE EXTERNAL CALL,
- Profile:
Fill the provided values:
- Name:
CDQ, - Country:
PL - Poland,
- Name:
Click the Lookup button,
Select the
Golden Record,Click the
Transfer values to search maskbutton,
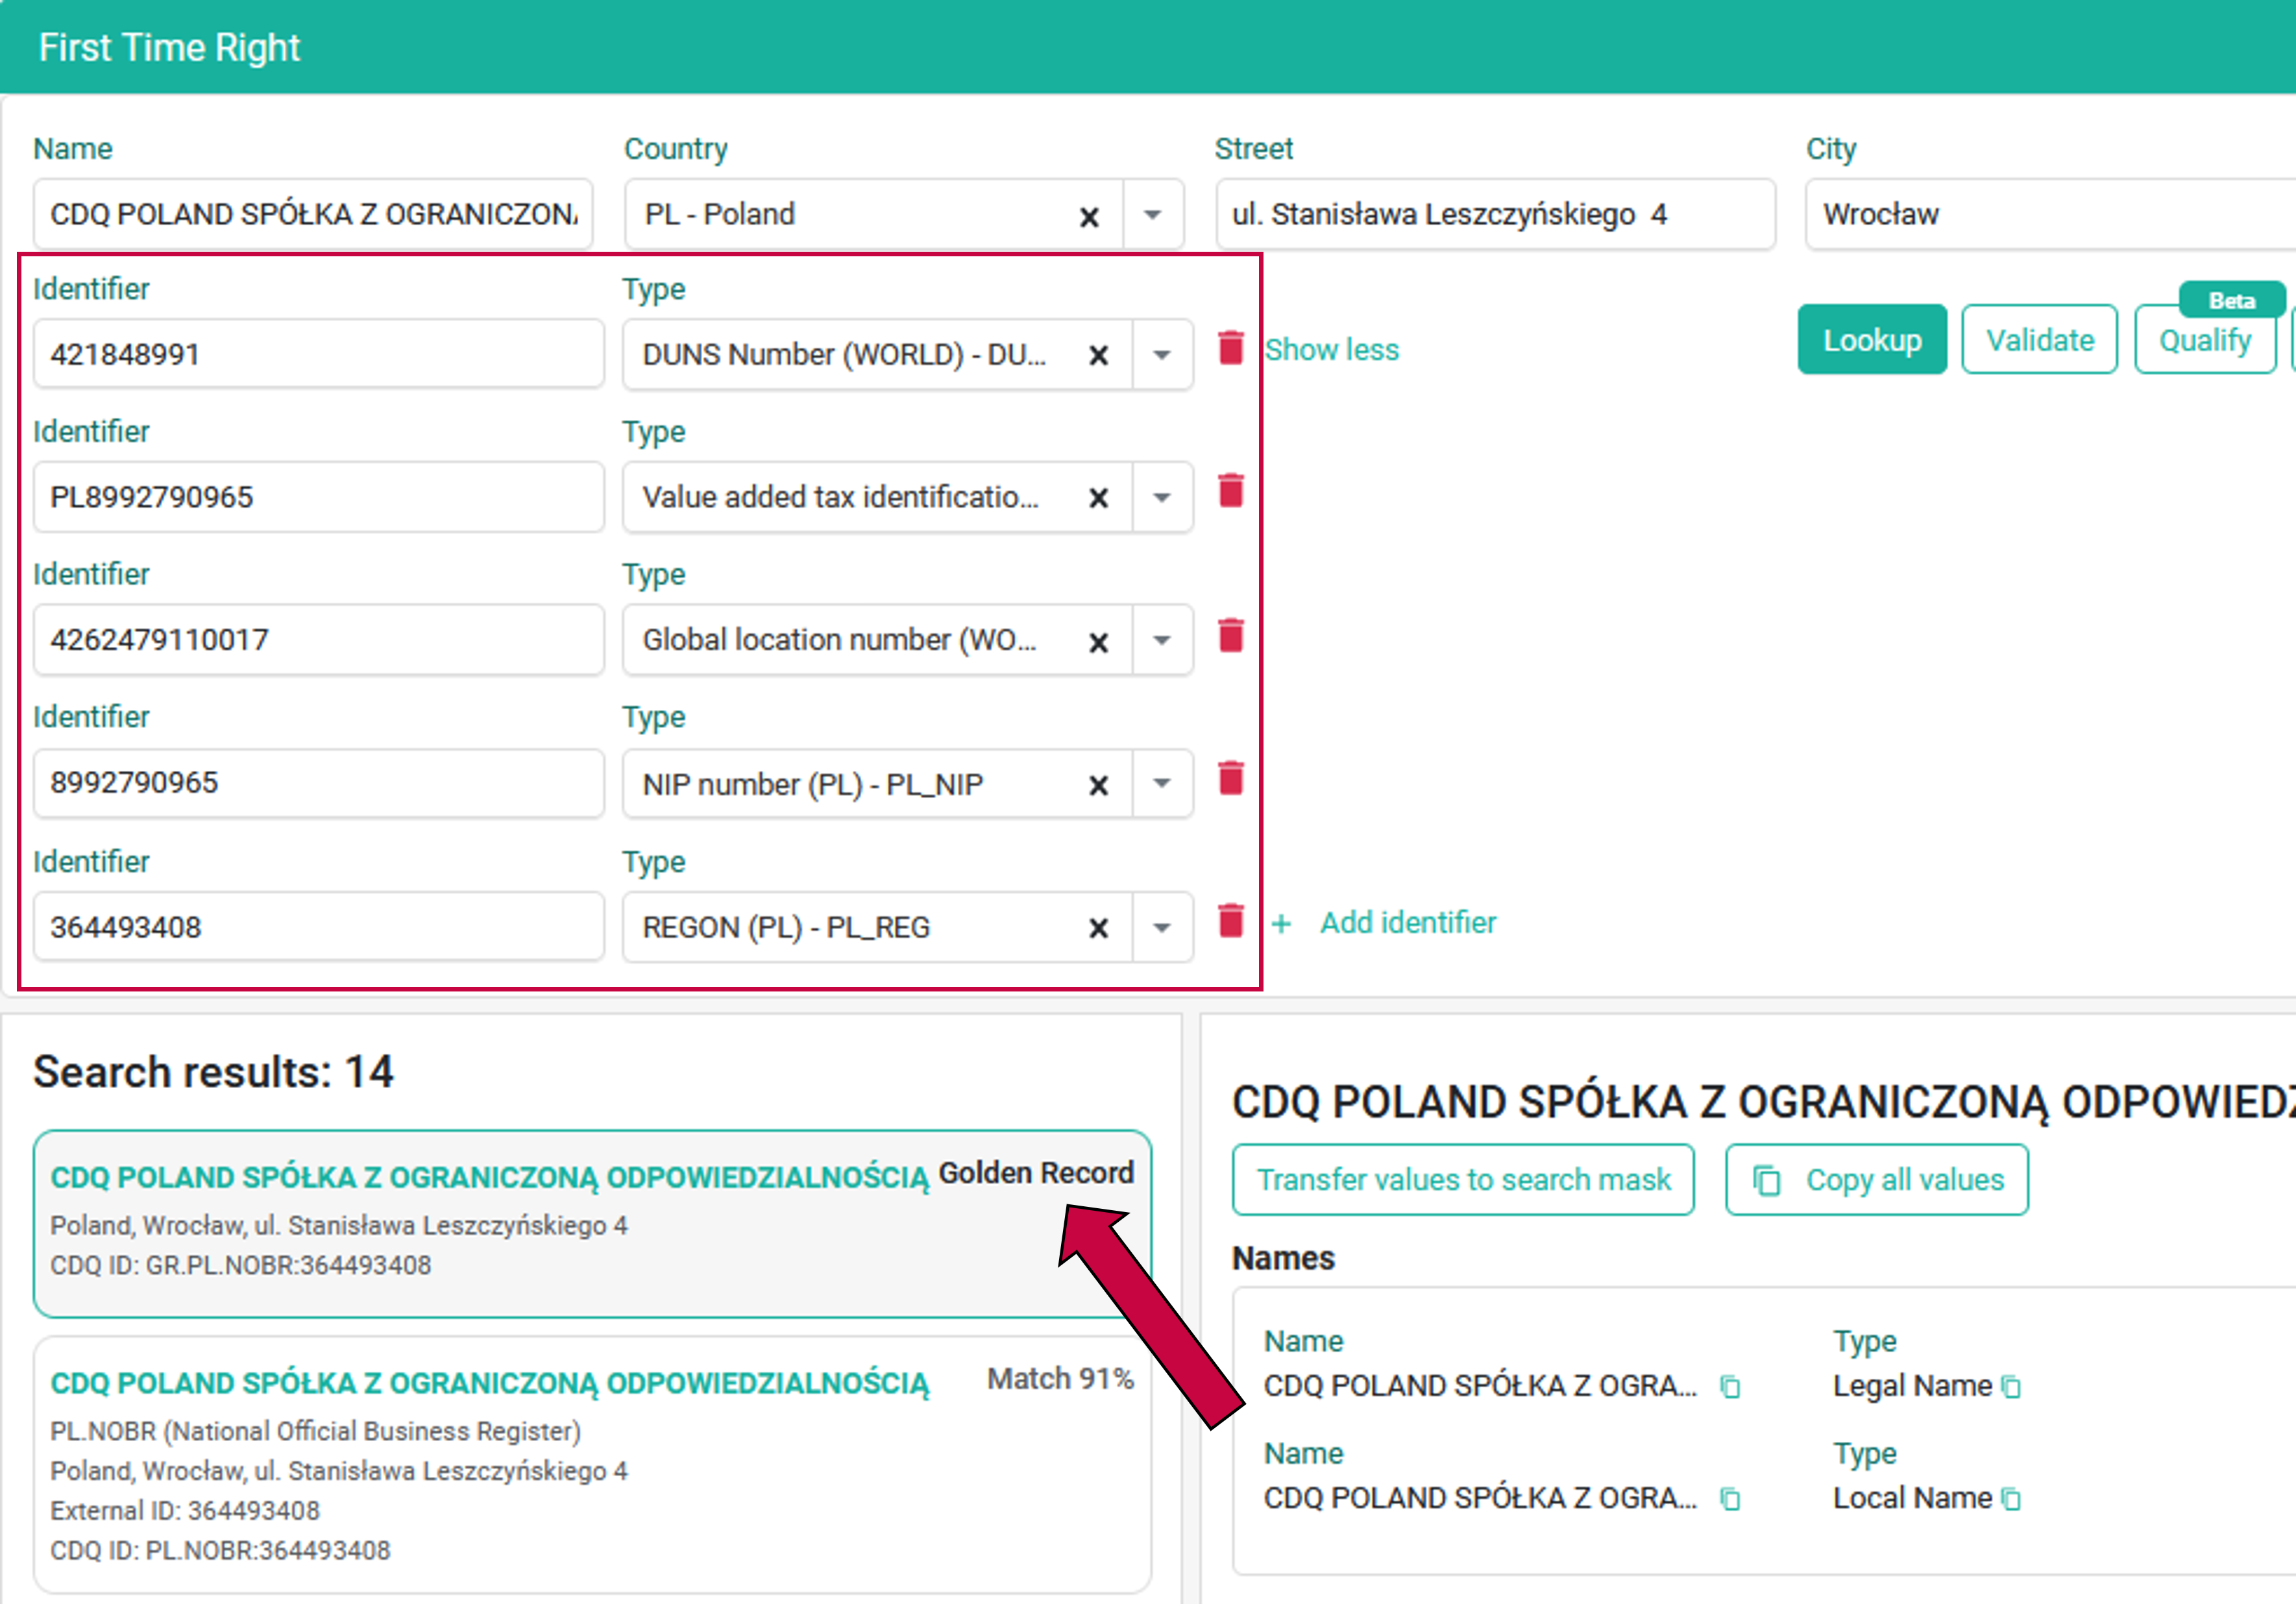
- When the values are transferred, click the Qualify button,
- Analyze the qualification results,
- Check the results from
VIESfor identifier typePL_REG.
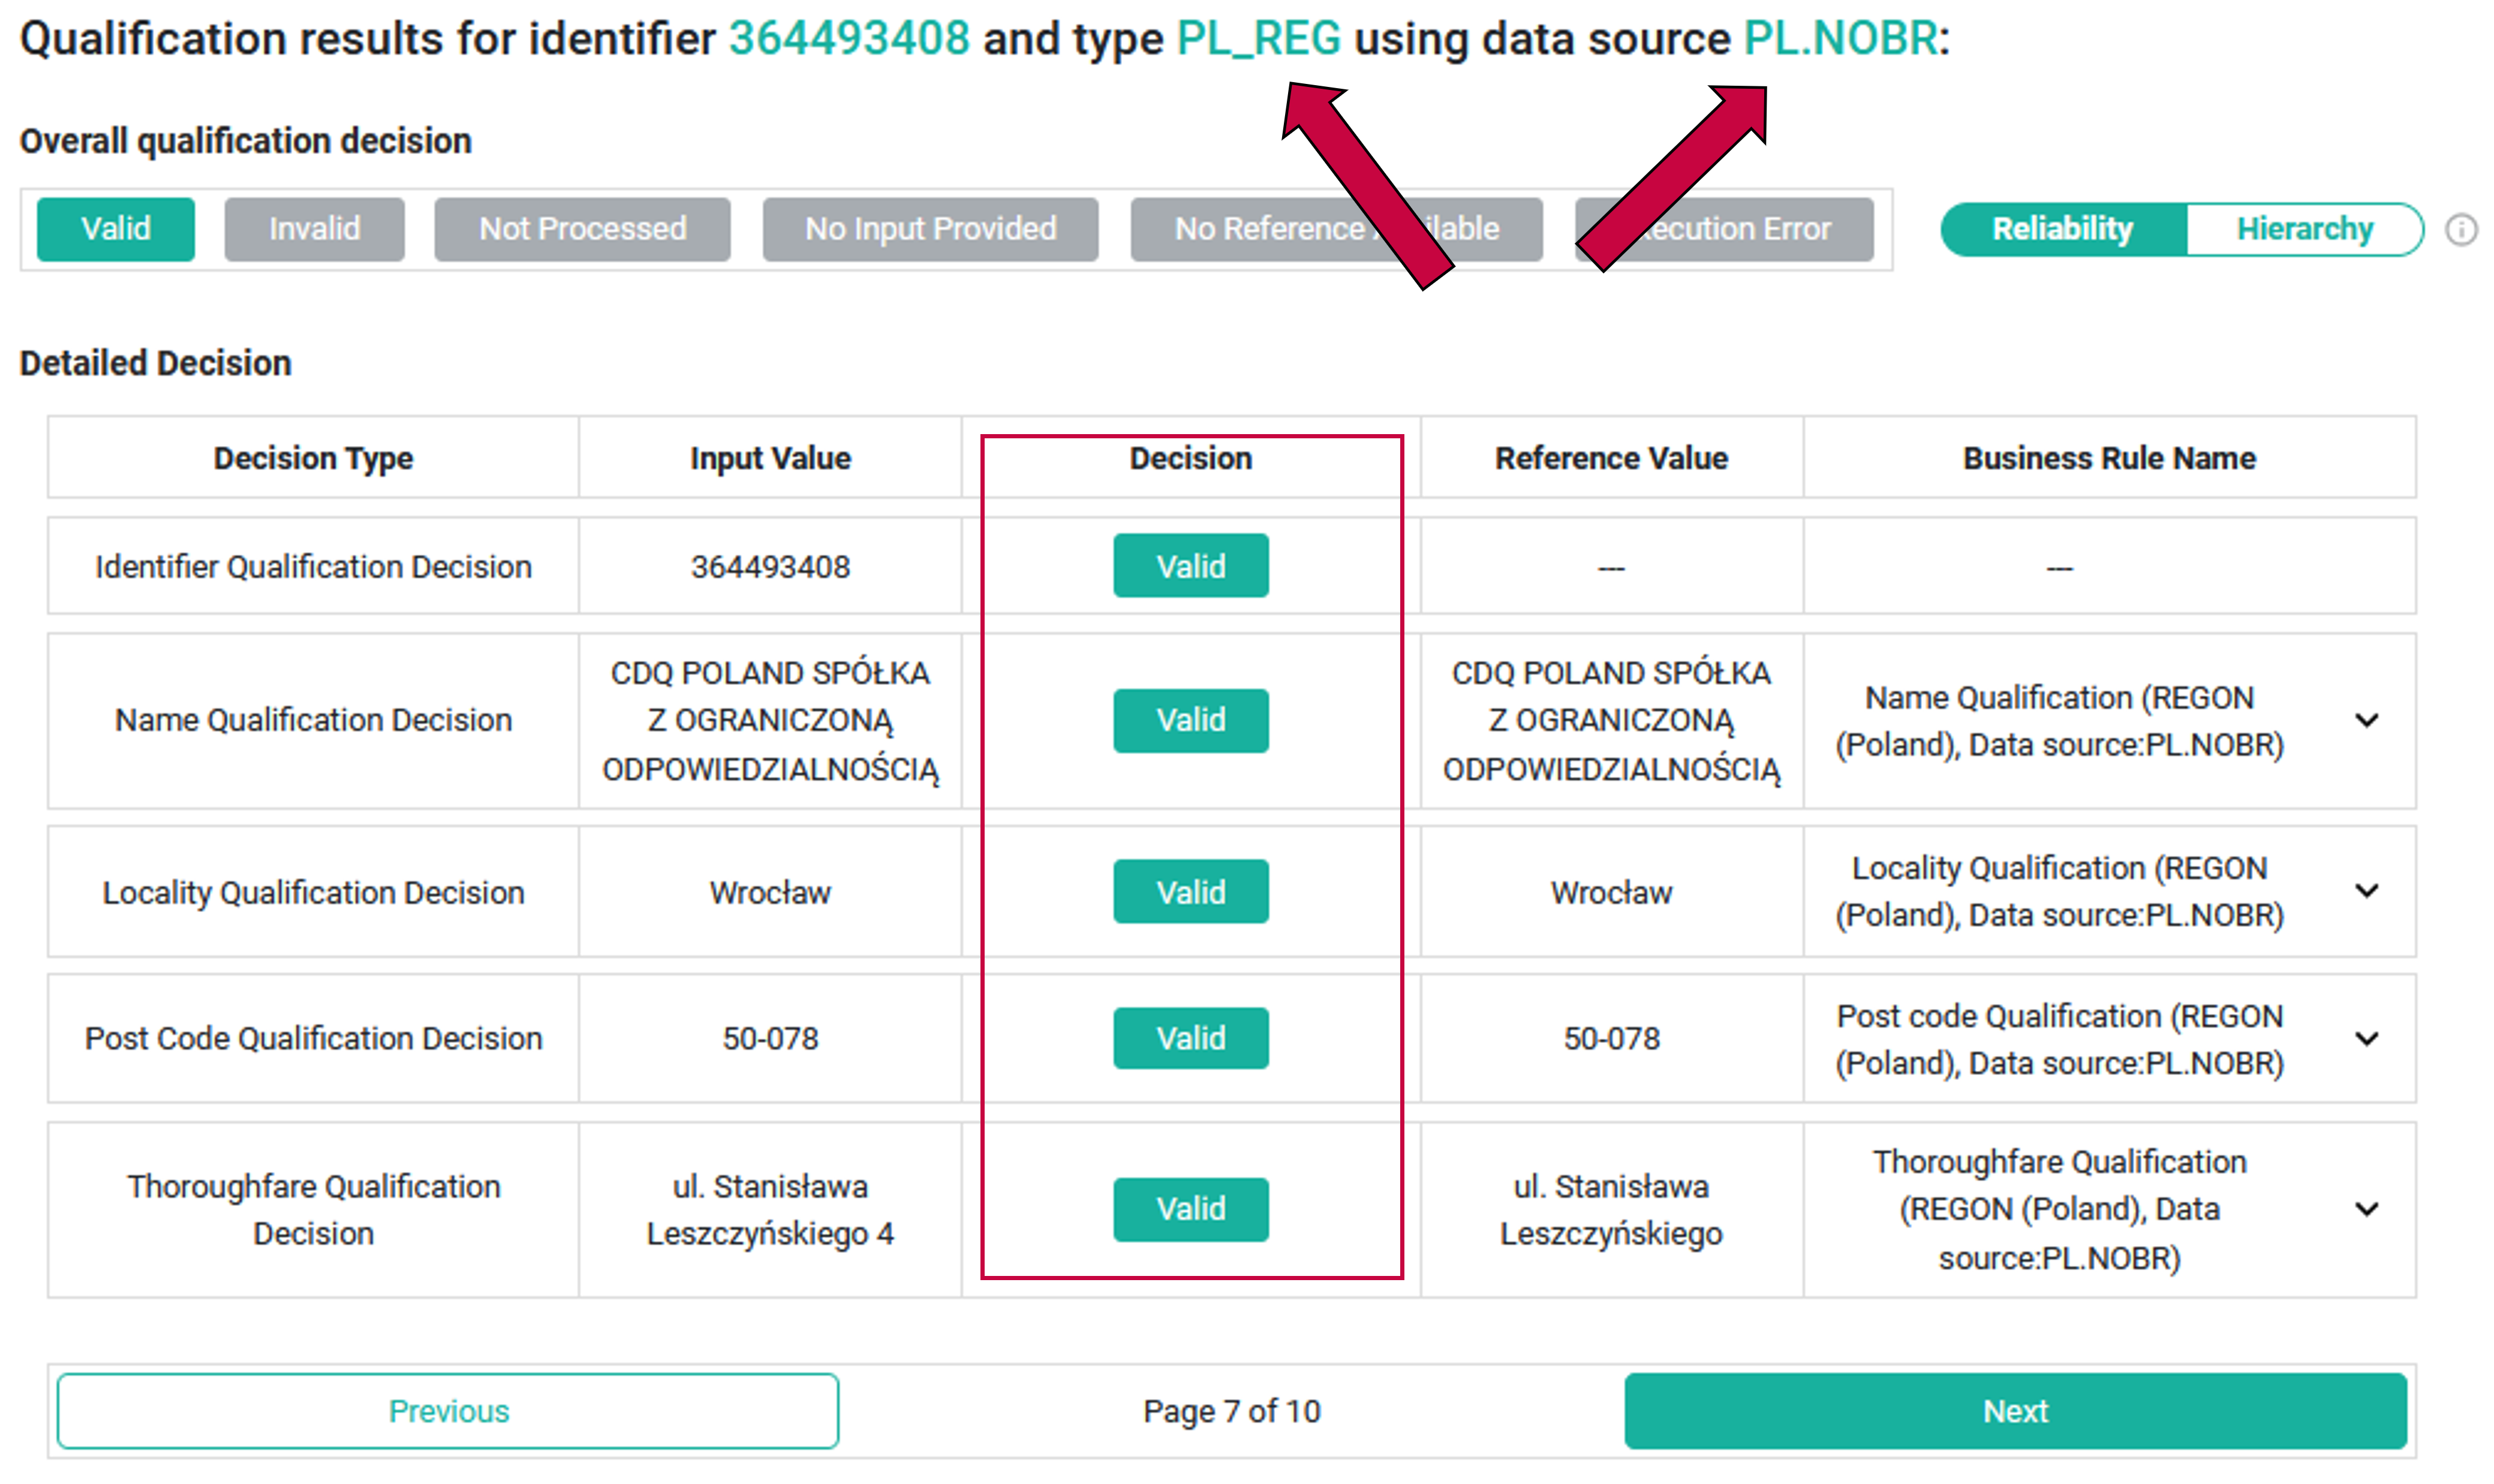
- Check the results from
PL.NOBRfor identifier typePL_REG.
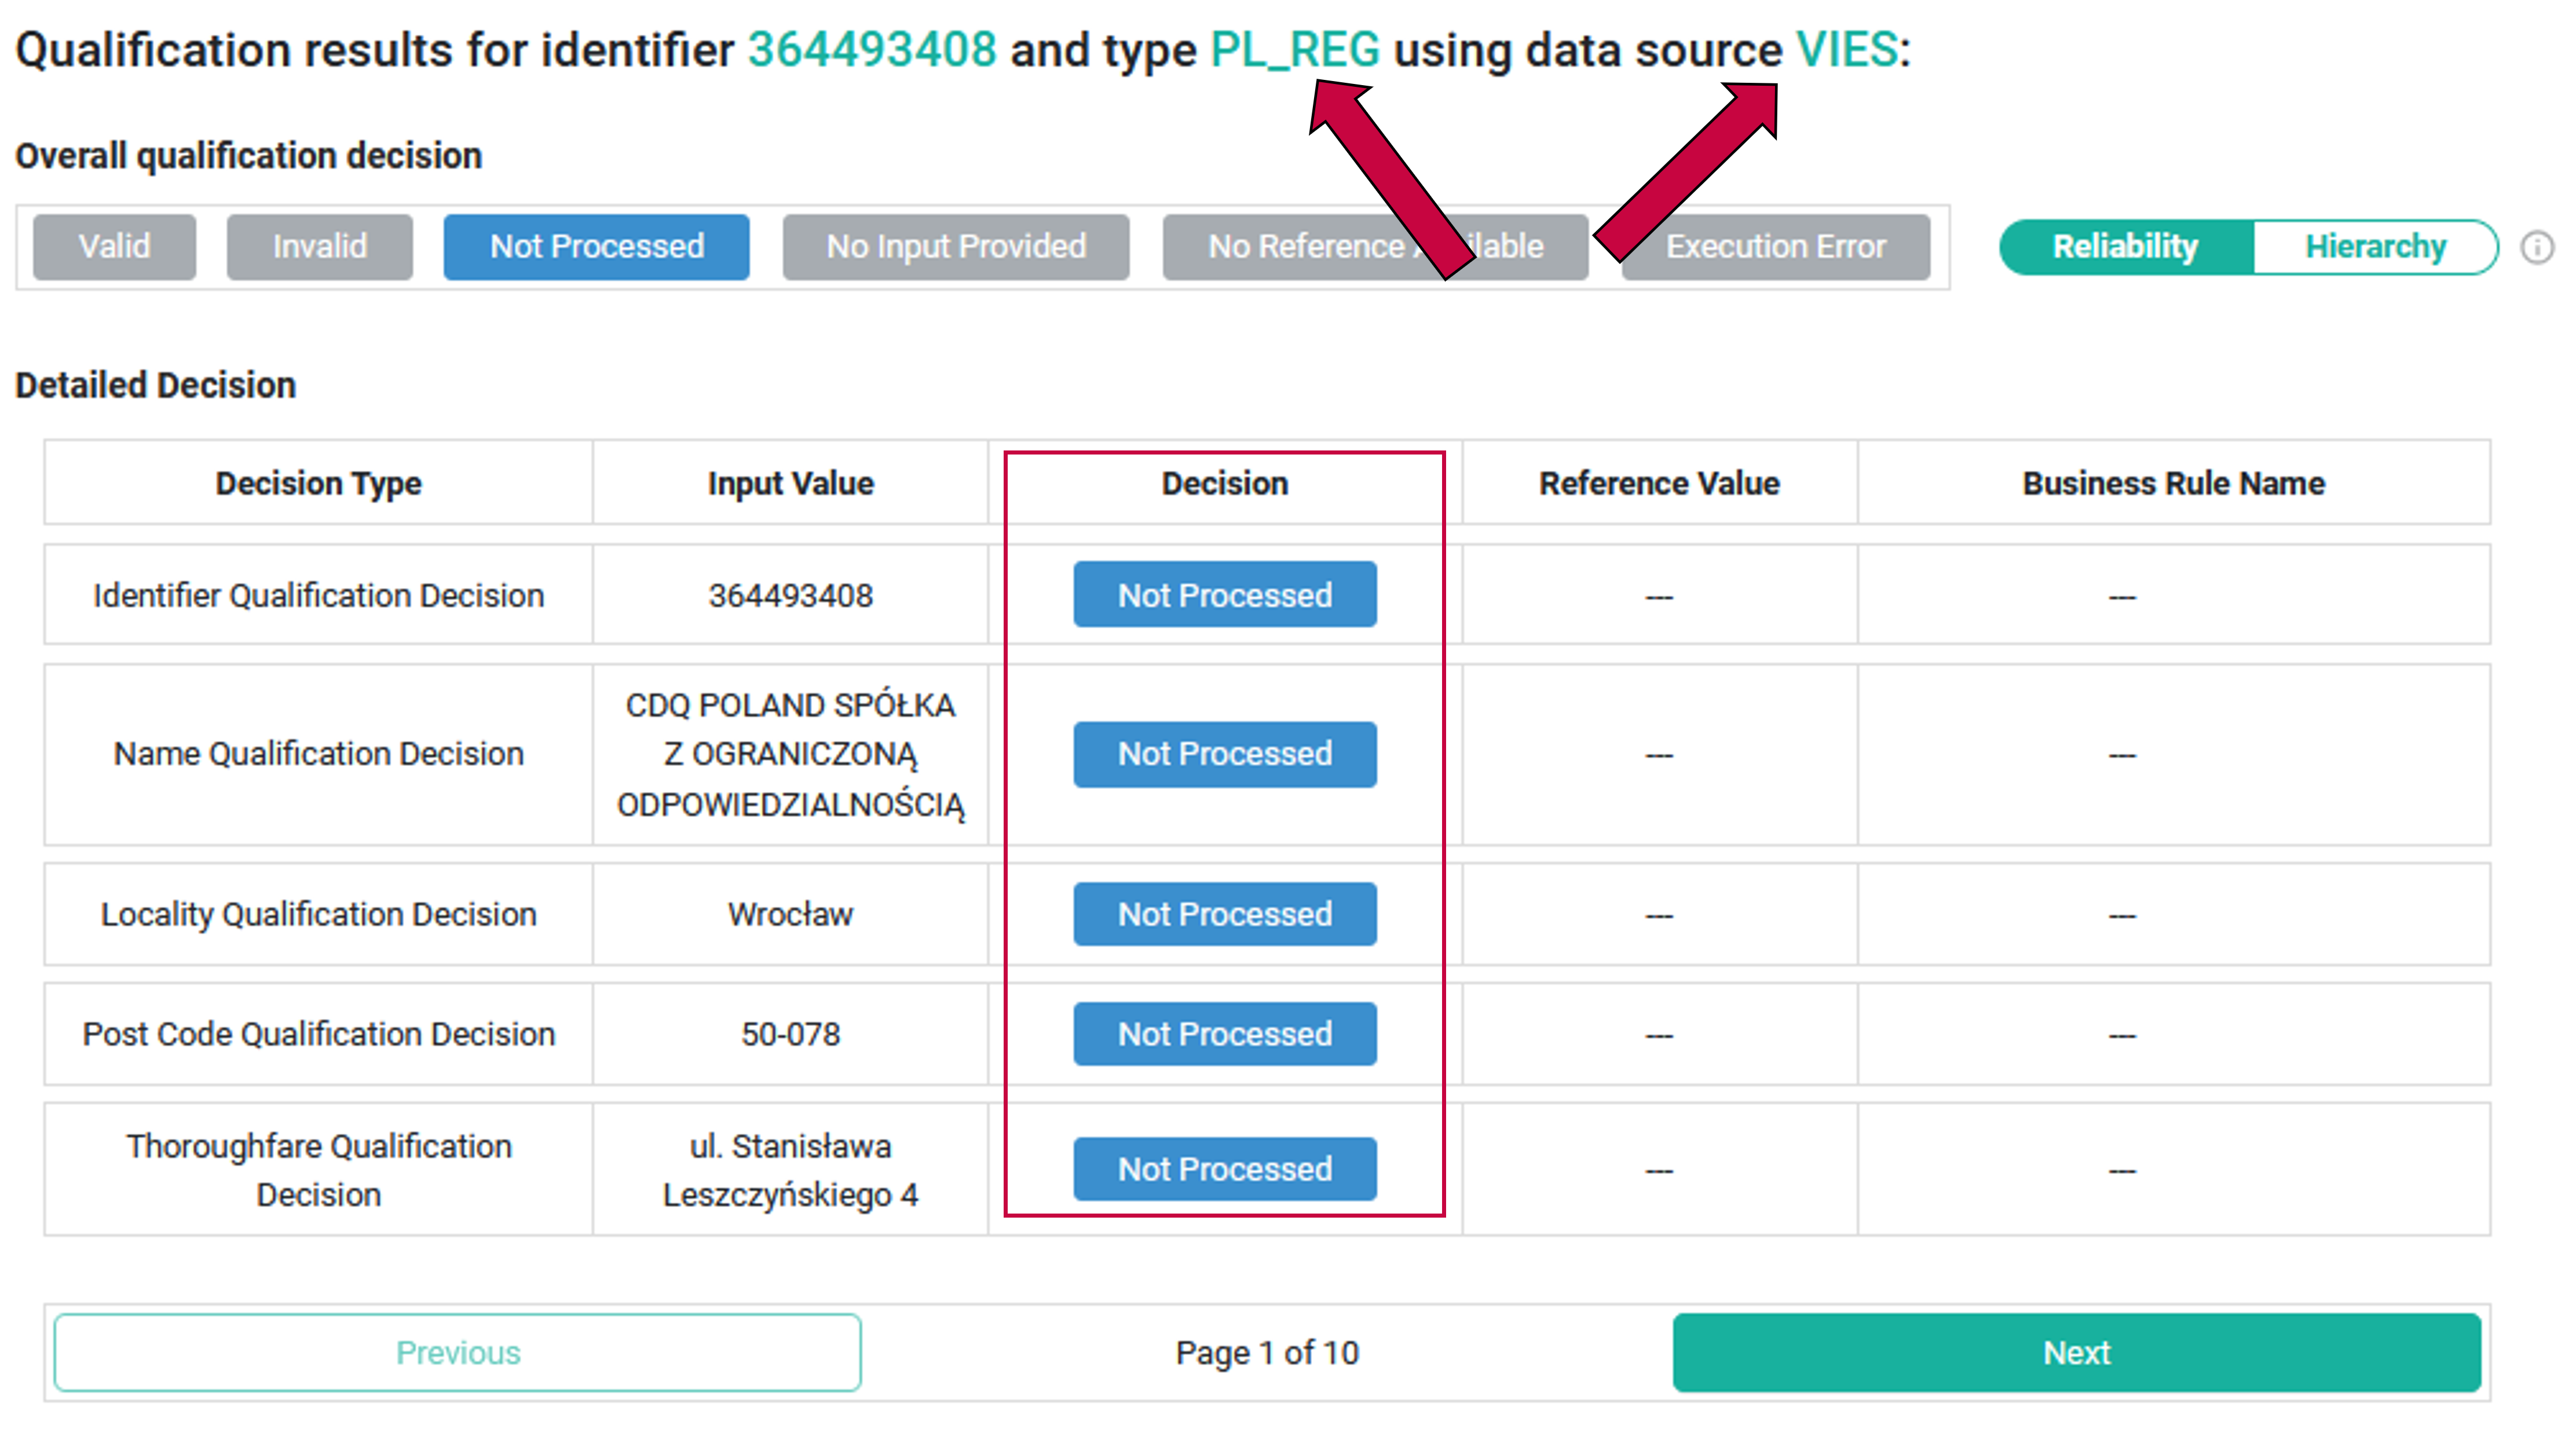
The PL_REG identifier type exist in the PL.NOBR data source and is VALID in the decision column. It doesn't exist in the VIES data source, and it's why it has NOT PROCESSED decision.
The /businesspartners/qualify endpoint enables the use of 18 different data sources. Not all data sources behave the same way or provide results in the same format. To integrate all of them, the necessary steps were taken to follow each data source's restrictions. A common interface has been provided with the following limitations:
| Limitations |
|---|
BZST does not support German Business Partners. |
VIES can validate only the EU VAT identifier of German Business Partners but does not provide reference data for the German address and name. |
VIES does not return reference data for Spanish Business Partners; it merely indicates whether a given input, such as name and address, is a match. |
Currently, only AT.FON can fully qualify German Business Partners with all attributes: identifier, postcode, name, locality, and thoroughfare. |
If the dataSources attribute is included in a request, results for each identifier from each requested data source will be provided, which may lead to many NOT_PROCESSED decisions. |
| In some cases, qualification of an identifier is based on the calculation of other checked fields: postcode, name, locality, and thoroughfare due to the absence of specific rules for checking the identifier alone; this remains under active development. |
Qualification can fail if issues arise with connecting to a reference data source, such as if it is undergoing maintenance. All issues that occur during execution will be available in the debugInfo data field of a response. |
| Currently, it is possible to qualify five data fields: identifier, postcode, name, locality, and thoroughfare of a Business Partner. If other Business Partner attributes require qualification, customers are encouraged to create an idea in the idea portal. |
Values that are empty or missing fields, such as not present "postCodes": [] data, result in the NO_INPUT_PROVIDED decision. |
Not all data sources provide the status of a business partner. For example, VIES provides decisions about the validity of an identifier but does not provide anything about the business partner status itself. As a result we usually provide status UNKNOWN except in cases when a reference data source provides otherwise (like in the CZ.REE register). |
We are constantly working on providing an outstanding user experience with our products. Please share your opinion about this tutorial!