Use case
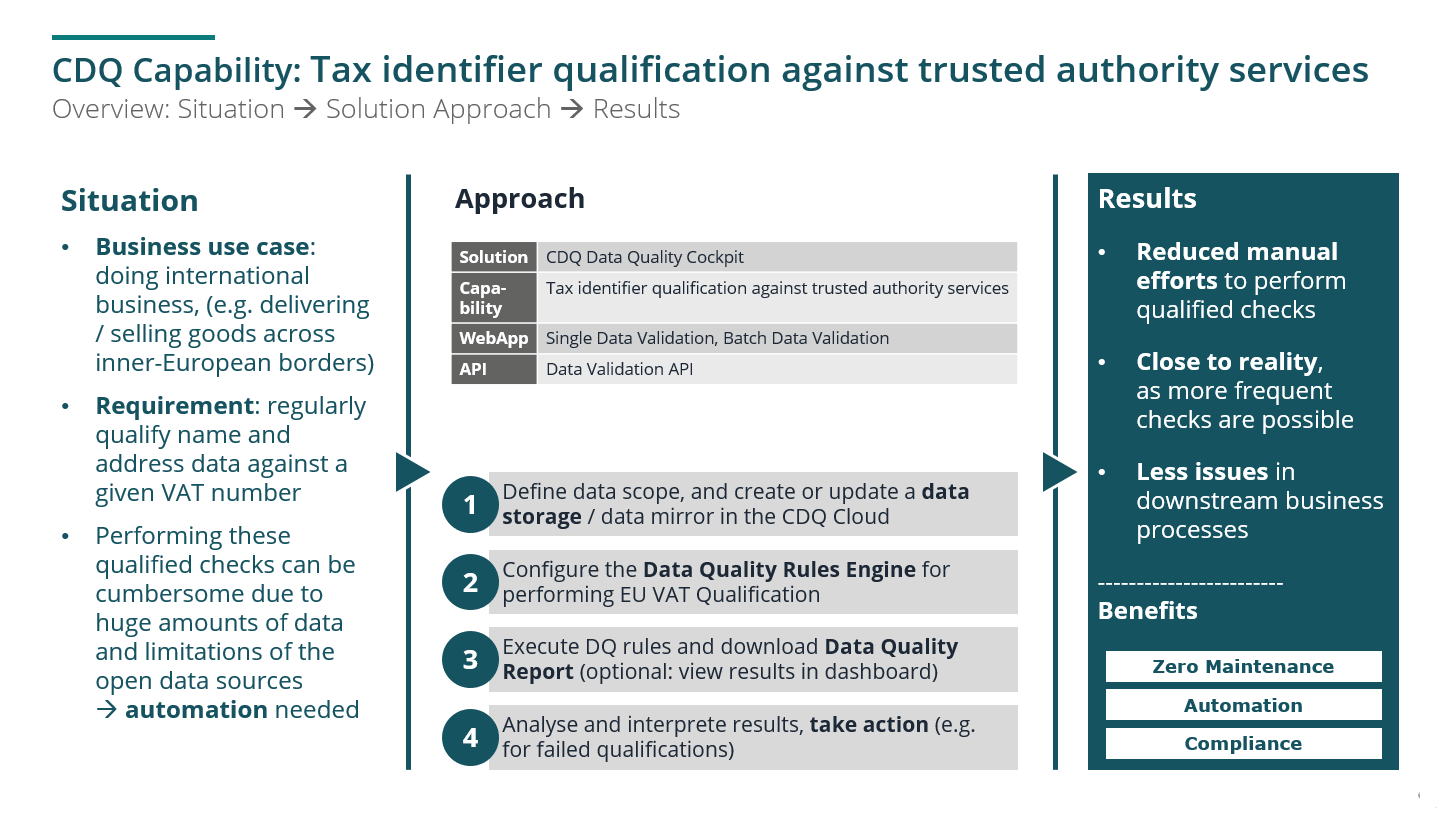
The purpose of the qualified check of EU VAT identifiers is to prove the consistency of the maintained address and name against the address and name with which the EU VAT is registered. This use case describes how to perform such a qualified validation of records to comply with EU tax compliance requirements (in German usually referred to as: "UID Bestätigungsverfahren"). The typical business use case is to qualify name and address data against a VAT number when doing intra-community business, i.e., delivering/selling goods across inner-European borders. A German company that sells and delivers goods to a French business partner has to perform a qualified check of the French business partner's VAT number.
This use case is based on the wiki use case but presents an integration approach using CDQ APIs.
 |
| Use Case: Situation, Approach and Results |
Learning Goals
 |
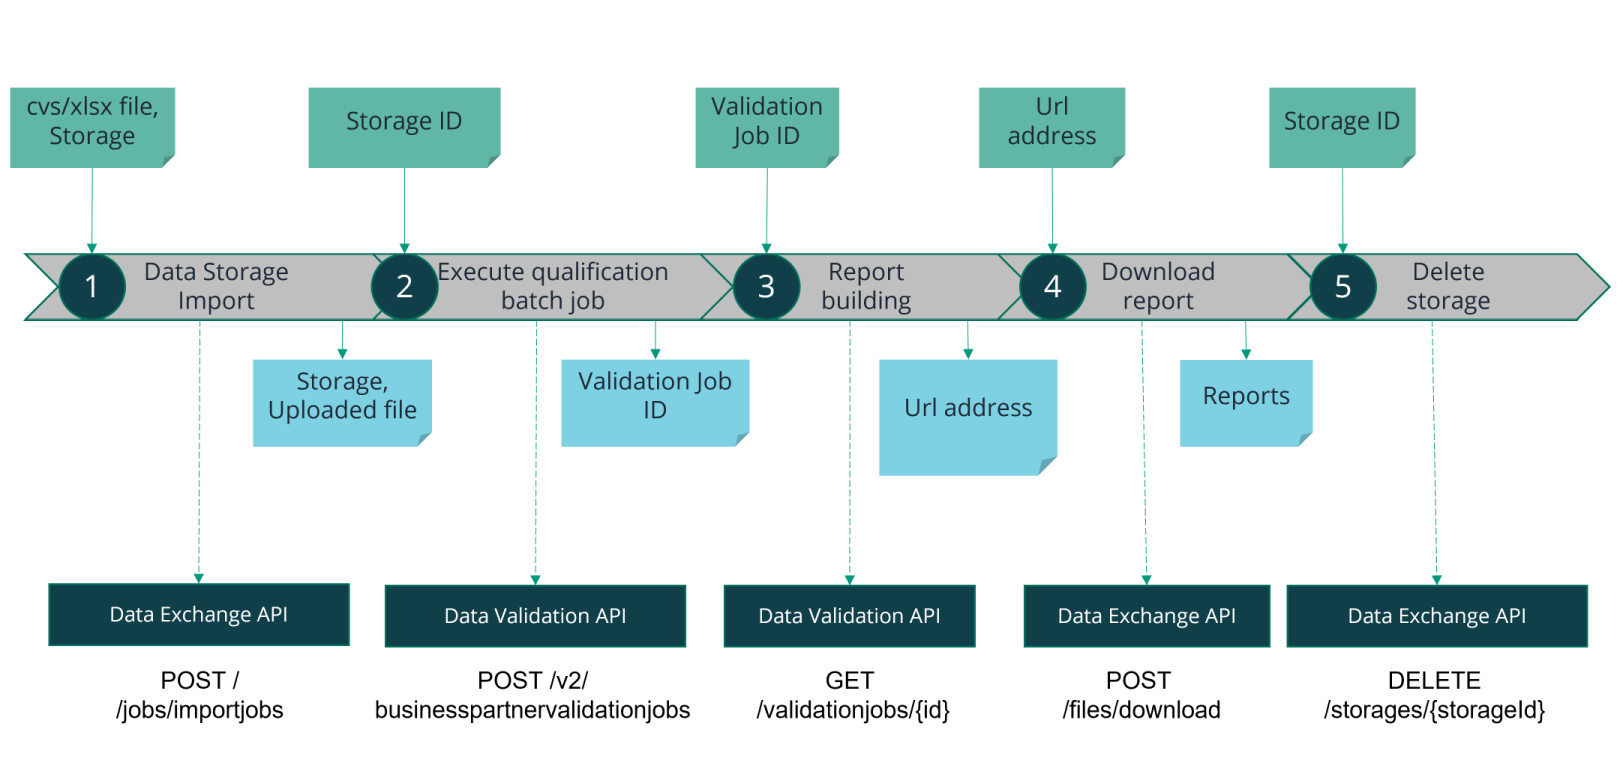
| Common Process and involved APIs/Endpoints |
In this tutorial, you will learn how:
- Create storage and upload data
- Run the validation job with Data Validation API.
- Report building
- Download report
- Delete storage
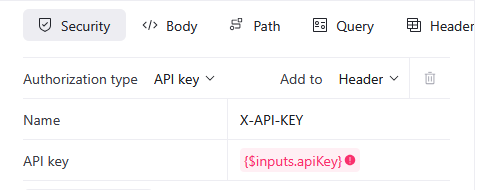
Before trying CDQ APIs, user must be authenticated:
- Paste the API Key in the console's security bar into the
X-API-KEYfield.

- After pasting the API Key, the green padlock will appear.

Green padlock doesn't mean that the API Key was pasted correctly.
- Check your API key for missing characters or extra space before trying.
- Check how to get one on authentication page.
- Follow the steps above.
Skip this step if a Data Storage was created before. You can use it multiple times for your files. Get the id of your Data Storage and go directly to the next step.
To upload desired files storage is needed! Before upload:
- Use the Create Storage endpoint to send the below request
- Select Create a storage example
- Replace the
dataStorageExampleand thedataSourceExamplewith new names
For the tutorial needs the value of dataMapperDefinitionId is set to default.
- Check the above example in the Try It Console now:
Important information:
- Your storage is created if the
status:CREATED_SUCCESSFULLYis displayed in the response body. - The
idrefers to the unique identifier of a newly created storage (for exampleid:3a10645d8be23f53a20b30bfa936e63d). - The storage is empty by default.
The Data Storage is successfully created. Use storage id in the next step.
To start the import job of a csv or xlsx file:
- Use the Start Import Job endpoint to send the below request
- Paste the existing storage
id - Select the file to upload
You can use your own file or use CDQ Sample File.
- Check the above example in the Try It Console now:
In response, you will find three important parameters:
- The value of the
idrepresentingYOUR_UPLOAD_JOB_ID- the unique number of every upload job. - The
progress:0represents the progress of the job. - The
status:SCHEDULED- the job is in the job queue.
Note down received YOUR_UPLOAD_JOB_ID for polling the job status.
To check the import job status:
- Use the Poll Import Job endpoint to send the below request
- Use the
YOUR_JOB_ID1from the previous step and replace thejobId - Check the above example in the Try It Console now:
- If the job is still running, the status with the progress will be displayed:
{
  "id" : "YOUR_UPLOAD_JOB_ID",
  "progress" : "71",
  "status" : "RUNNING"
}
The import job runtime is dependent on the size of the imported file. Poll the status regularly to find out when the import is done.
- When the job is done the
FINISHEDstatus will be displayed
{
  "id" : "YOUR_UPLOAD_JOB_ID",
  "progress" : "100",
  "status" : "FINISHED"
}
The data is fully imported to your storage now. The uploaded data can be processed now by a wide range of CDQ Solutions.
To verify exported data:
Use the Business Partner Validation Jobs endpoint
Modify request and replace the
YOUR_STORAGE_IDwith the storageidreceived from Step 1- The
EU_VAT_QUALIFICATIONis set as a profile. More profiles are described on the documentation page
- The
Check the above example in the Try It Console now:
In response, you will find three important parameters:
- The value of the
idrepresentingYOUR_VALIDATION_JOB_ID- the unique number of every upload job. - The
progress:0represents the progress of the job. - The
status:SCHEDULED- the job is in the job queue.
Save received YOUR_VALIDATION_JOB_ID for polling the job status and in the building report step.
To poll the validation job status:
- Use the Poll Validation Job endpoint to send the below request
- Use the
YOUR_VALIDATION_JOB_IDfrom the previous step and paste it into the jobidfield - Check the above example in the Try It Console now:
/>
- If the job is still running, the status with the progress will be displayed:
{
  "id" : "YOUR_VALIDATION_JOB_ID",
  "status" : "RUNNING",
  "progress" : "71"
}
The import job runtime is dependent on the size of the imported file. Poll the status regularly to find out when the import is done.
- When the job is done the
FINISHEDstatus will be displayed
{
  "id": "YOUR_VALIDATION_JOB_ID",
  "status": "FINISHED",
  "progress": "100"
}
The data is now qualified!.
To start the report building job:
- Use the Build Validation Reports endpoint
- Modify request and replace the
YOUR_VALIDATION_JOB_IDwith theidvalue received from Step 2
- The reportRequest with build parameter set to
true. The default value isfalse.
- Check the above example in the Try It Console now:
In response, you will find three important parameters:
- The value of the
idrepresentingYOUR_RAPORT_JOB_ID- the unique number of every upload job. - The
progress:0represents the progress of the job. - The
status:SCHEDULED- the job is in the job queue.
Save received YOUR_RAPORT_JOB_ID for polling the job status and in the building report step.
To poll the report job status:
- Use the Poll Validation Reports endpoint to send the below request
- Use the
YOUR_RAPORT_JOB_IDfrom the previous step and paste it into the jobidfield - Check the above example in the Try It Console now:
In response, you will find two important parameters:
- The
status:FINISHED- the job is done - The
url:job-files/YOUR_FILE_ID/Qualification+Report+Collection.zip- the link to the desired report.
{
  "id": "YOUR_RAPORT_JOB_ID",
  "status": "FINISHED",
  "attachments": [
    {
      "name": "Qualification+Report+Collection",
      "url": "YOUR_REPORT_URL"
    }
  ]
}
Save received YOUR_REPORT_URL for download. Copy entire url value.
To download the report:
- Use the Request a file download endpoint to send the below request
- Use the
YOUR_REPORT_URLfrom the previous step and paste into it theurlvalue - Check the above example in the Try It Console now:
In response, you will find download details:
{
    "url": "YOUR_REPORT_URL",
    "downloadLink": "YOUR_DOWNLOAD_LINK",
    "downloadMethod": "GET"
}
The file is waiting to be downloaded. Use the provided link and the HTTP method.
Delete the storage after you no longer need it.
- Use the Delete Storage endpoint to send the below request
- Use the existing storage
idno longer in use and replace thestorageIdin the request - Check the above example in the Try It Console now:
We are constantly working on providing an outstanding user experience with our products. Please share your opinion about this tutorial!