This tutorial explains how to synchronize business partner data with the CDQ Data Mirror using upsert and import job strategies. It covers integration options, mapping, tagging, and step-by-step instructions for uploading, updating, and deleting business partners.
Learning Goals
In this tutorial, you will learn how to:
- Choose the right integration strategy for your business needs
- Map your data to the CDQ Data Model
- Tag business partners for special processing
- Upsert business partners via API
- Import business partners using file upload
- Monitor and validate synchronization
- Delete or clear business partners and data sources
Before trying CDQ APIs, user must be authenticated:
- Paste the API Key in the console's security bar into the
X-API-KEYfield.
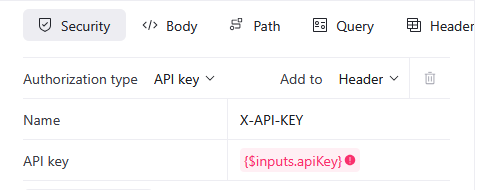
- After pasting the API Key, the green padlock will appear.

Green padlock doesn't mean that the API Key was pasted correctly.
- Check your API key for missing characters or extra space before trying.
- Check how to get one on authentication page.
- Follow the steps above.
There are a few ways to synchronize with the data mirror:
- Upsert Business Partners – endpoint
- Single BP
- BP in record
- BP in CDQ data model
- Bulk Upserts – 500 BP max
- BP in record
- BP in CDQ data model
- Single BP
- Import Job – endpoint
- Request upload – File size > 10MB
- File upload (CSV, XLSX)
- API – File size < 10MB
- APP – File size < 500MB
Depending on business requirements, the sync can be set:
- Immediately
- Each time when BP is created, updated, or deleted request is sent to CDQ.
- Single upsert – easiest and fastest option.
- Daily
- At the end of the day, collect all ERP changes and send to the data mirror:
- Bulk upsert – all business partners created/updated.
- Import job – request upload or file upload via API (recommended).
- At the end of the day, collect all ERP changes and send to the data mirror:
- On Demand
- When fast sync is not required, update the mirror from time to time:
- Manually via file upload in the APP.
- Manually via file upload or request upload – import job.
- When fast sync is not required, update the mirror from time to time:
Choosing upserts or an import job has consequences for the sync strategy. Single upserts make the connection live and results immediate (validation, sanction, augmentation). It is recommended to periodically check if all BPs are up-to-date by using an import job (UPSERT_BY_EXTERNAL_ID) or bulk upsert.
In case of an import job, you can:
- Provide just changes.
- Make a full update (
FULL_UPDATE) – slower but ensures database completeness.
- Vendor/Customer Request Initiation
- Business request to add a new BP - use Lookup to find BP in official data sources.
- Pre-Qualification & Compliance Checks
- Data Management checks the BP with CDQ services (Sanction, Fraud, Bank account validation, Email validation).
- Data Validation and Enrichment
- Validate and enrich BP data with lookup, validation, tax guard, duplicate detection.
- Internal Workflow & Risk Assessment Approval
- Procurement, Legal, and Finance approve the new BP.
- Supplier Creation in ERP
- Data Management creates a BP in ERP, triggering an upsert into the data mirror.
- Data Quality Monitoring
- Continuous monitoring using CDQ Partner Guard and Data Quality Guard.
The data mirror contains at least one data source. Each data source can have different mapping. Inside one workspace, you can map Business Partners from different systems.
You can create up to 100 data sources per data mirror.
To use CDQ services, uploaded data needs to be mapped to the CDQ Data Model. Based on knowledge of your data model, download the example mapping and adjust it with CSM support to your needs. Mapping can be uploaded via the APP or via API.
Data Mirror Management
The best way to map your data is to use dedicated app.
Go to the Data Mirror Management app and scroll down to the Mappings section.

Download Mapping Example and adjust it to your needs.

Upload your mapping:
Select Create Mapping,

Drag and drop your mapping file or select Choose file,
Name you mapping in the Mapping name field,
Save with Create mapping button,
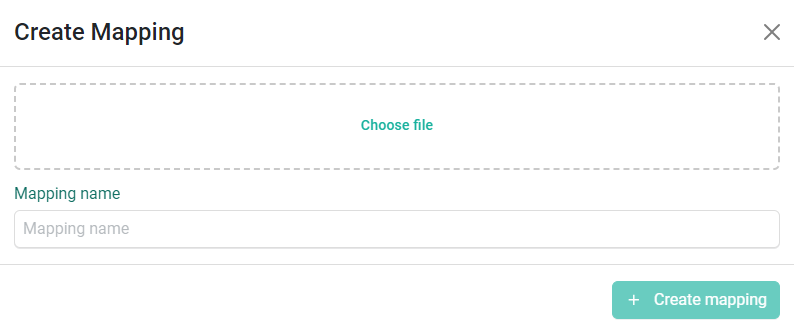
Your mapping is available on the list,

Check the details of your mapping by selecting it and clicking the Details button

Tutorial under construction.
- Create Data Source
Scroll up to the Data Mirror section
Select Create Data Source,

Name the Data Source and assign your mapping.
Save with Create Data Source button,
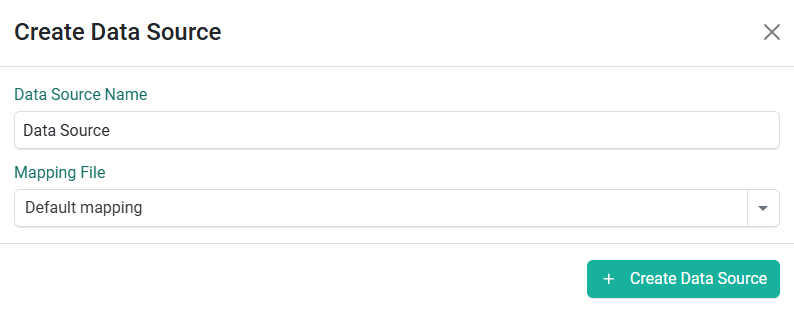
Your mapping is available on the list,
To edit existing Data Source, select it and click the Edit Data Source button

If your data source contains Business Partners and you change the assigned mapping to a different one via the APP, it will automatically start the transformation job to make sure your data in the CDQ model is up-to-date.
Transformation
If you change elements in a mapping that is already assigned to the data source to see the changes, you are required to transform the data via the Start Transformation Job endpoint. If changes were done only for some countries, it's worth adding countries in the request to make the process faster, for example:
curl -i -X POST \
  https://api.cdq.com/data-exchange/rest/jobs/transformationjobs \
  -H 'Content-Type: application/json' \
  -H 'X-API-KEY: YOUR_API_KEY_HERE' \
  -d '{
    "dataSourceId": "YOUR_DATASOURCE_ID",
    "storageId": "YOUR_STORAGE_ID",
    "featuresOn": [
      "UPSERT_CHANGES_ONLY"
    ],
    "countries": [
      {"shortName": "CH"}
    ]
  }'
API
Alternatively, you can use the API to manage your mappings:
Business Partners can have customized, defined tags adjusted to your needs. In case of adding MARKED_FOR_DELETION, which indicates that this Business Partner will be deleted from the database. Business Partners with this tag will be treated with special logic.
Tagged information will be displayed in the HCP HCO Monitoring Report.
To enable tags upserting:
Go to Data Mirror Management app.
Select Edit Data Mirror.

Select Tags managed by upsert checkbox.
Save the settings.

Tags added to example mapping:
{
  "sourceAttributes": ["Delete"],
  "targetAttributes": ["businessPartner.profile.tags[0].value"],
  "targetAttributeTypes": ["MARKED_FOR_DELETION"]
}The upsert option is helpful if you want to keep the sync very fast to get immediate results from monitoring. For both options, always provide the data source ID to ensure that Business Partners are uploaded to the correct data source.
Business Partner is provided in the record object. Thanks to mapping CDQ services, transform them to the BP data model. Upsert Business Partner endpoint:
curl -i -X PUT \
  'https://api.cdq.com/data-exchange/rest/v4/storages/YOUR_STORAGE_ID/businesspartners' \
  -H 'Content-Type: application/json' \
  -H 'X-API-KEY: YOUR_API_KEY_HERE' \
  -d '{
    "dataSource": "YOUR_DATASOURCE_ID",
    "featuresOn": [
      "UPSERT_BY_EXTERNAL_ID"
    ],
    "businessPartners": [
      {
        "externalId": "YOUR_EXTERNAL_ID",
        "disclosed": "true",
        "record": "{\"Customer number\":\"YOUR_EXTERNAL_ID\", \"Name\":\"COMPANY_NAME\", \"Country\":\"COUNTRY_CODE\", \"City\":\"CITY\", \"Street\":\"STREET\", \"Postal code\":\"POSTAL_CODE\"}"
      }
    ]
  }'
For Bulk upload you can provide up to 500 Business Partners per request
A Business Partner can already be uploaded in the form of the CDQ data model. In this case, mapping won't play a role, and the upserted Business Partner will look exactly as in the request. Remember to provide the feature UPSERT_BY_EXTERNAL_ID, which will force a check to see if a Business Partner with the same ID already exists and help avoid duplicate creation.
curl --location --request PUT 'https://api.corporate-data-league.ch/data-exchange/rest/v4/storages/YOUR_STORAGE_ID/businesspartners' \
--header 'X-API-KEY: YOUR_API_KEY_HERE' \
--header 'Content-Type: application/json' \
--data '{
    "dataSource": "YOUR_DATASOURCE_ID",
    "externalId": "1000001",
    "disclosed": "true",
    "businessPartners": [
        {
            "names": [{"type": {"technicalKey": "LOCAL"}, "value": "CDQ AG"}],
            "identifiers": [
                {"type": {"technicalKey": "CH_UID"}, "value": "CHE-218.608.886 HR/MWST"},
                {"type": {"technicalKey": "CH_VAT_ID"}, "value": "CHE218608886"}
            ],
            "addresses": [
                {
                    "country": {"shortName": "CH"},
                    "postCodes": [{"value": "9008", "type": {"technicalKey": "REGULAR"}}],
                    "localities": [{"value": "St. Gallen", "type": {"technicalKey": "CITY"}}],
                    "thoroughfares": [{"value": "Lukasstrasse 4", "type": {"technicalKey": "STREET"}}],
                    "types": [{"technicalKey": "LOCAL"}]
                }
            ]
        }
    ],
    "featuresOn": ["UPSERT_BY_EXTERNAL_ID"]
}'The second option to send your business partners to the mirror is the import job, which can be done via API and app. It's possible to upload in a few ways, thanks to special featuresOn:
FULL_UPDATE- Forces the job to delete existing records that are not included in the import file. Records to be updated or deleted are identified by external IDs, i.e., not by the internal database IDs. To confirm this understanding, theUPSERT_BY_EXTERNAL_IDfeature must also be activated. When aFULL_UPDATEimport job is completed, new records from the import file are created, existing ones are updated by keeping their internal database IDs and their external IDs, and records that are not provided by the file are deleted. If this feature is selected, the dataSource and theUPSERT_BY_EXTERNAL_IDfeature are mandatory. Whenever import errors occur, this action is not executed.UPSERT_BY_EXTERNAL_ID- Updates Business Partners identified by external ID instead of an insert if the external ID is already present in this storage. If this feature is selected, dataSource and externalIdColumn are mandatory. When selected, the ID must not be provided in a Business Partner.
When FULL_UPDATE is used, it's not required to integrate endpoints to delete BPs. In this case, it's also important to use the UPSERT_BY_EXTERNAL_ID feature to avoid the creation of a new record, because it will cause usage of quota for new linkage, augmentation, validation, etc.
In case your file is bigger than 10 MB, uploading Business Partners requires three steps:
- URL creation
- Upload file
- Upload BP from the URL
URL creation
Via the endpoint Request File Upload, it's possible to create a file name that will be uploaded to customer-uploads/ directory.
Maximum allowed file size is 5GB.
curl -i -X POST \
  https://api.cdq.com/data-exchange/rest/files/upload \
  -H 'Content-Type: application/json' \
  -H 'X-API-KEY: YOUR_API_KEY_HERE' \
  -d '{
    "url": "file_with_bps.csv"
  }'
In the response, you will receive four elements:
uploadLink- use this link to create a new requestuploadMethod- use it to create a new requestexpiresAt- the date when the link will expireurl- will be needed for the last step - Upload BPs from the URL
Upload file
To upload the file:
- Use data response of the previous request to create a new request:
- Choose the upload method based on the response from the previous step -
uploadMethod - Provide a link for creating a request from the previous step -
uploadLink
- Choose the upload method based on the response from the previous step -
- Set the body of the request to Binary File
- Select the file from your computer
- Send the request
Upload BPs from the URL
The file is uploaded to a special URL, so now Business Partner from this file must be sent to your mirror. Use the created URL in the first step and upload data thanks to the Start Import Job endpoint.
curl -i -X POST \
  https://api.cdq.com/data-exchange/rest/jobs/importjobs \
  -H 'Content-Type: multipart/form-data' \
  -H 'X-API-KEY: YOUR_API_KEY_HERE' \
  -F url=URL_FROM_FIRST_STEP \
  -F storageId=YOUR_STORAGE_ID \
  -F dataSource=YOUR_DATASOURCE_ID \
  -F externalIdColumn=BP_EXTERNAL_ID \
  -F dataMapperDefinitionId=YOUR_MAPPING_ID \
  -F featuresOn=UPSERT_BY_EXTERNAL_ID
The status of the job can be checked by the Poll Import Job endpoint. Get the jobId provided in the response from Start Import Job endpoint and add it as a request parameter:
curl -i -X GET \
  'https://api.cdq.com/data-exchange/rest/jobs/importjobs/{jobId}' \
-H 'X-API-KEY: YOUR_API_KEY_HERE'When your file is smaller than 10 mb, you can upload your file just with the Start Import Job endpoint.
curl -i -X POST \
  https://api.cdq.com/data-exchange/rest/jobs/importjobs \
  -H 'Content-Type: multipart/form-data' \
  -H 'X-API-KEY: YOUR_API_KEY_HERE' \
  -F file=CH-import.csv \

  -F storageId=YOUR_STORAGE_ID \
  -F dataSource=YOUR_DATASOURCE_ID \
  -F externalIdColumn=BP_EXTERNAL_ID \
  -F dataMapperDefinitionId=YOUR_MAPPING_ID \
  -F featuresOn=UPSERT_BY_EXTERNAL_ID
Status of the job can be checked by the Poll Import Job endpoint.
curl -i -X GET \
  'https://api.cdq.com/data-exchange/rest/jobs/importjobs/{jobId}' \
-H 'X-API-KEY: YOUR_API_KEY_HERE'You can use the Data Mirror Management for file uploads.
Open Data Mirror Management app.
Select data source and Import Data.

Choose file or drag&drop it,
Select your update type
- Full Update - for complete update with all existing data replaced
- Update and Insert - for adding new data and updating existing records
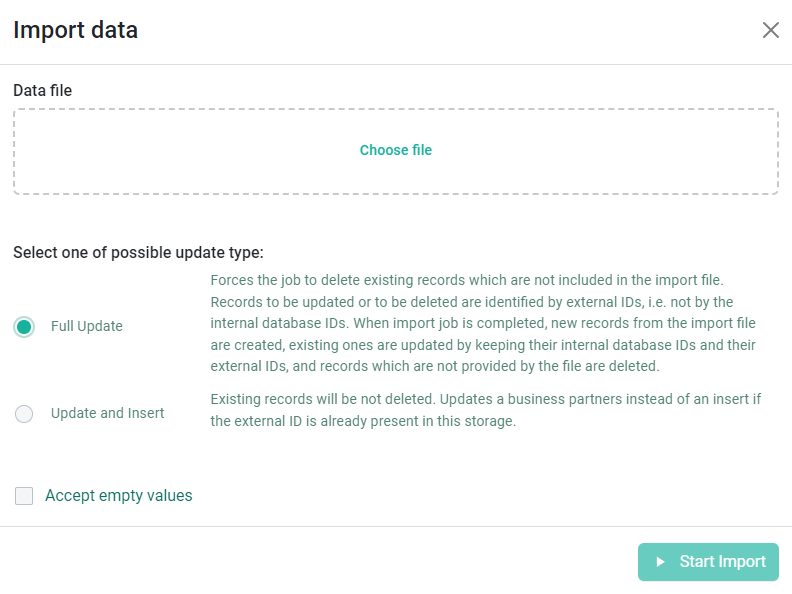
- Select Start Import.
- Monitor job status.
| Status | Description |
|---|---|
 | Import in progress |
 | Completed Import |
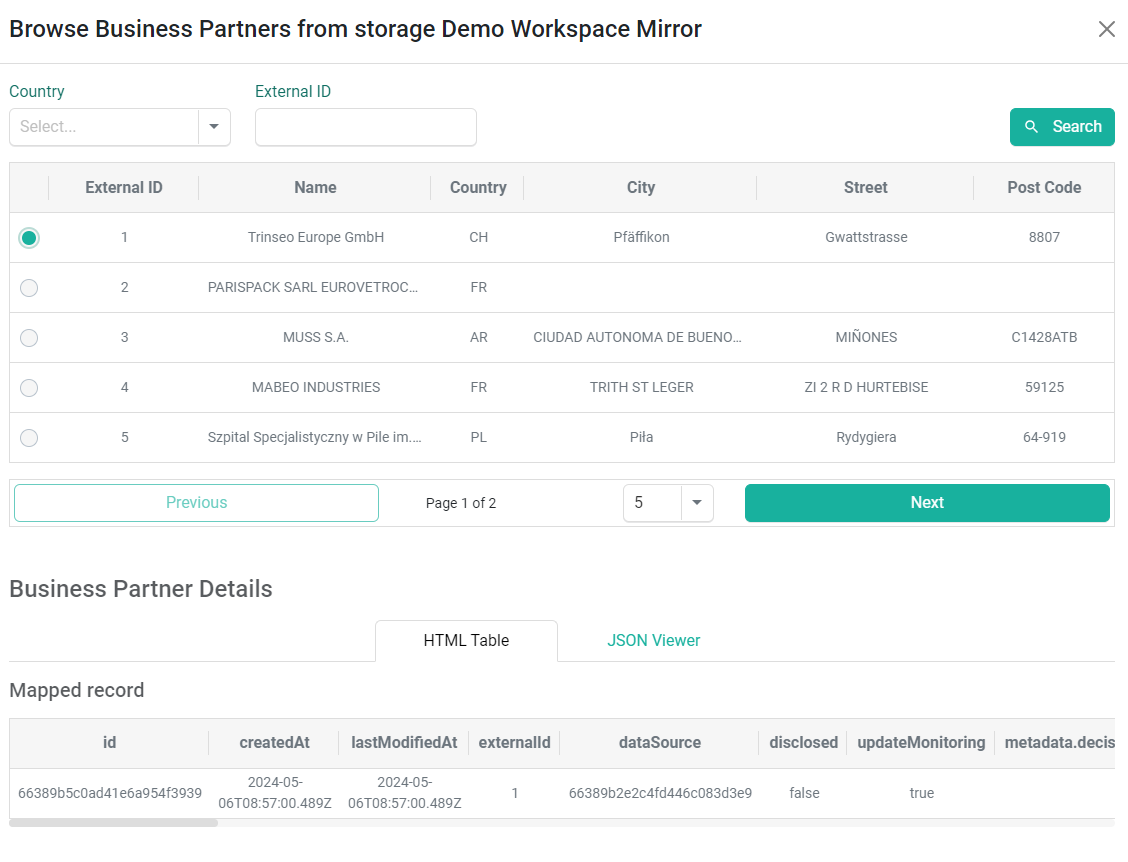
- Validate results via Browse button:
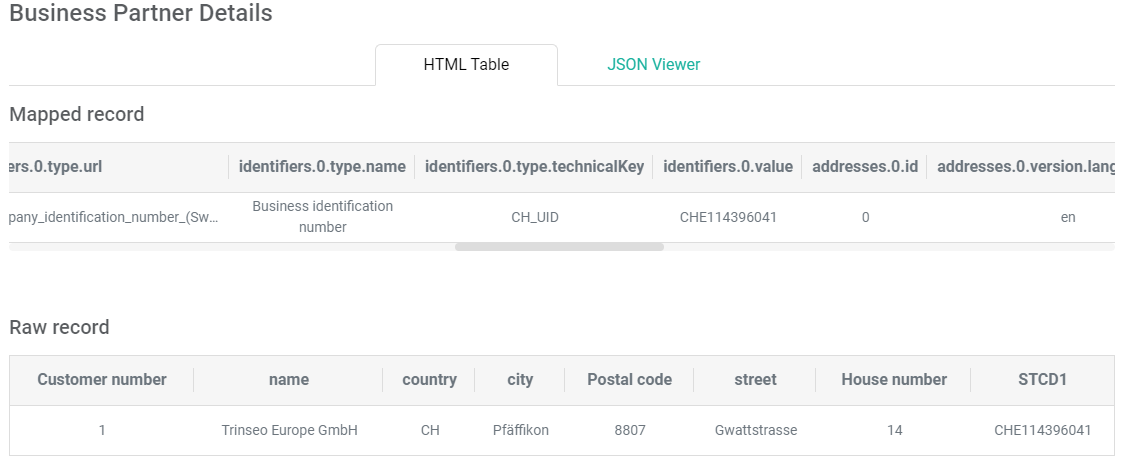
Results can be filtered by Country or External ID. Select a Business Partner and scroll down to check details:

Compare your mapped record with the raw record to see if the mapping was correctly created and if the required data is reflected in the CDQ model.
Business Partner can also be checked via API with endpoints:
List Business Partners
curl --location --globoff 'https://api.cdq.com/data-exchange/rest/v4/storages/YOUR_STORAGE_ID/businesspartners?dataSource=YOUR_DATASOURCE_ID' \
  --header 'X-API-KEY: YOUR_API_KEY_HERE'
Fetch Business Partner
curl -i -X POST \
  'https://api.cdq.com/data-exchange/rest/v4/storages/YOUR_STORAGE_ID/businesspartners/fetch' \
  -H 'Content-Type: application/json' \
  -H 'X-API-KEY: YOUR_API_KEY_HERE' \
  -d '{
    "externalId": "YOUR_BP_EXTERNAL_ID",
    "dataSource": "YOUR_DATASOURCE_ID"
}'Depending on the type of sync, Business Partners can be removed thanks to an import job with featuresOn: FULL_UPDATE or on demand with special endpoints presented below:
Using upserts to sync data mirrors requires the integration of an additional endpoint, "Delete Business Partners," to remove Business Partners deleted from the ERP system. Similar to upserts, it's possible to immediately sync and remove a single Business Partner or do it daily/temporarily with bulk deletion (up to 1000 Business Partners per request). This request can also be used in case of other types of sync.
curl -i -X POST \
  https://api.cdq.com/data-exchange/rest/storages/YOUR_STORAGE_ID/businesspartners/delete \
  -H 'Content-Type: application/json' \
  -H 'X-API-KEY: YOUR_API_KEY_HERE' \
  -d '{
    "dataSource": "YOUR_DATASOURCE_ID",
    "businessPartners": [
      {
        "externalId": "BP_EXTERNAL_ID"
      }
    ],
    "featuresOn": [
      "DELETE_BY_EXTERNAL_ID"
    ]
}'To get rid of all Business Partners from all data sources and completely clear the full data mirror, you can use the Clear Storage endpoint:
curl -i -X POST \
  https://api.cdq.com/data-exchange/rest/storages/YOUR_STORAGE_ID/clear \
  -H 'X-API-KEY: YOUR_API_KEY_HERE'
It is not recommended to clear storage before running an import job or a full sync, since it may impact quotas.
To remove all Business Partners from single, chosen data source, you can use the Clear Data Source endpoint:
curl -i -X POST \
  'https://api.cdq.com/data-exchange/rest/storages/YOUR_STORAGE_ID/datasources/YOUR_DATASOURCE_ID/clear' \
-H 'X-API-KEY: YOUR_API_KEY_HERE'To delete the whole data source you need the Delete Data Source endpoint.
curl -i -X DELETE \
  'https://api.cdq.com/data-exchange/rest/storages/YOUR_STORAGE_ID/datasources/YOUR_DATASOURCE_ID' \
-H 'X-API-KEY: YOUR_API_KEY_HERE'We are constantly working on providing an outstanding user experience with our products. Please share your opinion about this tutorial!