CDQ AML Guard is an advanced compliance solution designed to help you manage and monitor your business partners effectively. By utilizing Master Data, CDQ AML Guard extracts business partner names and other relevant data from your address changes, ensuring that your organization complies with the latest regulations.
One of the core features of AML Guard is its robust screening functionality, which allows you to configure and customize the screening process based on your organization's specific needs. This tutorial will guide you through the steps to set up a Screening Configuration, enabling you to choose which Sanction Lists, Watchlists, and Politically Exposed Persons (PEP) checks are performed upon master data changes.
Before screening, you need to set your environment for your compliance checks.
Learning Goals
In this tutorial, the user will be focused on:
- Setting up your Users: Understanding User Groups and Workflow in AML Guard
- Selecting Sanction and Watchlists
- Configuring PEP Checks
- Setting the confidence level for compliance checks
- Activating the Configuration
By the end of this tutorial, you will have a customized screening configuration tailored to your organization's risk management and compliance requirements.
In CDQ AML Guard, we have two distinct user groups designed to manage and utilize screening functionalities effectively:
"Sanction List App" Group:
- Role: Users in this group can perform screenings but cannot modify screening configurations.
- Access: They can initiate screenings, view results, and make decisions based on the incoming screening results.
- Decision-Making: Users take necessary actions based on the screening outcomes, such as flagging high-risk partners, escalating potential issues, or clearing partners that pass the screening criteria. They can escalate decisions to the Sanction List Manager group for a four-eye principal review.
"Sanction List Manager" Group:
- Role: Users in this group have administrative privileges to set up and manage screening configurations.
- Access: They can create, modify, and update screening configurations that define which sanction lists, watchlists, and PEP checks are utilized. They also act as an escalation point for decision-making, ensuring a four-eye principal for critical decisions.
- Maintenance: Managers regularly update configurations to reflect changes in regulations and business requirements.
- Escalation Point: Managers act as the escalation point for decisions requiring a four-eye principal, ensuring thorough and compliant decision-making processes.
The first thing needed to do is to set up a user with administrative rights that can adjust the AML Configuration to the organizations needs. The organization needs at least one user that has the Sanction List Manager role, and should have at least one or more users inside the CDQ-cloud-environment with the Sanction List App role.
It is not recommended to do the operational daily work with a user that has the Sanction List Manager role.
The following steps are needed to set up a user:
- Go to the User Management in CDQ Cloud Apps.
- Find the user you want to assign to the
Sanction List Managerrole and click on the Edit button.

- Assign the
Fraud App Managerrole to the user and click on the Save Changes button.
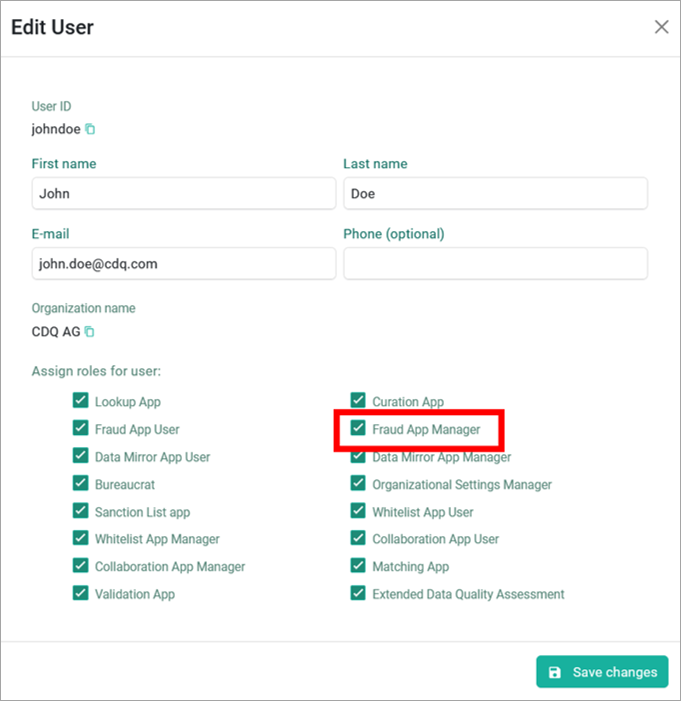
The Manager is responsible for setting up the rules for the screening and can perform all tasks of the Sanction List App user.
Define the content of the screening process. What compliance regulations is the organization entitled to comply with? This is highly dependent on location and its legal requirements, the location of the customer, the kind of services or goods the organization is offering, and many other factors.
To set up the conguration, follow these steps:
- Go to the Sanction and Watchlist configurator in CDQ Cloud Apps.
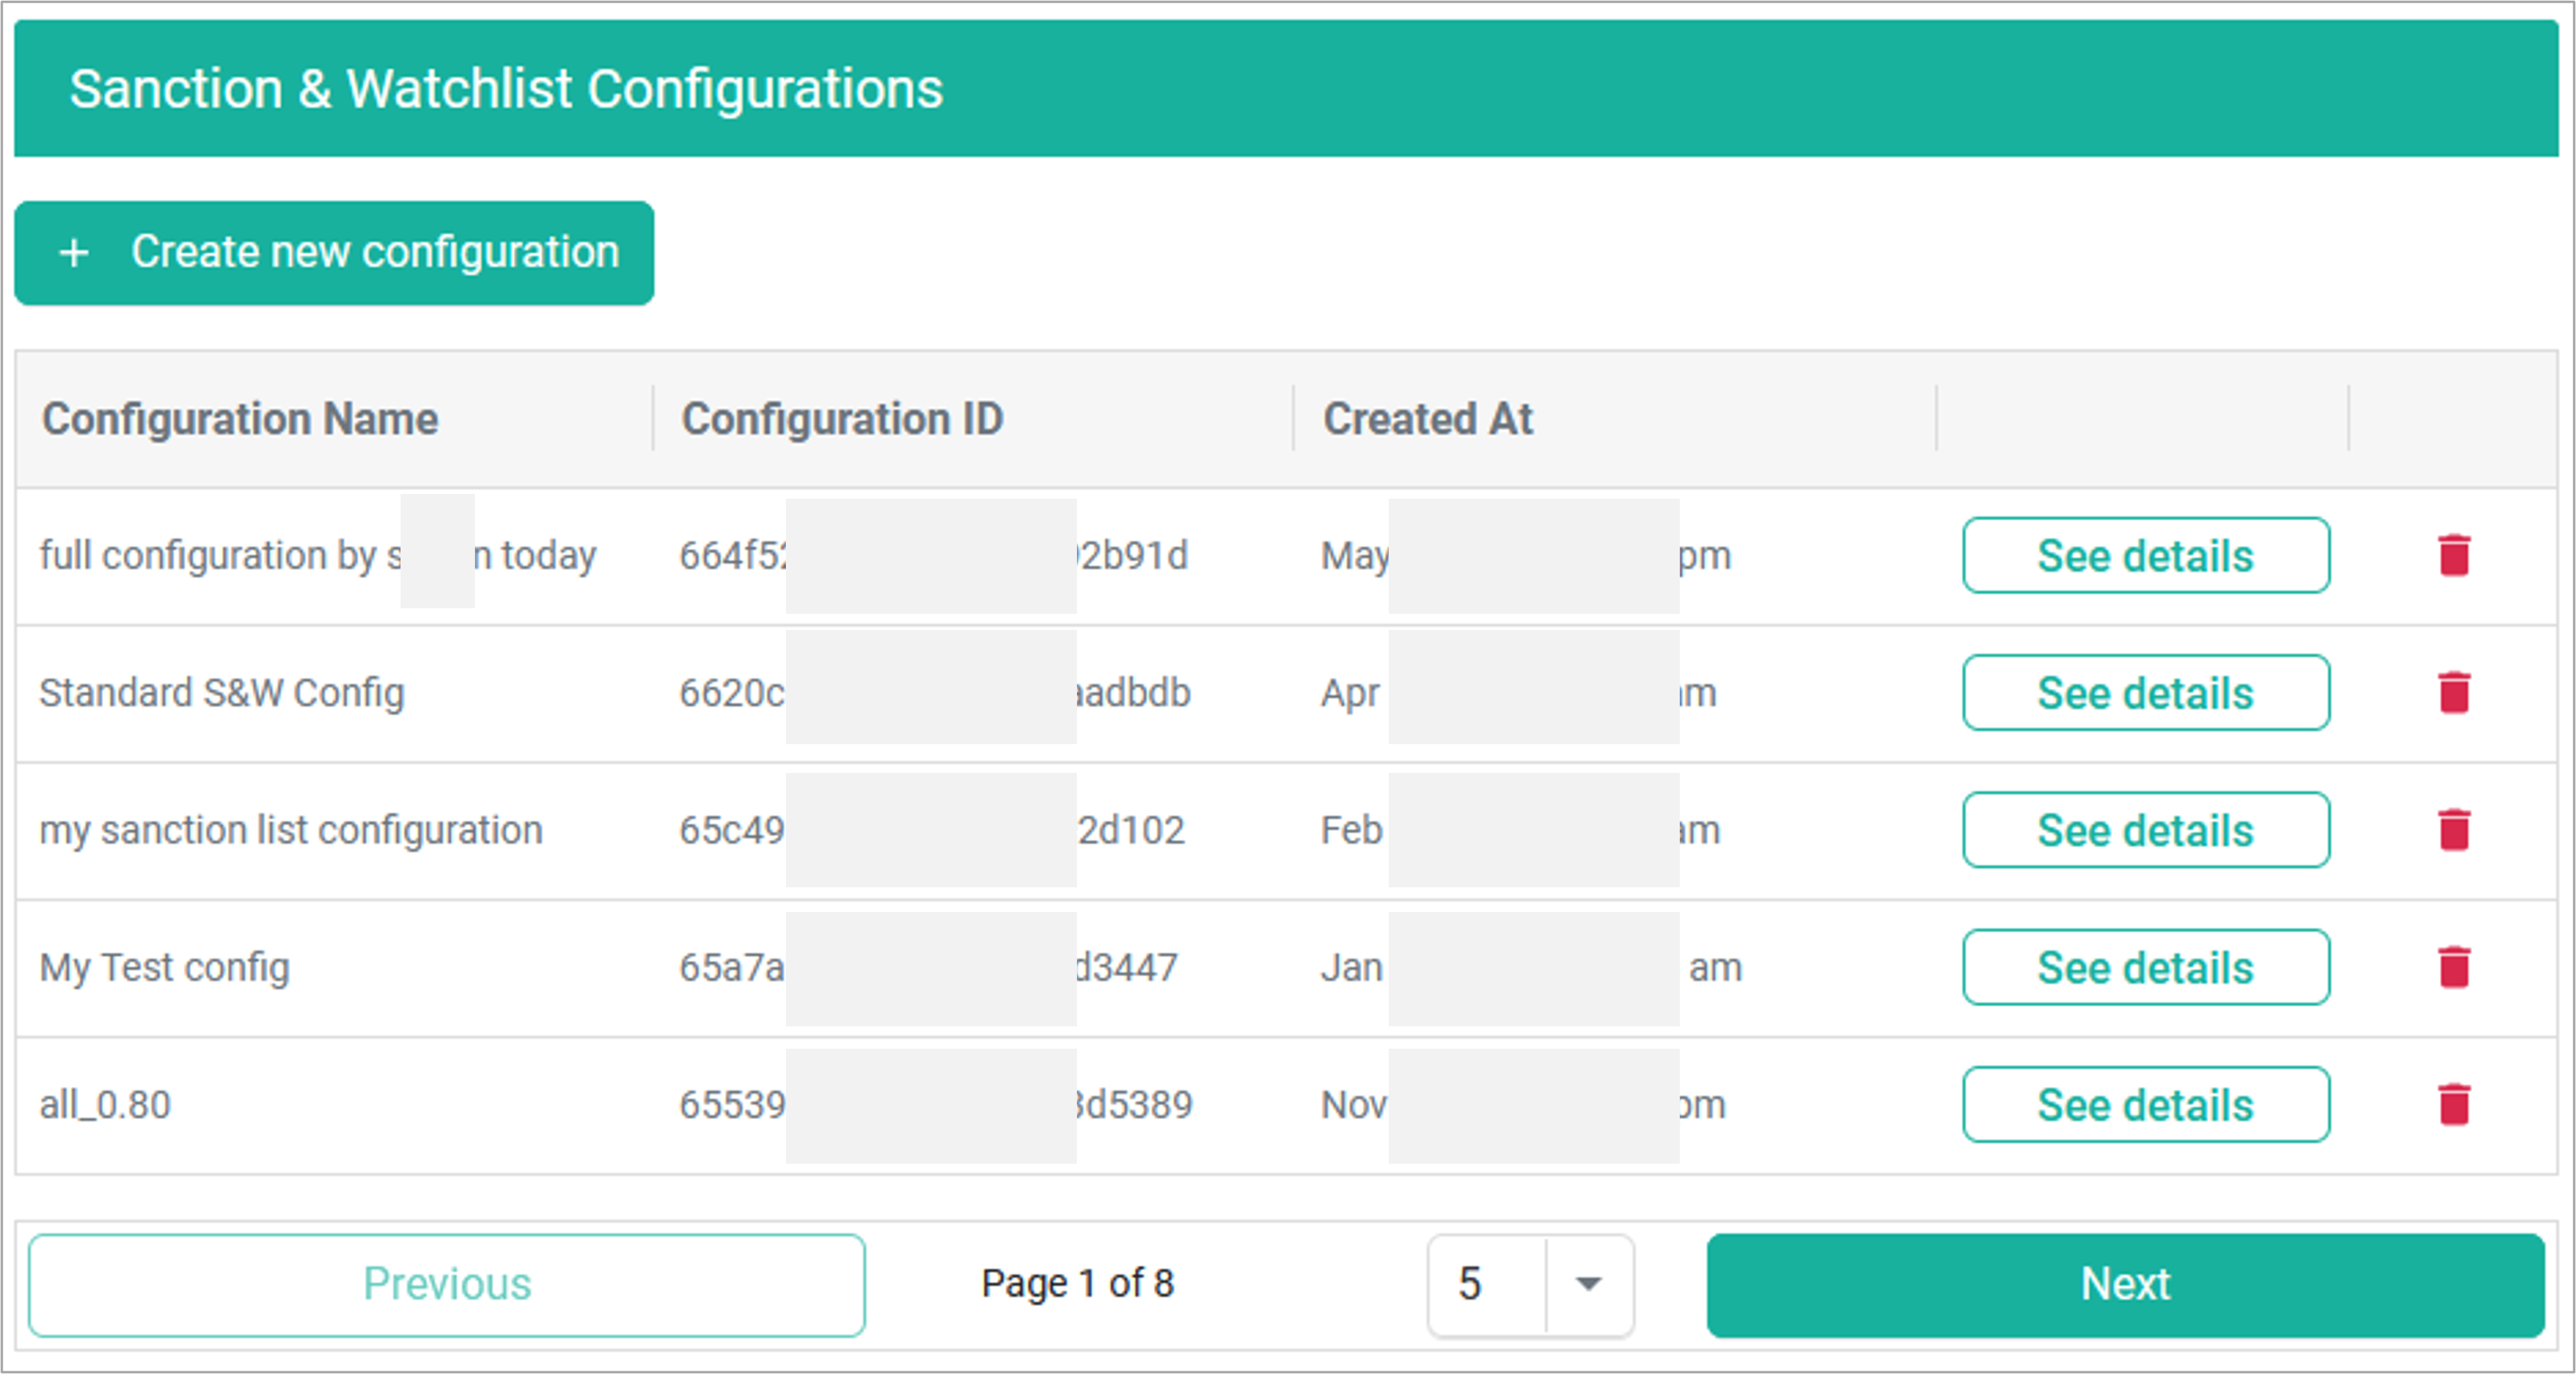
Select the existing configuration or create a new one by clicking on the Create new configuration button.
Click the See details button to adjust the configuration.
The matching threshold, also called confidence-level, in AML-Screening app is a critical parameter that filters screening results based on a confidence level. This setting determines the balance between identifying sanctioned parties and minimizing false positives.
- In the details view, adjust the
Matching thresholdby typing the desired number.

Organization's compliance department may also have the requirement to perform different levels of screening based on the type of Business Partner or its location. Please refer to Implementing a risk-based approach chapter for further details.
A lower matching threshold leads to more results. It increases the likelihood of identifying more sanctioned parties and PEPs. However, this comes with the downside of generating a higher number of false positives, which in turn increases the workload required to resolve these alerts. Conversely, a higher matching threshold reduces the number of false positives, thereby lowering the workload for resolving them, but it may also result in missing some sanctioned parties as fewer matches will be identified.
Setting the matching threshold involves finding a balance between security (catching more sanctioned parties) and operational efficiency (reducing false positives). We recommend setting the matching threshold to at least 75-80%. This level provides a good balance, ensuring a reasonable number of genuine matches while keeping the false positives manageable. A 75-80% threshold offers a solid middle ground, capturing most sanctioned parties without overwhelming you with false alerts.
Choosing the right matching threshold is essential for effective AML screening. By setting it at 75-80%, you can maintain robust security measures while managing the workload of resolving false positives. Adjust as needed based on your specific risk tolerance and operational capacity. For further assistance, please refer to the user manual or contact support. You may have to adjust this setting at a later stage when your data hits operational business. Ask your CDQ-contact to assist you on the finetuning.
After you have defined the setup of what shall be screened, please save your configuration in order to finalize the choice of lists, the PEPs and the confidence level.
CDQ has put a high effort to setting up templates for the most important lists. These can be accessed by picking one of the options from the Configuration Profile dropdown. You may take these preselections as base for later refinement.
In cases of doubt, please check with the compliance department instead of switching on every list.
- In the details view, select the
Configuration profilefrom the dropdown menu.
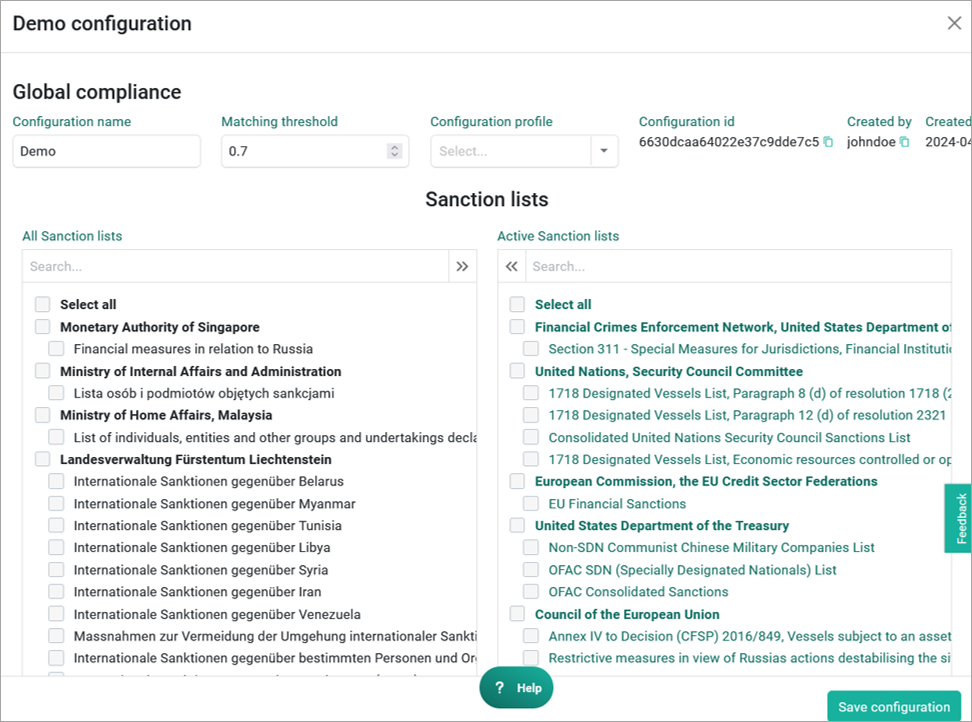
Configuration profiles with the preselected lists:
| Configuration Profile | Description |
|---|---|
QUICK | For a quick check against the most relevant sanction and watchlists. |
STANDARD | The standard set of lists against which most of our customers perform their screening. |
PEP | Only activates the identification of politically exposed persons without considering any sanction or watchlist. |
FULL | Activates all available sanctions and watchlists, including the identification of politically exposed persons. |
Please note that these preselections within profiles are only recommendations and that CDQ takes no obligation on the right choice for the organization's implementation scenario.
- Adjust the list selections for screening by using arrows to move lists from the one side to the another of the screen.
{ % admonition type="info" %} Commented out. { % /admonition %}
PEP lists are not issued by official authorities. They contain political exposed persons from various countries. In the Configurator, you can select or deselect these countries.
Check all countries or check no countries at all depending on whether AML-obligations require checking PEP or not.
- In the details view, scroll down to the PEP section.
- Select or deselect the countries you want to check for PEPs.
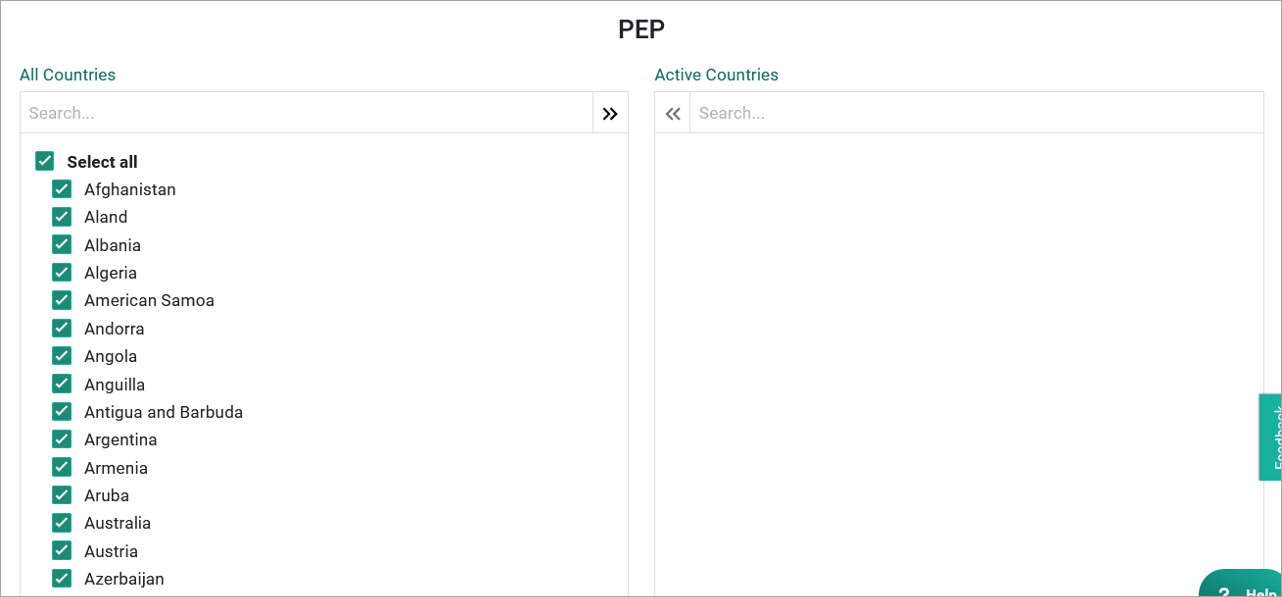
When all settings are done, please save the configuration by clicking the Save configuration button.
Once the sanction lists, watchlists, PEP countries, and the confidence level for the screening are configured, all these settings are stored within a Compliance Configuration. Users have the flexibility to create as many configurations as needed to meet various compliance requirements.
In the next step, it is essential to assign each of these configurations to an API Key. This ensures that the specific Compliance Configuration is linked to the appropriate API-Key for operational use.
- Go to the API Key Management in your CDQ Cloud Apps.
- Select the existing API Key or create a new one and click on the See Details button.
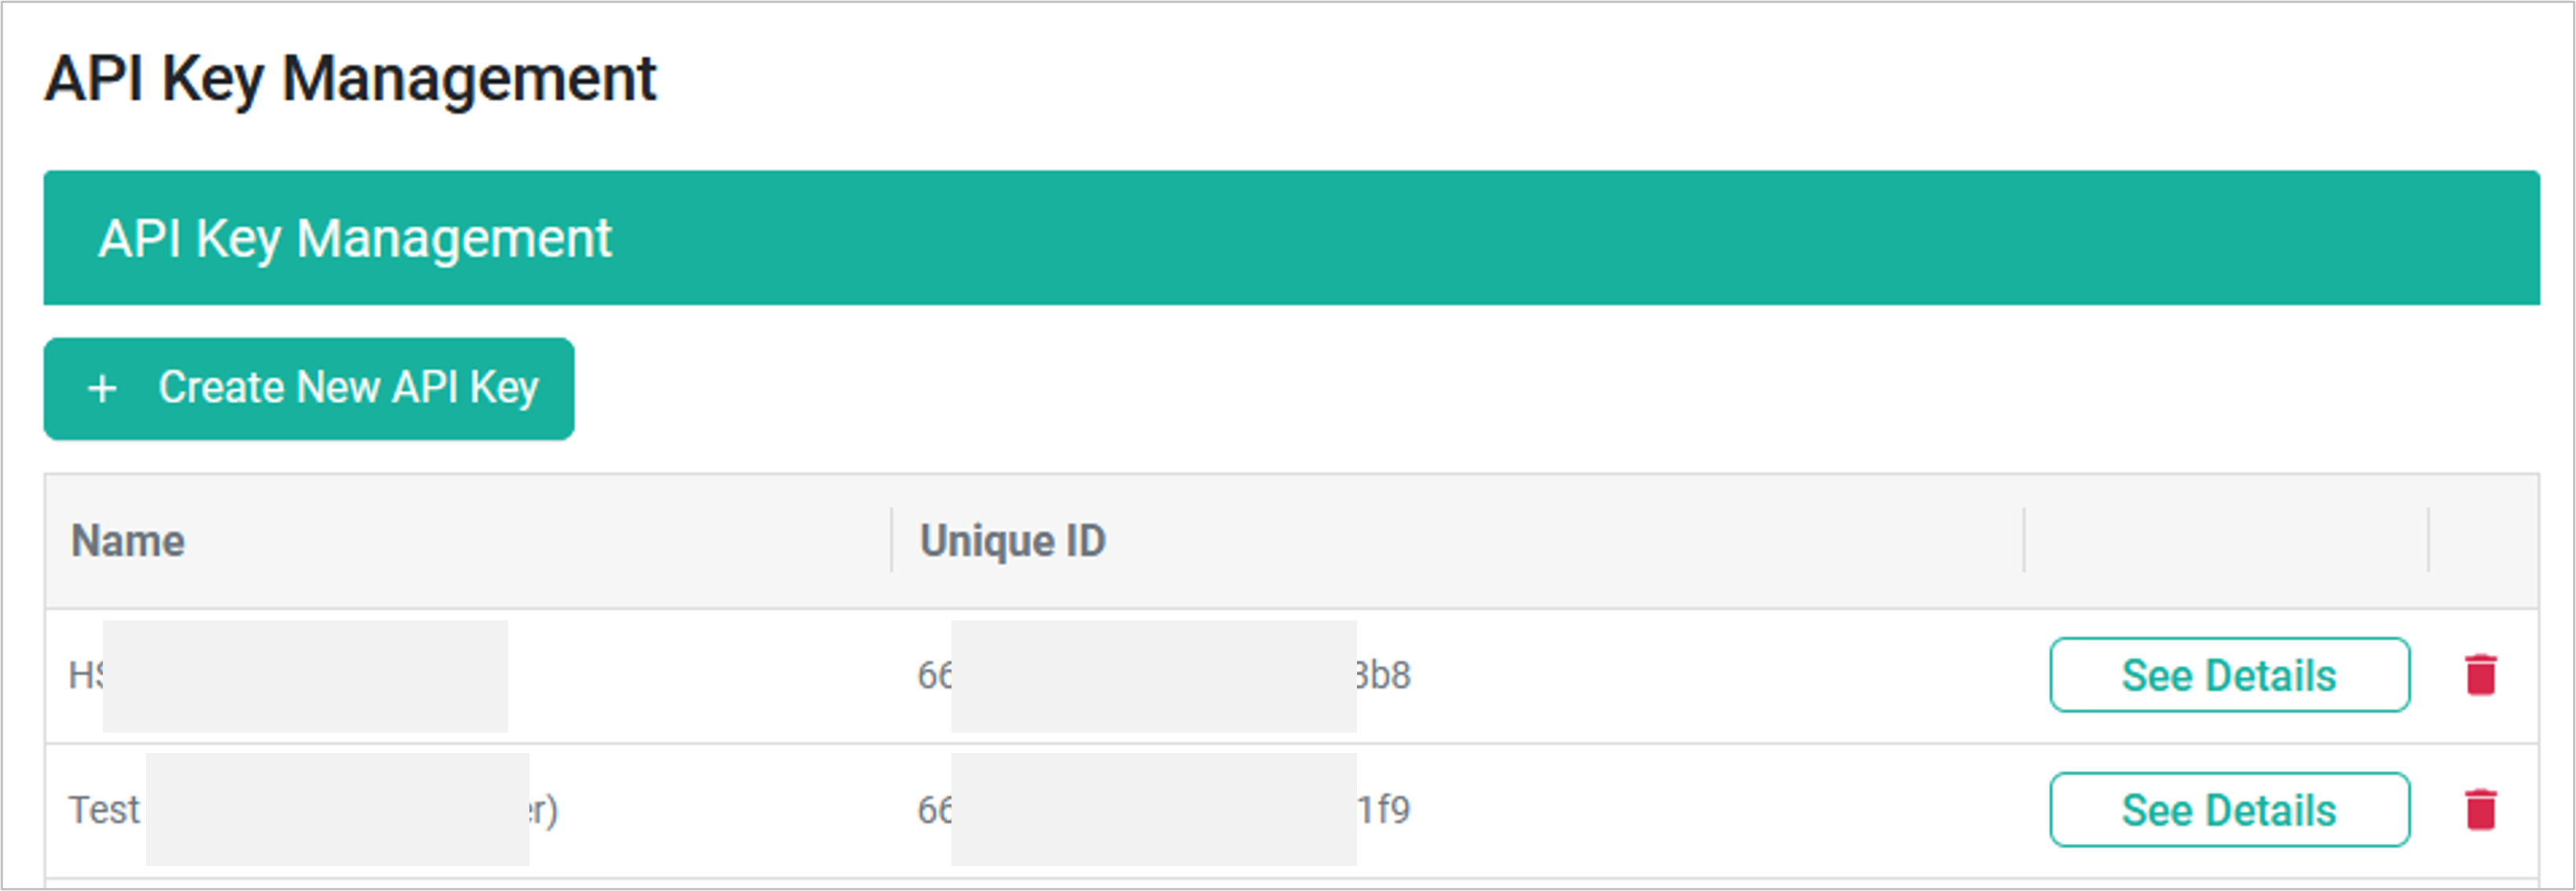
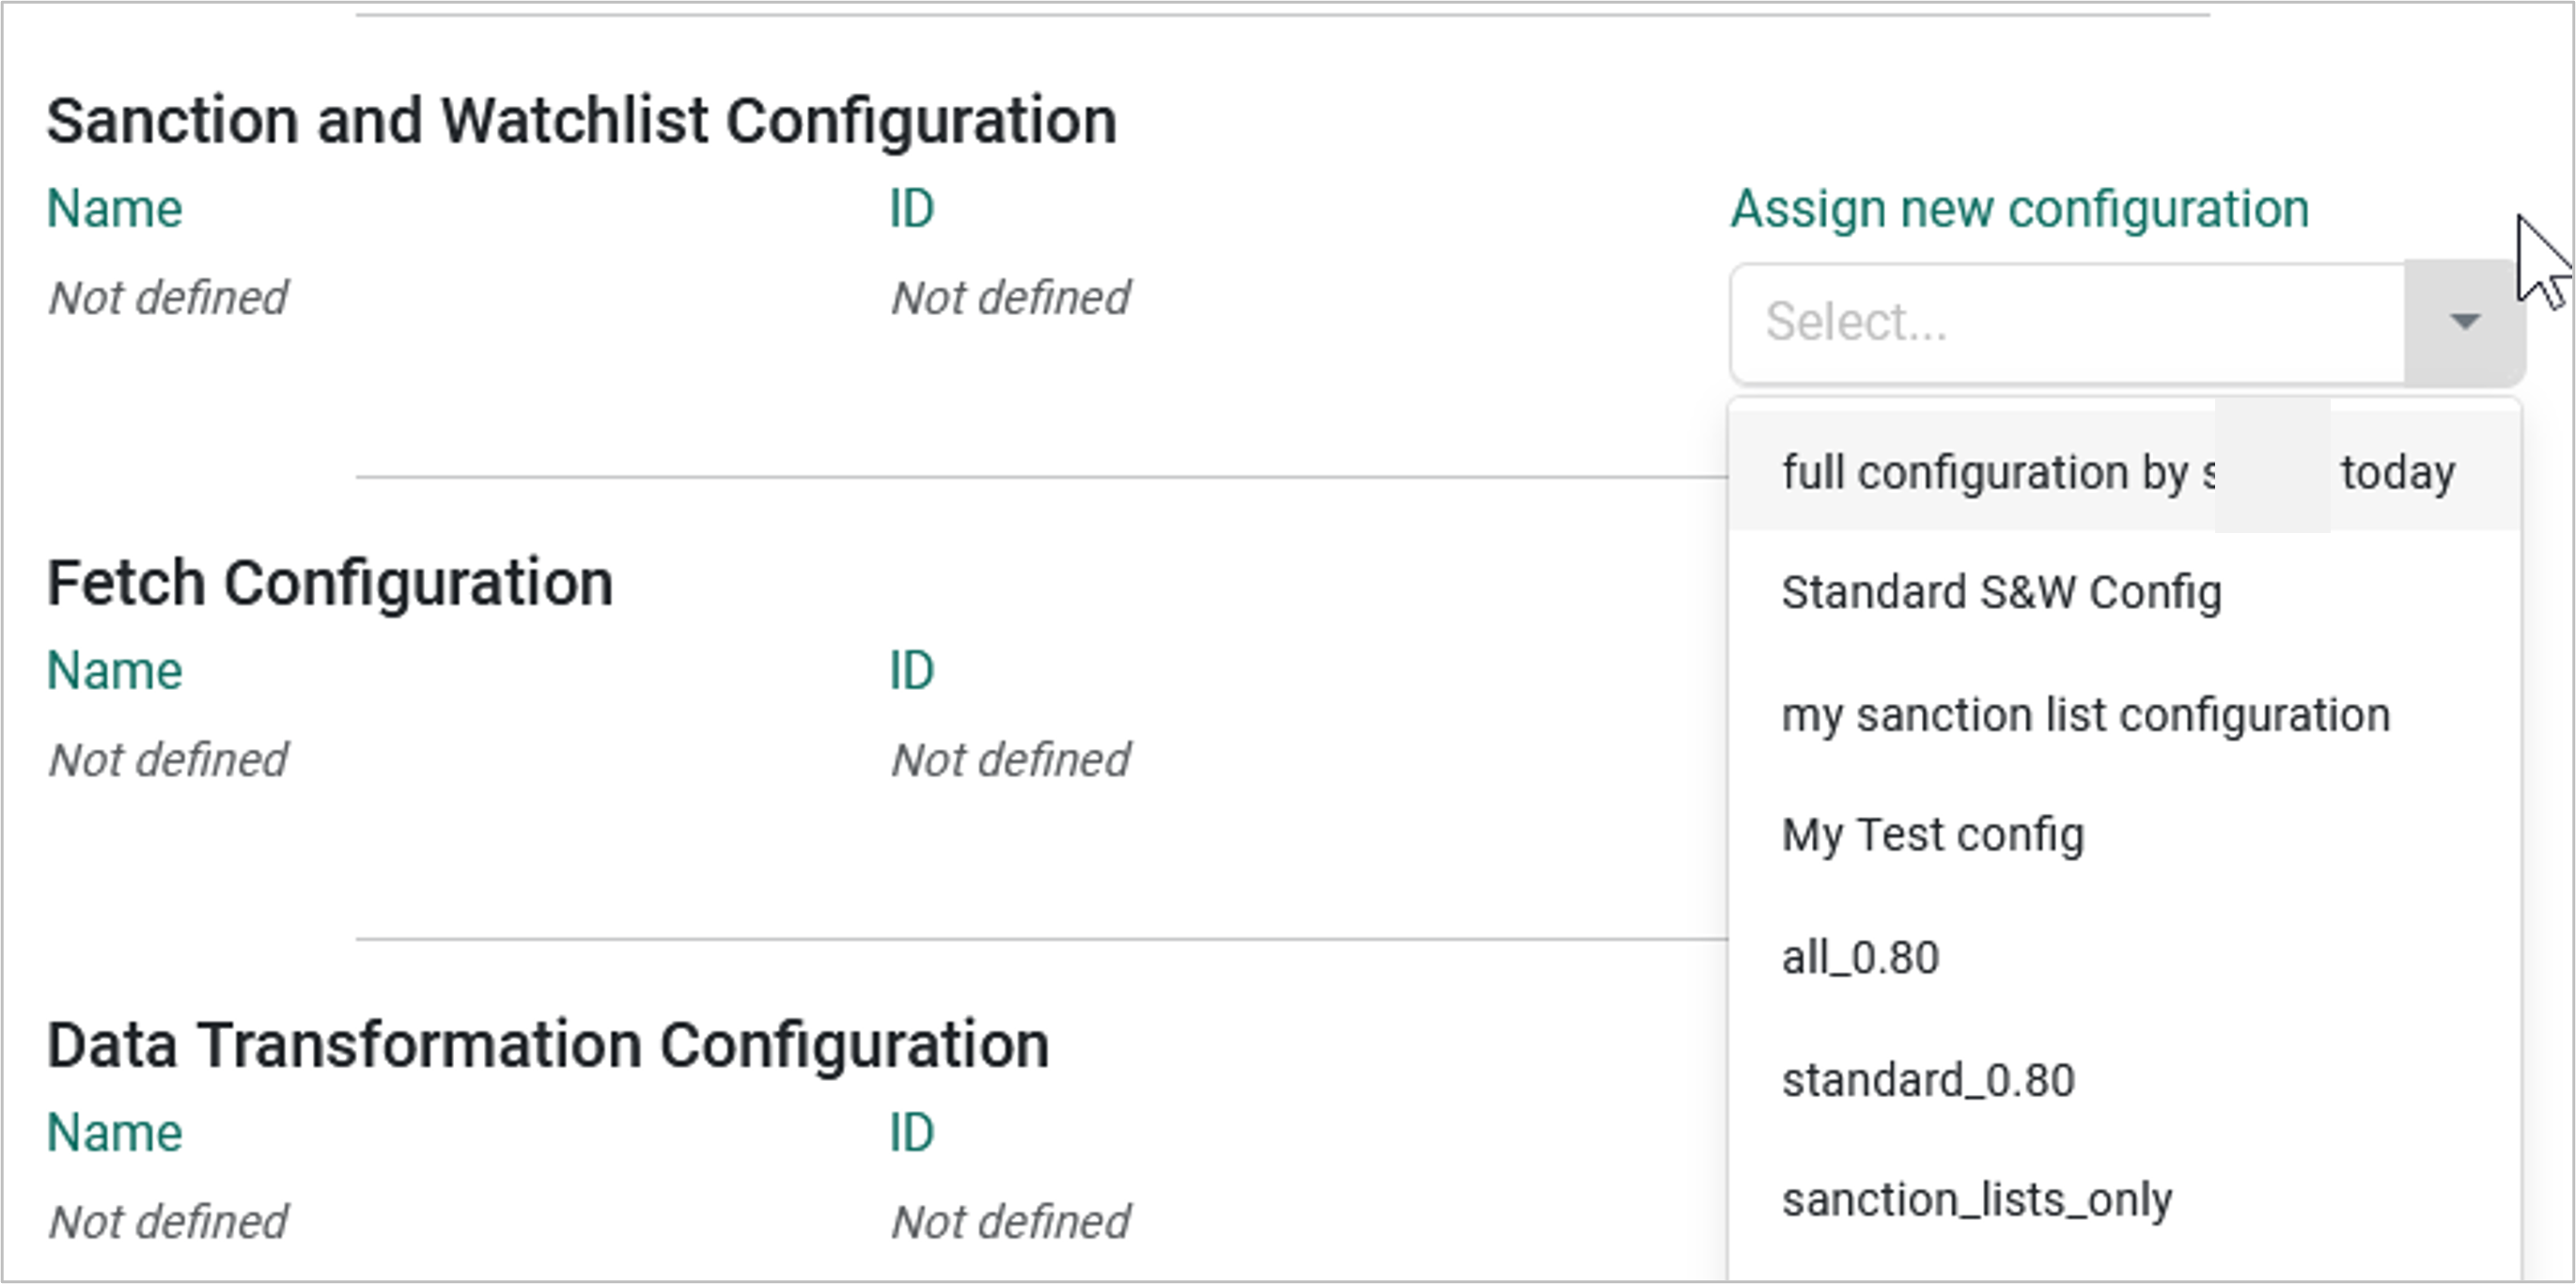
- In the details view, scroll down to the Sanction and Watchlist Configuration and select the prepared configuration from Assign new configuration's dropdown list.
- Click on the Save changes button.
This process allows you to manage and organize multiple Compliance Configurations efficiently, tailoring them to different API Keys as per your organizational needs. By correctly assigning configurations to API Keys, you ensure that each API performs screenings according to the defined compliance parameters, maintaining consistency and accuracy in your compliance operations. For further assistance or detailed instructions, please refer to the user manual or contact support.
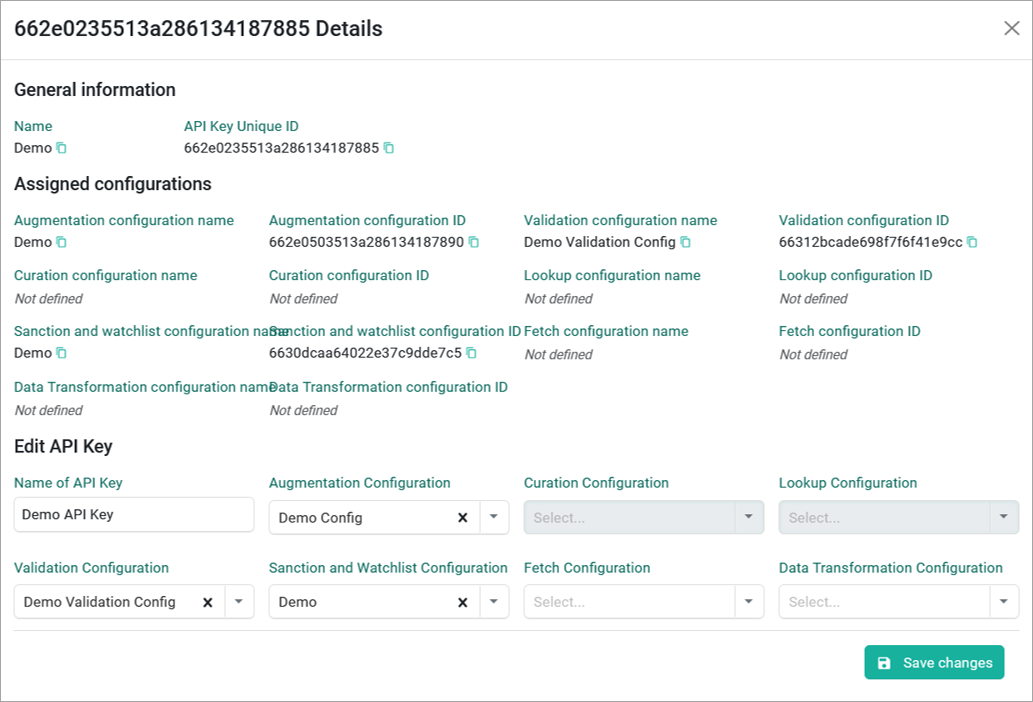
You have now successfully set up your compliance configuration in AML Guard. Now the user is ready to efficiently manage and monitor Business Partners for compliance. For detailed guidance on how to proceed with screening a Business Partner, please refer to the next tutorial, "CDQ AML Guard - How to screen a business partner?".
A Risk-Based Approach (RBA) in compliance with Business Partner Master Data Management involves prioritizing resources and efforts based on the assessed risk each partner poses. When focusing on the choice of sanction lists for different risk levels, the approach can be summarized as follows:
- Risk Evaluation: Assess partners' risk levels (high, medium, low) based on financial health, compliance history, geopolitical factors, etc. This is usually done in operative Risk Management systems within Finance, Purchasing and Supply management.
Each of the business partners now may be handled differently inside the CDQ AML-Guards. Lets take the following three risk-groups as an example. Suppose your Business partners are grouped into three different risk levels identified by operative systems, then the choice of lists may be as follows:
High-Risk Partners:
- Comprehensive Sanction Lists: Utilize extensive and detailed sanction lists, including global, regional, and industry-specific lists.
- Enhanced Due Diligence: Conduct thorough checks using multiple databases (e.g., OFAC, EU, UN, country-specific lists).
Medium-Risk Partners:
- Standard Sanction Lists: Use major global sanction lists (e.g., OFAC, EU, UN) but with slightly less frequency than high-risk partners.
- Periodic Monitoring: Regularly update and review sanction list checks, though not as frequently as for high-risk partners.
Low-Risk Partners:
- Basic Sanction Lists: Focus on essential sanction lists, such as those from primary jurisdictions (e.g., OFAC).
- Minimal Monitoring: Conduct initial checks and periodic reviews as part of routine compliance.
Inside CDQ-Cloud apps, you create one configuration for each risk level and choose your desired lists in the Sanction and Watchlist configurator. In a next step, you create one API key for each of the Risk Groups and assign each of the configurations to one of the new API keys. In your implementation of CDQ AML Guard, trigger the screening service based on the risk level of your business partner using the corresponding API key.
We are constantly working on providing an outstanding user experience with our products. Please share your opinion about this tutorial!